User Tag List

Thanks useful information Thanks useful information:  0
Results 1 to 8 of 8

Thread: JPEG Artifacts: how do I get rid of these?

  1. #1
    Ausphotography Regular
    Join Date
    19 Jan 2007
    Location
    Perth, Straya
    Posts
    1,242
    Mentioned
    0 Post(s)
    Tagged
    0 Thread(s)

    JPEG Artifacts: how do I get rid of these?

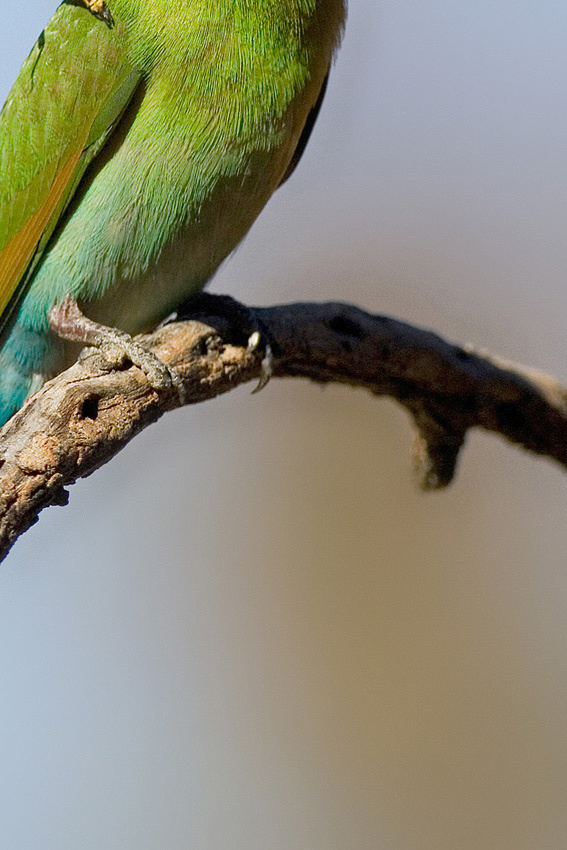
    I only now have a jpg of this image after a recent hard drive disaster and on closer inspection I can see that there appears to be artefacts in the graduated bokeh in the lower right area which seen here as a crop.

    The artefacts really show up on a print.

    Do any of our guru's have ideas on how I can smooth these out without effecting the rest of the images. I assume I will need to use a layer at some point and I would prefer to be able to just brush in the adjusted layer for the BG and keep what is left of the image quality intact.

    Thank you for your assistance,

    Wayne.


    "Nature photography is about choosing a location, crawling through dirt, being bitten by insects and occasionally taking a great image". - Wayne Eddy.

    Canon 5D MkIII, Canon 7D, 17-40mm f/4L,
    24-105mm f/4L
    + Canon 70-200mm f/2.8L IS +400mm f/5.6L + Canon 1.4xTC + Canon 100 EF f2.8 USM + 430-EX


  2. #2
    Administrator ricktas's Avatar
    Join Date
    24 Jun 2007
    Location
    Hobart
    Posts
    16,846
    Mentioned
    12 Post(s)
    Tagged
    1 Thread(s)
    have you tried making a selection of the area, feathering it and applying a bit of blur, Wayne. Not something I have had to deal with, so this is just a guess at something that might work!
    "It is one thing to make a picture of what a person looks like, it is another thing to make a portrait of who they are" - Paul Caponigro

    Constructive Critique of my photographs is always appreciated
    Nikon, etc!

    RICK
    My Photography

  3. #3
    can't remember Tannin's Avatar
    Join Date
    16 Apr 2007
    Location
    Huon Valley
    Posts
    4,122
    Mentioned
    3 Post(s)
    Tagged
    0 Thread(s)
    Looks to me like the same problem I've been struggling with lately, Wayne. I don't think these are actually JPG artifacts per se, they are the result of colour compression - fitting the very large number of colours in the original scene into a much smaller number of colours. JPGs do this, of course, but you can get exactly the same sort of problem with any other file format when you have a small enough number of colours - PNG for example, or even TIFF.

    This happens all over the image, but you can only see it when there is (a) no other detail to mask it (such as plumage), (b) not a lot of noise (random noise masks it well), and (c) enough colour graduation for the effect to show.

    Printers (as I recall) don't have as fine a control over colour as a good screen does, so it's reasonable to expect problems when printing.

    One of the causitive factors is an uneven histogram. You can start with a picture that is perfectly OK and make a JPG no worries. Then apply some PP that changes the histogram (curves, levels, shadow/highlight, even noise reduction in some cases) and make a second JPG. BAM! The problem is there.

    I assume that it's worse again when you put the image through conversion to a different colourspace - which is exactly wht happens when you print, of course.

    The cure is to return to the original image and do your PP differently ... if you can! Otherwise, you have to do some heavy-duty Photoshop stuff ..... which is the point at which my slender river of knowledge dries up and fades gently away into the sand.

  4. #4
    Member
    Join Date
    20 Apr 2008
    Location
    Brisbane
    Posts
    4
    Mentioned
    0 Post(s)
    Tagged
    0 Thread(s)
    possibly look at taking the steps usually using in 'airbrushing a model'?

    I always have to follow the tut's can never remember the steps
    Nikon D300 ~ Nikon 16-85mm DX VR ~ Nikon 70-300mm VR ~ Manfrotto with 322RC2 ball head ~ SB400 on backorder ~ Photoshop CS3
    About 7 years ago I knew all about this stuff... now I'm an amateur again ~ I encourage CC, and am happy for you to rework, but more importantly, help me learn from it

  5. #5
    Ausphotography Regular
    Threadstarter

    Join Date
    19 Jan 2007
    Location
    Perth, Straya
    Posts
    1,242
    Mentioned
    0 Post(s)
    Tagged
    0 Thread(s)
    Quote Originally Posted by Tannin View Post
    Looks to me like the same problem I've been struggling with lately, Wayne. I don't think these are actually JPG artifacts per se, they are the result of colour compression - fitting the very large number of colours in the original scene into a much smaller number of colours. JPGs do this, of course, but you can get exactly the same sort of problem with any other file format when you have a small enough number of colours - PNG for example, or even TIFF.

    This happens all over the image, but you can only see it when there is (a) no other detail to mask it (such as plumage), (b) not a lot of noise (random noise masks it well), and (c) enough colour graduation for the effect to show.

    Printers (as I recall) don't have as fine a control over colour as a good screen does, so it's reasonable to expect problems when printing.

    One of the causitive factors is an uneven histogram. You can start with a picture that is perfectly OK and make a JPG no worries. Then apply some PP that changes the histogram (curves, levels, shadow/highlight, even noise reduction in some cases) and make a second JPG. BAM! The problem is there.

    I assume that it's worse again when you put the image through conversion to a different colourspace - which is exactly wht happens when you print, of course.

    The cure is to return to the original image and do your PP differently ... if you can! Otherwise, you have to do some heavy-duty Photoshop stuff ..... which is the point at which my slender river of knowledge dries up and fades gently away into the sand.
    thanks ppl.

    I only have a high res jpeg image. The original RAW and later TIFF went into the ether with that hard drive.

    Looks like a series of steps might eb to do a noise reduction to smooth the area out and then apply a healing brush an layer the original subject in.

  6. #6
    Member
    Join Date
    20 Apr 2008
    Location
    Brisbane
    Posts
    4
    Mentioned
    0 Post(s)
    Tagged
    0 Thread(s)
    don't forget to add noise back into the healed area

  7. #7
    Site Rules Breach - Permanent Ban
    Join Date
    04 Jan 2009
    Location
    **Suburb/Town Required**
    Posts
    33
    Mentioned
    0 Post(s)
    Tagged
    0 Thread(s)
    Shot is quite noisy, but if you had a cleaner shot it makes it much easier to smooth the background. Here's a 1min attempt, it's a bit sloppy but hopefully the point is clear. This was layer masked gaussian blur


    This posterization is nasty...one of the advantages of RAW is you get a bit more leeway

  8. #8
    Ausphotography Regular
    Threadstarter

    Join Date
    19 Jan 2007
    Location
    Perth, Straya
    Posts
    1,242
    Mentioned
    0 Post(s)
    Tagged
    0 Thread(s)
    Quote Originally Posted by smorter View Post
    Shot is quite noisy, but if you had a cleaner shot it makes it much easier to smooth the background. Here's a 1min attempt, it's a bit sloppy but hopefully the point is clear. This was layer masked gaussian blur


    This posterization is nasty...one of the advantages of RAW is you get a bit more leeway
    thanks smorter,

    I'll have a go at that tonight.

Posting Permissions

  • You may not post new threads
  • You may not post replies
  • You may not post attachments
  • You may not edit your posts
  •