User Tag List

Thanks useful information Thanks useful information:  22
Page 1 of 3 123 LastLast
Results 1 to 20 of 45

Thread: Can't seem to get colour into landscapes

  1. #1
    Member
    Join Date
    23 Jan 2011
    Location
    Goolwa
    Posts
    3,775
    Mentioned
    0 Post(s)
    Tagged
    0 Thread(s)

    Can't seem to get colour into landscapes

    Hi all

    I couldn't think of a better title without it being very very long!!

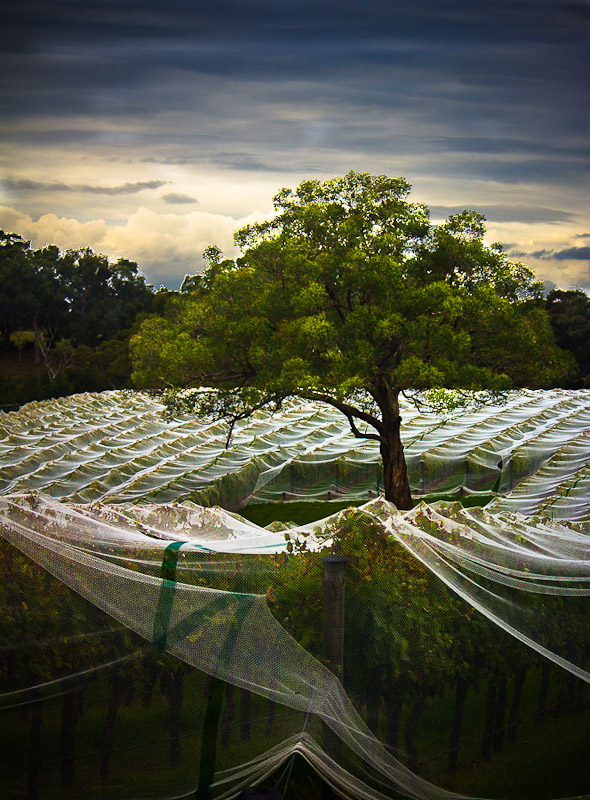
    I am finding that when I am shooting a landscape, the colours are dull and lacking in oomph unless shot is bright sunlight. So I go to my trusty LR and try to add more oomph there but it just doesn't seem to work. Take today for instance... it was cloudy, but not too bad I thought. I took quite a few photos with different angles etc. When I was in LR no amount of saturation, contrast, luminance, fill light and blacks would help this image (or the others)....here's the original....


    IMG_1279 by Miss Monny, on Flickr

    So, where to from here???


    I know maybe elements would probably benefit...I have that but I am also still working out how to save properly with it (wish it was just a simple as LR!).

    Any ideas or help would be eternally grateful.

    This is totally original RAW saved as JPEG - no sharpening etc has been done.
    Last edited by Ms Monny; 13-04-2011 at 10:51pm.
    Monika
    Equipment: Canon 60D, Nikon FE, Nikkor 50mm 1.8 lens, Fancier FT-662A tripod, 18-55mm kit lens, 55-250mm kit lens, 30mm 1.4 Sigma lens, LR4, PS Elements
    Check out my Flickr photos ... http://www.flickr.com/photos/missmonny/
    ... and then you can like me on www.facebook.com/PhotoByMB or see my shop on http://www.redbubble.com/people/msmonny


  2. #2
    Ausphotography Site Sponsor/Advertiser DAdeGroot's Avatar
    Join Date
    27 Feb 2009
    Location
    Cedar Creek, Qld, Australia
    Posts
    1,890
    Mentioned
    0 Post(s)
    Tagged
    0 Thread(s)
    Check your shooting menus in the camera and see that your Colour Space is set to sRGB (NOT AdobeRGB1998).
    Dave

    http://www.degrootphotography.com.au/
    Canon EOS 1D MkIV | Canon EOS 5D MkII | Canon EOS 30D | Canon EF 400mm f/5.6L USM | Canon EF 70-200mm f/2.8L IS USM | Canon EF 17-40mm f/4L USM | Canon EF 85mm f/1.2L II USM | Canon EF 35mm f/1.4L USM | Canon TS-E 17mm f/4L & some non-L lenses.

  3. #3
    Ausphotography Site Sponsor/Advertiser DAdeGroot's Avatar
    Join Date
    27 Feb 2009
    Location
    Cedar Creek, Qld, Australia
    Posts
    1,890
    Mentioned
    0 Post(s)
    Tagged
    0 Thread(s)
    Ok, I've had a quick play with it in LR3.

    Here's what I did:
    Edits.jpg

    And the results:


    Clearly I only had a low-res JPG to work with and this is just a very quick edit, but given you have LR, you should be able to get at least as close as this.

    RAW files straight from the camera are indeed flat as no in-camera processing is applied to them.

  4. #4
    Member
    Threadstarter

    Join Date
    23 Jan 2011
    Location
    Goolwa
    Posts
    3,775
    Mentioned
    0 Post(s)
    Tagged
    0 Thread(s)
    Thanks...I did get close to this and I don't like it! Don't know why?? Maybe cos there is too much yellow??? Maybe it is just a crap shot and I was hoping to get more out of it than I can!

    I checked the colour space and it is sRGB.

  5. #5
    Member share50's Avatar
    Join Date
    03 Nov 2009
    Location
    Perth WA
    Posts
    40
    Mentioned
    0 Post(s)
    Tagged
    0 Thread(s)
    Hello
    There are a few free presets on the internet for JPG in LR which enable you to enhance hope that helps
    cheers
    Shareen
    a newbe with lots of maturity

  6. #6
    Member
    Join Date
    06 Apr 2011
    Location
    Sydney
    Posts
    19
    Mentioned
    0 Post(s)
    Tagged
    0 Thread(s)
    Maybe try a bit more Vibrancy or saturation? I have found that sometimes just a small shift gives the colours a wee tweek I would also check the curve and make some adjustments.


    I have taken the Vibrancy up very high there but you will be able to have a better play around Hope that helps.
    Last edited by Flesh; 14-04-2011 at 12:12pm.

  7. #7
    Member
    Join Date
    03 Aug 2010
    Location
    In the hills north of Perth
    Posts
    1,052
    Mentioned
    0 Post(s)
    Tagged
    0 Thread(s)
    I found this yesterday and thought you might find it helpful - Landscape Photography Post Processing Tutorial in Lightroom. Worth a try?
    Michaela

    Comments and critique always welcome and appreciated.

    My photos on Flickr
    Canon 5D Mk III | 7D | Assorted Canon Lenses


  8. #8
    Member
    Threadstarter

    Join Date
    23 Jan 2011
    Location
    Goolwa
    Posts
    3,775
    Mentioned
    0 Post(s)
    Tagged
    0 Thread(s)
    Thanks so much everyone!! I will check out the link Michaela and also, I think that what I see in my head when I take the photo is probably not what I can achieve on the computer. I need soooo much more practice with landscapes. Hmmm, might just try B&W to see if I can achieve what is close to what I am thinking.....either that or it is just a crap photo!!

  9. #9
    Member
    Join Date
    22 Jul 2010
    Location
    Sydney
    Posts
    343
    Mentioned
    0 Post(s)
    Tagged
    0 Thread(s)
    One challenge you have in the example photo is that naturally the sky is a lot brighter than the foreground. You've shot it at a compromise - the sky is a bit overexposed and the foreground is a bit underexposed... well, quite underexposed IMHO. You can tackle this problem by post-processing, HDR, or shooting in the early morning or late evening, when landscape photographers are their busiest!

  10. #10
    Member
    Threadstarter

    Join Date
    23 Jan 2011
    Location
    Goolwa
    Posts
    3,775
    Mentioned
    0 Post(s)
    Tagged
    0 Thread(s)
    Yep, achee, I think if it was closer to later in the day it would work better BUT I think the whole look of the photo just doesn't work. I also will get myself some filters I think....and get out to do alot more practice NOT just as a secondary thought while travelling from A to B!!

  11. #11
    It's all about the Light!
    Tech Admin
    Kym's Avatar
    Join Date
    15 Jun 2008
    Location
    Modbury, Adelaide
    Posts
    9,632
    Mentioned
    23 Post(s)
    Tagged
    0 Thread(s)
    HDR with a 2 or 3 image blend would help... Or invest in some ND grad filters to tame the sky
    regards, Kym Gallery Honest & Direct Constructive Critique Appreciated! ©
    Digital & film, Bits of glass covering 10mm to 500mm, and other stuff


  12. #12
    Member
    Threadstarter

    Join Date
    23 Jan 2011
    Location
    Goolwa
    Posts
    3,775
    Mentioned
    0 Post(s)
    Tagged
    0 Thread(s)
    Hi Kym
    can I do a HDR from a single image? Make one exposed for the sky, one the darker areas and one for midtones???

    Hmm, looks like I might be infront of the computer again tonight (when am I not! LOL! Need an ironing lady hahahaha).

  13. #13
    A royal pain in the bum! arthurking83's Avatar
    Join Date
    04 Jun 2006
    Location
    the worst house, in the best street
    Posts
    8,777
    Mentioned
    4 Post(s)
    Tagged
    0 Thread(s)
    Quote Originally Posted by DAdeGroot View Post
    Check your shooting menus in the camera and see that your Colour Space is set to sRGB (NOT AdobeRGB1998).
    If the original is in raw format, the colourspace is of no consequence.
    Only the colour profile of the output format may have some consequences when displayed.

    Quote Originally Posted by achee View Post
    One challenge you have in the example photo is that naturally the sky is a lot brighter than the foreground. You've shot it at a compromise - the sky is a bit overexposed and the foreground is a bit underexposed... well, quite underexposed IMHO. You can tackle this problem by post-processing, HDR, or shooting in the early morning or late evening, when landscape photographers are their busiest!
    if the foreground looks under exposed or the sky looks over exposed, it could be your monitor calibration achee! Histogram reveals that brightness levels are well within the extremities.. ie. neither under or over exposed(in this image).

    But, achee hit on an important point, when you're trying to capture more vivid colours.
    Even tho many people will advise to expose to the right(ETTR) for a better digital image, when you do this, the extra brightness levels in the file, usually make for slightly duller colour rendition.
    Slightly less exposure will produce more colour into an image(whether digital or film) naturally. From there it's then easier to add more subtle colour increases, without making it too obvious(that the colour has been tweaked via software).

    The problem here, in this image, is that the cloudy conditions naturally mute the colour in the scene. Cloudy conditions are some of my favourite conditions to shoot in, but not overcast conditions. There has to be a small amount of sunlight peeking through to get good colour.

    I think with a tweak of curves and levels and whatnot, you could(or should) be able to bring out a bit more colour from the image, especially from the raw file(whereas our tweaking of a jpg file is not going to produce the same level of quality).
    I generally don't use levels and curves, but sometimes I use the 'set black point' tool, where you define where the black is going to be in an image like this. Histgoram tells us that there is no black point in the image. The darkest point in the image seems to be in the 10, 10, 10 range(maybe slightly more.. sorry I can't remember ) but all I tried was to set a blackpoint, where I thought was the darkest part of the scene. But the blackpoint level I chose was not 0,0,0(not a good idea to do actually!), so I used the values of 5,5,5 instead. I pointed the blackpoint tool at the base of the post in the middle of the foreground(and then tweaked it's position a bit to suit).

    5615587913_7f81d61357_o.jpg

    (actually, I apologise. I did also spot brighten the central portion of the image by 15% to compensate for the darkening when I'd made the blackpoint setting. This also produces a slight vignetted look to it .. but that's not the point of this thread!)

    For 99% of my images and hence my general workflow, my main priority (when trying to capture more vivid colour) is to tend to under expose the image by a small amount. That is, not underexpose the image and lose pixel data in the shadow range. choose a particular colour in the scene(generally the greens), spot meter and not try to capture that brightness level at 0Ev, but instead also shoot it at -0.7Ev.
    Nikon D800E, D300, D70s
    {Nikon}; -> 50/1.2 : 500/8 : 105/2.8VR Micro : 180/2.8 ais : 105mm f/1.8 ais : 24mm/2 ais
    {Sigma}; ->10-20/4-5.6 : 50/1.4 : 12-24/4.5-5.6II : 150-600mm|S
    {Tamron}; -> 17-50/2.8 : 28-75/2.8 : 70-200/2.8 : 300/2.8 SP MF : 24-70/2.8VC

    {Yongnuo}; -> YN35/2N : YN50/1.8N


  14. #14
    Member
    Threadstarter

    Join Date
    23 Jan 2011
    Location
    Goolwa
    Posts
    3,775
    Mentioned
    0 Post(s)
    Tagged
    0 Thread(s)
    Arthur, I think you may have nailed it too!! Yes, it was overcast, which did mute the colours, and it was slightly overexposed because I read somewhere that it is easier to recover highlights but harder to get detail out of underexposed blacks......thats all good if the image was taken in the middle of the day in bright sunlight which may have created very dark shadows or if I was in a cave with a brightly lit cave entrance!! Thanks for the tips!

    There is so much to learn and remember when doing landscape photography. I also am just getting the hang of hyperfocal distance too, which I didn't do here....I used a large f/stop and focused on the tree....which seems to have worked but probably not ideal!

  15. #15
    Perpetually Bewildered
    Join Date
    13 Sep 2009
    Location
    Sydney
    Posts
    1,244
    Mentioned
    1 Post(s)
    Tagged
    0 Thread(s)
    Nice scene you've captured here Ms Monny.

    I agree with achee here. Even though your camera has given you what it determined is a 'good' exposure, from an image point of view it's not ideal (IMO of course). I see the image as having three key elements: the netting, the tree, and the sky. The sky is over exposed for what I'd want, the tree is under exposed for what I'd want, and the netting is exposed ok (probably a little bit under in fact). If you try to apply global adjustments in LR it's unlikely to be successful because fixing one part of the image is going to make another part worse. (e.g. increasing exposure to get more detail in the tree blows out the sky, etc).

    So each element of the image needs to be handled separately. The Adjustment Brush can be used to do this. What I'd do is use global adjustments to get the netting and foreground looking as I'd want it. Then select (paint in) the sky with the Adjustment Brush reducing the exposure and adjusting the saturation, contrast, etc to taste. Then create a new selection for the tree, this time increasing the exposure and adjusting other attributes as desired.

    If you are not familiar with the Adjustment Brush there is a good tute here.

    Having said all that, the gloomy conditions here are not going to give you a lot of colour to play with, however I think there's plenty of scope to make the image more dramatic. Here's a quick rework showing the direction I'd take...


    Hope this helps...


    Cheers.
    Last edited by fillum; 15-04-2011 at 5:27am.
    Phil.

    Some Nikon stuff. I shoot Mirrorless and Mirrorlessless.


  16. #16
    Member
    Join Date
    07 May 2010
    Location
    Bruthen, East Gippsland
    Posts
    4,638
    Mentioned
    1 Post(s)
    Tagged
    0 Thread(s)
    Buy a Nikon.

    Another thing to try, is to get as little of the sky in as possible.
    Last edited by geoffsta; 15-04-2011 at 7:04am.
    Geoff
    Honesty is best policy.
    CC is always welcome
    Nikon D3000 ... Nikon D90... Nikon D700 Various lenses, Home studio equipment and all the associated stuff
    Flickr

  17. #17
    Administrator ricktas's Avatar
    Join Date
    24 Jun 2007
    Location
    Hobart
    Posts
    16,846
    Mentioned
    12 Post(s)
    Tagged
    1 Thread(s)
    I decided to do some PP to give it a different look, and change the seasons, I noticed the grapes had some yellow/orange tones to the leaves, which is appropriate for this time of year. I also wanted to enhance the feeling of morning/evening in the result. Working on a small filesize image, you have to be careful not to push it to far or the small filesize resrictions come into play, with artifacts, etc appearing., Working on the full sized file will render better results to any edits done.

    * I made a selection of the main tree and then changed the colour balance to modify it to a more autumnal toning, by increasing the colour balance in the red/orange/yellow spectrum.
    * Then using the Nik Software Color Efex plugin, I used the lighten/darken centre to brighten the centre and darken the edges, creating a vignette of sorts.
    * Used a 'paint with light' technique to adjust that darkening and lightening till I was happy with the result, using a small brush set to 7% opacity, so that the strokes were built up, rather than each one making a huge visual adjustment to the photo.
    * Levels adjustment and saved
    Attached Images Attached Images
    Last edited by ricktas; 15-04-2011 at 8:52am.
    "It is one thing to make a picture of what a person looks like, it is another thing to make a portrait of who they are" - Paul Caponigro

    Constructive Critique of my photographs is always appreciated
    Nikon, etc!

    RICK
    My Photography

  18. #18
    Member
    Join Date
    11 Apr 2011
    Location
    Roleystone
    Posts
    88
    Mentioned
    0 Post(s)
    Tagged
    0 Thread(s)
    This edit is really stunning. Did you do all this in lightroom?

  19. #19
    It's all about the Light!
    Tech Admin
    Kym's Avatar
    Join Date
    15 Jun 2008
    Location
    Modbury, Adelaide
    Posts
    9,632
    Mentioned
    23 Post(s)
    Tagged
    0 Thread(s)
    Quote Originally Posted by Sueann View Post
    This edit is really stunning. Did you do all this in lightroom?
    I'm 99.9% sure Rick used Photoshop CS5

    Re: HDR - usually you take 2 or 3 images at +/0/- exposures (maybe 1 or 2 stops) and blend them in software.
    Last edited by Kym; 15-04-2011 at 9:34am.

  20. #20
    Administrator ricktas's Avatar
    Join Date
    24 Jun 2007
    Location
    Hobart
    Posts
    16,846
    Mentioned
    12 Post(s)
    Tagged
    1 Thread(s)
    Yes in Photoshop, but all the Nik Software Plugins are available for Lightroom

Page 1 of 3 123 LastLast

Posting Permissions

  • You may not post new threads
  • You may not post replies
  • You may not post attachments
  • You may not edit your posts
  •