User Tag List

Thanks useful information Thanks useful information:  11
Results 1 to 18 of 18

Thread: How to compose a night shot when you can't see through viewfinder

  1. #1
    Member
    Join Date
    16 Sep 2011
    Location
    Canberra
    Posts
    1,217
    Mentioned
    0 Post(s)
    Tagged
    0 Thread(s)

    How to compose a night shot when you can't see through viewfinder

    I was doing some long exposure night shots last night, but with such low light, it's basically impossible to compose the image with the camera when you can't see the image in the viewfinder or on the live view screen.

    I tried several times to use "trial and error" by taking a shot, looking at the result, then moving the camera slightly to adjust for the error in composition and taking the shot again.
    But the difficulty with this, is that I had to aim the camera first at the campfire and press the button halfway to get it to focus, then reposition it for the shot, but of course that meant every time I moved the camera to get focus, it became hard to judge exactly where it had last been to make the adjustment from the previous shot.

    Apart from the one shot where I had two vehicle's headlights on so I could compose the shot with light (before turning them off for the shot) it was proving a very frustrating experience.

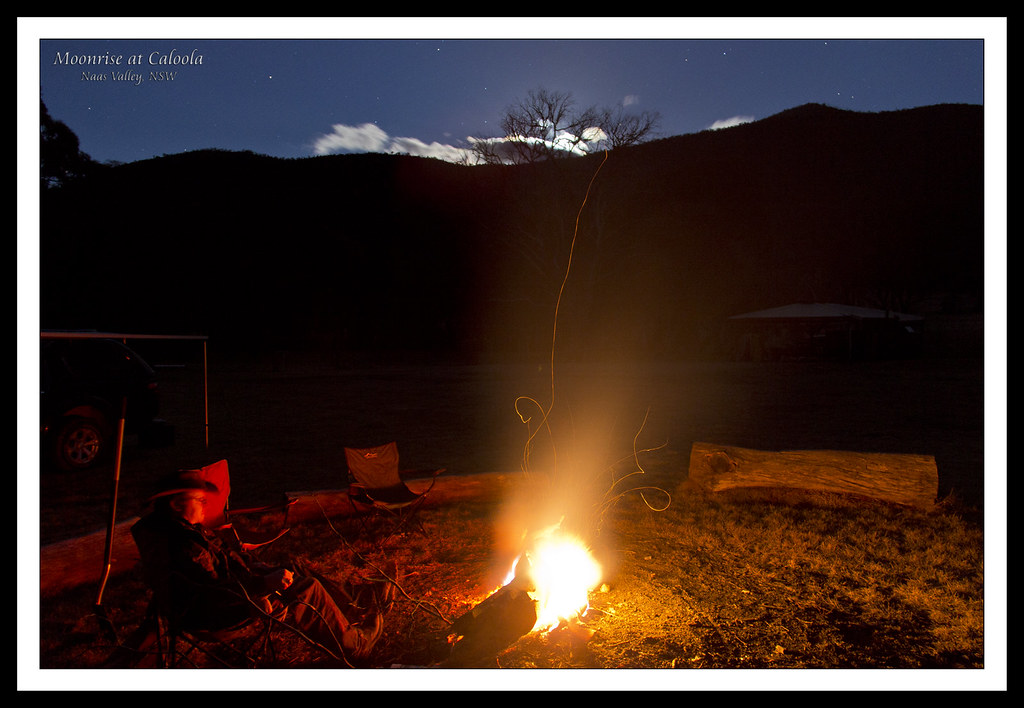
    Despite all this, the trial and error sort of worked to a degree for a while, but then when I wanted to get the moonrising, I had probably only about 1 minute to get the shot right before the moon would be too high, and with 30 second exposures, I had barely time for two goes, which wasn't really enough, so the best shot with the moon in exactly the right spot, had the person's feet hard against the edge of the bottom of the shot, probably better than cutting OFF the feet, but still hardly good composition.

    There must be some way to take night shots when it's too dark to see anything in the viewfinder or rear screen.
    Canon EOS 60D ..... EFS 18-200mm f/3.5 - 5.6 IS - 430 EXII Speedlite - "eBay special" Remote Control Unit - Manfrotto 190XPROB w 804RC2 head.

  2. #2
    Member anon's Avatar
    Join Date
    21 Jul 2012
    Location
    Heathmont
    Posts
    79
    Mentioned
    0 Post(s)
    Tagged
    0 Thread(s)
    Hi,

    Perhaps rather than using the fire to focus between shots, you could switch to manual focus (which should stop the focus from changing), once you had focused. Then your shoot and adjust technique might work better...

    Also looking though the viewfinder and shining a torch might (depending on distance and torch strength) give you an idea of how things sat within the frame...

    Hope this might help in future...

    Regards,
    Anon

  3. #3
    Administrator ricktas's Avatar
    Join Date
    24 Jun 2007
    Location
    Hobart
    Posts
    16,846
    Mentioned
    12 Post(s)
    Tagged
    1 Thread(s)
    Agree with Anon on using a torch. Sometimes liveview can show you more than what is visible through the viewfinder as well, so you could try that.
    "It is one thing to make a picture of what a person looks like, it is another thing to make a portrait of who they are" - Paul Caponigro

    Constructive Critique of my photographs is always appreciated
    Nikon, etc!

    RICK
    My Photography

  4. #4
    Ausphotography Site Sponsor/Advertiser OzzieTraveller's Avatar
    Join Date
    12 Oct 2009
    Location
    Forster- Tuncurry, eastern Australia
    Posts
    1,598
    Mentioned
    0 Post(s)
    Tagged
    0 Thread(s)
    G'day ez

    Well mate - I'm glad that I'm not the only one with this "issue"
    Ya could turn the flash on & when you see the moon, you know ya've got it rite ...

    More seriously
    Several things / thoughts


    Campfire stuff ~ I will often focus into the flames, onto a log etc then flick AF to MF to prevent any focus hunting after that
    This will get me plenty of general campfire pix that are "plenty okay"

    For people around the fire, it's a bit harder, but much the same - AF to MF

    I have several 250 Lumens LED torches [ie-very, very bright] that I use for focussing in the dark - that works quite well

    As for moon shots, again it's a MF deal there too - the AF system does find it hard to latch onto the small-blob of a moon seemingly lost in a large black sky, but at max zoom [600mm for me] it is relatively easy to MF. Moon exposure I use is based on "iso-400 x 1/300s x f5,6" then I raise or lower iso to suit the results

    As to stars in a black sky - nothing I know of will 'see' into a black sky - so it is trial & error .... I shoot a 30sec pic, look closely at it in review mode & play with the focus & try again. Often I need 3 or 4 trial pix to get it exact. Then the camera goes for an hour or three depending upon how full the red-wine bottle was at the start

    Hope this helps
    Regards, Phil
    Of all the stuff in a busy photographers kitbag, the ability to see photographically is the most important
    google me at Travelling School of Photography
    images.: flickr.com/photos/ozzie_traveller/sets/

  5. #5
    Member
    Threadstarter

    Join Date
    16 Sep 2011
    Location
    Canberra
    Posts
    1,217
    Mentioned
    0 Post(s)
    Tagged
    0 Thread(s)
    Thanks for the ideas.
    I've used manual focus on the moon several times, but this time I didn't want the moon in focus, I wanted the people around the campfire in focus, but I wanted them around the campfire with the moon just right on the rim of the mountain behind them, but I really should have tried manual focus on the fire, it would probably have been near enough given that a 30 second exposure with humans that struggle to remain perfectly still that long, was going to be sure to blur them enough that getting a perfect focus on them would have been wasted. Problem there is that I tend to forget about MF totally because my eyesight can rarely do a good job at picking when it's in focus manually, so rarely think to use it, but I should try it with liveview and the zoom feature.
    I have a 300 lumen focusable LED torch, and when focussed that will show up in the viewfinder, but really only as a small dot, and generally doesn't light up distant trees and things well enough to see how they're positioned within the shot, but I should have tried it for the close stuff (like the mate's feet I had too close to the bottom of the shot).
    Maybe it's time to upgrade the torch any excuse to buy a new torch - I'm a bit of a torch nut. Pity my 10 million Candlepower torch weighs a tonne, and sucks it's battery dry far too fast to last as long as I spend playing around on a night shoot.
  6. #6
    Member anon's Avatar
    Join Date
    21 Jul 2012
    Location
    Heathmont
    Posts
    79
    Mentioned
    0 Post(s)
    Tagged
    0 Thread(s)
    Ezookiel,

    That's the nifty trick, use AF to get focus, then switch to MF to stop the focus from changing, you don't actually need to focus manually...
    and if you're set up on a tripod and tweak your positioning (now that you don't need to re-focus using the fire) you can do some test shots and see the distant stuff in those to check your composition...

    Regards,
    Anon

  7. #7
    Ausphotography Regular
    Join Date
    02 Jul 2010
    Location
    Sydney
    Posts
    886
    Mentioned
    0 Post(s)
    Tagged
    0 Thread(s)
    There's also the very old school method of using the hyper focal range of the lens, combined with an appropriate aperture. not perfect, but can work.

  8. #8
    Member
    Threadstarter

    Join Date
    16 Sep 2011
    Location
    Canberra
    Posts
    1,217
    Mentioned
    0 Post(s)
    Tagged
    0 Thread(s)
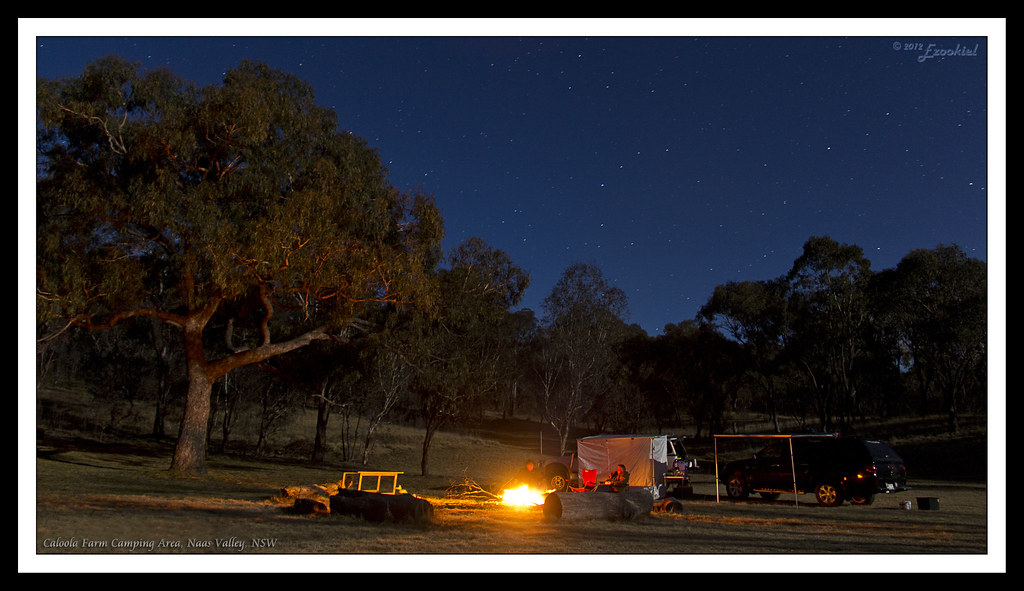
    I guess I should show one of the shots from the night. Had a lot of trouble with the fire overexposing while getting the rest of the shot exposed. Probably need to start another shooting help thread to ask how to solve that problem too.


    Caloola Camp w graham_049 net 1 by Ezookiel, on Flickr

    And this was the failed moonrising shot, where I cut too close to his feet (to name just one thing of many that I got wrong, rushing the shot when we saw the moon was rising and had to run for the camera)


    Caloola Camp w graham_034 alt net by Ezookiel, on Flickr

    Thanks heaps for the suggestions. I'll definitely be using that AF then switch to MF trick. That's a pearler if it works like that. It probably just saved a heap of hassles for future shots, as I've had to do the half-press and recompose for nearly every shot I take since I tend to do a lot of landscape type stuff.
    Last edited by Ezookiel; 05-08-2012 at 10:00pm.

  9. #9
    Member anon's Avatar
    Join Date
    21 Jul 2012
    Location
    Heathmont
    Posts
    79
    Mentioned
    0 Post(s)
    Tagged
    0 Thread(s)
    Thanks for posting the pic, very nice , I had been meaning to ask...

    As for the fire, I think the simplest thing would be to let the fire burn down a bit more next time when you know you'll be taking a shot (will also reduce the light it's casting on the campsite thought), or you could collect some old coals, and throw them over the fire just before taking the shot (again will also reduce the light it's casting on the campsite), or dig it in a bit deeper (which should not have as great effect on the amount f light being cast onto the campsite...), to reduce the light heading to the camera...

    I'm not sure how well it would work, but it might take a bit of the edge off it...

    Best of luck next time,

    Regards,
    Anon

  10. #10
    Member
    Threadstarter

    Join Date
    16 Sep 2011
    Location
    Canberra
    Posts
    1,217
    Mentioned
    0 Post(s)
    Tagged
    0 Thread(s)
    Ooops. Forgot the link to the moonrising shot. It's now edited into the post where it was supposed to be.
    We saw that part of the sky get light much earlier in the night, and thought the moon might rise, but were sitting talking and didn't see that it was about to rise till way too late. I pretty much grabbed the camera plonked it down right beside my chair, and barely had it on and set up as the moon came up behind that cloud. Looked fantastic to the eye. Wish I'd been better prepared for it, as it caught me completely unready to compose the shot at all well, but the damned thing moves so fast when it's rising, there's not much time at all if you want it right on the horizon, but were too busy chatting and staring at the fire to notice it coming up till too late.
    Last edited by Ezookiel; 05-08-2012 at 10:04pm.

  11. #11
    Member anon's Avatar
    Join Date
    21 Jul 2012
    Location
    Heathmont
    Posts
    79
    Mentioned
    0 Post(s)
    Tagged
    0 Thread(s)
    My pleasure,

    It's a trick I use time to time with my Pentax, should work just as well with your Canon
    No reason you can't test it next time you have your camera out.

    Thanks for adding in the moonrise shot

    Regards,
    Anon

  12. #12
    Administrator ricktas's Avatar
    Join Date
    24 Jun 2007
    Location
    Hobart
    Posts
    16,846
    Mentioned
    12 Post(s)
    Tagged
    1 Thread(s)
    When the dynamic range of your camera does not let you get the creative result you want, then consider HDR! Now I am the first to say I am generally not a fan of the HDR, but used well, it can get you what you want. BUT for me, if I was shooting this scene, I would create a pseudo HDR, using blending. I would take at least two shots, using my tripod, expose one for the sky and surrounds, and one for the campfire. Put them into my editing software, layered with the campfire one of the bottom and the sky one on top, then start using masking to bring the bits from the campfire shot through. Once happy, I have my sky and scene and a well exposed campfire.

    Sometimes we have to think outside the square to get the creative result we want, whilst working withing the limitations of our gear.

  13. #13
    A royal pain in the bum! arthurking83's Avatar
    Join Date
    04 Jun 2006
    Location
    the worst house, in the best street
    Posts
    8,777
    Mentioned
    4 Post(s)
    Tagged
    0 Thread(s)
    Quote Originally Posted by Ezookiel View Post
    .......

    Thanks heaps for the suggestions. I'll definitely be using that AF then switch to MF trick. That's a pearler if it works like that. It probably just saved a heap of hassles for future shots.....
    An even better method of achieving this AF workflow is to use the AF-On feature.
    That is, if your camera has an AF-On button, then set it up properly and take full advantage of it's ability.
    I see that you have a Canon 60D, which (from memory) has an AF-On button.
    This method of focusing is not for everyone, but it allows the user to maintain a lot more control over the focusing system, and most of those that switch to it and give it a chance to show it's ability, usually prefer it.

    AF-On: somewhere in your camera's menu system is the ability to set the camera to ONLY focus when pressing the AF-On button.
    (being a Canon, I can't help you find this menu item, but I'm sure a Canon person will chime in to help)
    Set this menu item so that a half press of the shutter release doesn't then try to acquire focus.
    This is usually set to something like 'Priority Release' or whatever else it may be called.
    Then you have to switch the camera to use only continuous AF mode, not single shot with confirmation beep.

    So with the camera set to AF-Continuous mode, and the AF-On button set to operate the AF system and the release mode set to priority release, you're now set to focus wherever you choose and then shoot the scene without fear of the camera refocusing as it chooses.

    What you lose in terms of focusing, is more than made up in terms of control and speed(of workflow).
    The camera now will not 'tell you' that you have achieved focus with the single shot focus mode and confirm beep!
    Using this method you just have to trust that the image is now in focus when you shoot. You can shoot even if focus has not been confirmed, whereas the other way, you can only shoot after the focus has been confirmed, or if you switch to manual focus mode.
    The idea behind the AF-On method is that you focus, and then just wait for the moment to shoot .. no need to go switching to AF-MF, or nothing .. and then being stuck in the wrong focus mode just when you need it most!!
    If you've only used the focus confirm, half press method, then it may take a while to get use to focusing as you shoot.
    That is with this AF-On method, for it to work properly, you need to continuously press the AF-On button to focus(remember that you are going to be in AF-Continuous mode!!).

    This way it allows you the ability to control the way that the camera focuses, whether it focuses or not and when and at what!
    It's a simple push of an easy to reach button(shooting hand thumb) and it's located in an appropriate position on most cameras.

    I reckon you'd probably see the advantages of this camera setup, as one of the points of contention you have mentioned was the mucking around doing this and setting up that on the camera when you have 'limited time' to work with.
    The last thing you want is to have to press a switch either on camera or lens to set MF, and then accidentally knock another button or switch and lose the shot completely as a result.

    And also, don't worry about blown highlights in areas where you'd expect there to be extremely bright highlights anyhow.
    Fires, Sun, light sources etc .. it's only natural to see them with blown out highlight details and is not an annoyance in most images.

    As Rick said, you could do HDR(which I think will look too fake!) or even better, you'd just let the fire die down a little bit more(that they were in these two images) and take the shot whilst the fire is low, and then re stoke the fire to where you prefer it.
    Anyhow, the first image looks pretty much spot on. The 'over exposed' fire is perfectly acceptable, and something you'd expect to see in the real world.
    Nikon D800E, D300, D70s
    {Nikon}; -> 50/1.2 : 500/8 : 105/2.8VR Micro : 180/2.8 ais : 105mm f/1.8 ais : 24mm/2 ais
    {Sigma}; ->10-20/4-5.6 : 50/1.4 : 12-24/4.5-5.6II : 150-600mm|S
    {Tamron}; -> 17-50/2.8 : 28-75/2.8 : 70-200/2.8 : 300/2.8 SP MF : 24-70/2.8VC

    {Yongnuo}; -> YN35/2N : YN50/1.8N


  14. #14
    Member
    Threadstarter

    Join Date
    16 Sep 2011
    Location
    Canberra
    Posts
    1,217
    Mentioned
    0 Post(s)
    Tagged
    0 Thread(s)
    Thanks heaps arthurking, I keep thinking I'm going to have to learn what and how the AF-on is used. It wouldn't be there if there wasn't a good reason for it (even on a Canon ) so it's something I've been planning to start using. Your detailed description of how to do so, and it's advantages, has convinced me that it's about time to start the whole new method of shooting. Even my P&S's from way back in the film days had the half-press method, so it is many many many years of shooting that way that have to be unlearned. It's the only thing that put me off. But the time has come. Now to go grab the camera and play around with the menus and experiment. It's especially going to be hard to get used to not having a beep, as I turned that off for a Dawn Service once, and found it really weird, but the viewfinder also has a focus achieved indicator as well, so maybe that will still work with the AF-on method. It will be nice to be able to take the shot whether the camera thinks I should or not. I found that having to refocus when I knew nothing had changed from the last shot, was really frustrating. Thanks for the time and effort you put into the explanation, it has really helped.

  15. #15
    Member
    Join Date
    26 Jul 2010
    Location
    Orange
    Posts
    397
    Mentioned
    0 Post(s)
    Tagged
    0 Thread(s)
    I would have manually blended in a few exposures to fix the fire issue using layers in PS.

    btw if you want to play around with the firelight you are attempting to bring down the exposure time of the fire vs the rest of the shot so you need to stop some of the light reaching the sensor. I have made filters out of black card board or even a gloved hand when no real filters are handy so you could have a play next time with covering the fire with your finger in front of the lens until right near the end of the exposure and then removing it to produce a result. It's just a bit of fun but it does work sometimes.


    If it's dark I will just use MF. If it's really dark I have a pretty good idea of where hyper focal is on my lens and set it using the markings on the focus ring, handy when shooting stars that you can't see very much at all in the viewfinder.

  16. #16
    Ausphotography irregular Mark L's Avatar
    Join Date
    21 Nov 2010
    Location
    magical Mudgee
    Posts
    21,592
    Mentioned
    34 Post(s)
    Tagged
    1 Thread(s)
    Good question and some interesting info (thanks AK)
    No expert here, but have been surprised with what live view can pick up at night. Try live view with MF (get a guide with AF first if you want), then enlarge on the subject you want in focus. On your 60D the enlarge button is the top right on back of camera. Press once = x5, press again = x10 (if I remember right), fine tune focus, recompose and ..... all the best!
    Also worth leaving live view on when taking the photo to stop any possible camera shake from shutter opening at start of exposure.

  17. #17
    Member
    Threadstarter

    Join Date
    16 Sep 2011
    Location
    Canberra
    Posts
    1,217
    Mentioned
    0 Post(s)
    Tagged
    0 Thread(s)
    Yeah, thanks Mark. I use only liveview for this kind of work, it's too hard looking through the viewfinder. But I do have to start using the zoom feature. It's not one I commonly use to be honest (try never) instead I just get annoyed at it when trying in the dark to press one button, and get one of the zooms instead. Time to take advantage of it I guess.
    I guess it comes down in part, to knowing the features the camera has, and taking advantage of them, I'm about to embark today on setting the AF-on button up as described above, and starting the painful new learning curve of shooting so differently to the way I have for the last 20 years. This is going to be fun..... *cough*

  18. #18
    A royal pain in the bum! arthurking83's Avatar
    Join Date
    04 Jun 2006
    Location
    the worst house, in the best street
    Posts
    8,777
    Mentioned
    4 Post(s)
    Tagged
    0 Thread(s)
    Another thing with LiveView, is that you can(or should be able too) brighten the LiveView screen, to a point that usually displays a brighter image than the viewfinder can show you.
    The image is pretty grainy and crappy, but you can at least see something of importance to focus(manually) on.

    Also! Be mindful of using 'hyperfocal' for focusing.
    The hyperfocal method of photography usually assumes that you have subject matter both near and far that you want 'in focus'.
    In neither of these image does there appear to be anything that is near(1-2m or less) that should be in focus.

    I can only assume, as there is no exif in the images displayed here, that these are 18mm shots or thereabouts, so these are considered wide angle lens images.
    Your DOF is going to be quite deep as a natural consequence of the focal length.

    So as an example of why NOT to use hyperfocal (in a willy nilly manner):
    Say you are using the 18mm setting of the lens, and you calculate hyperfocal to be 1.2m for most aperture situations.
    In these shots (as examples) you may have subject matter 5m or more away in #1 and 2-3m or more away in #2.
    Setting the lens to 1.2m to use the hyperfocal method is wasting DOF!
    You are better off setting the lens to the focus distance(approx) of where your subject matter is at!
    That is, set the lens focus distance to about 3m or more for #1 and about 2m-3m for #2.

    Note that 3m is about where infinity starts for an 18mm lens anyhow, so you could easily just set the first shot to infinity, and you're done!
    Some lenses(especially kit lenses) don't have focus distance marking, so that it's hard to estimate focus distance. And there's no way of knowing how the focus gearing is set on the lens.
    But if you try to use infinity focus(say in #1) which I think would be a lot better than using hyperfocal, you would wind the lens out to infinity and then back it off a millimeter or so.
    This is to ensure that you don't focus past infinity, and that it gets you as much sharpness as you can possibly get for the shot.

    Another point to think about too tho is the topic of sharpness in the image.
    These types of images are not the sort that you scrutinise for detail clarity and sharpness.... they are al about the moment!
    The light, the mood the surroundings and so on .. that's what the images are about, not the detail in them as you would view a macro image.

Posting Permissions

  • You may not post new threads
  • You may not post replies
  • You may not post attachments
  • You may not edit your posts
  •