User Tag List

Thanks useful information Thanks useful information:  0
Page 2 of 3 FirstFirst 123 LastLast
Results 21 to 40 of 41

Thread: Dilemma regarding Epson Perfection V700 Photo Scanner for digitalising 35mm colour slides....

  1. #21
    A royal pain in the bum! arthurking83's Avatar
    Join Date
    04 Jun 2006
    Location
    the worst house, in the best street
    Posts
    8,777
    Mentioned
    4 Post(s)
    Tagged
    0 Thread(s)
    That's a bummer!

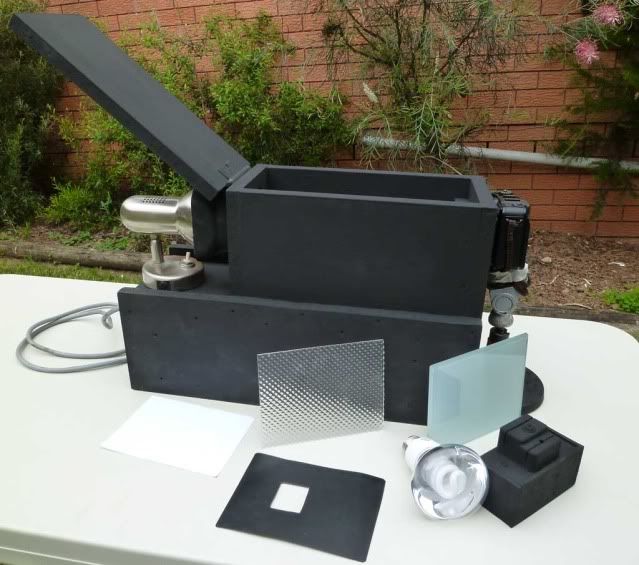
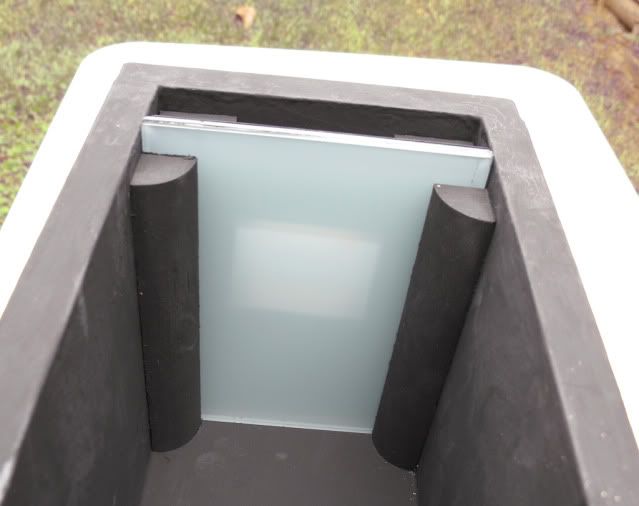
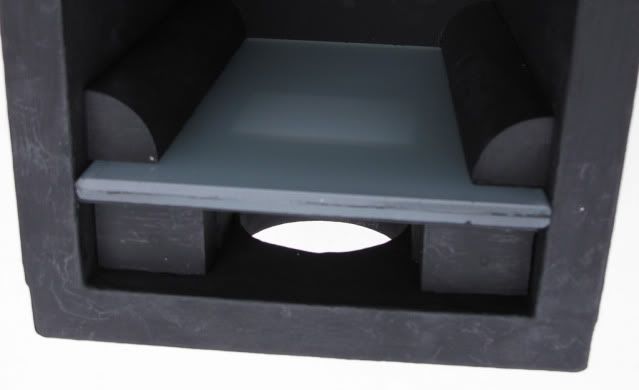
    How large is your piece of opaque plastic?

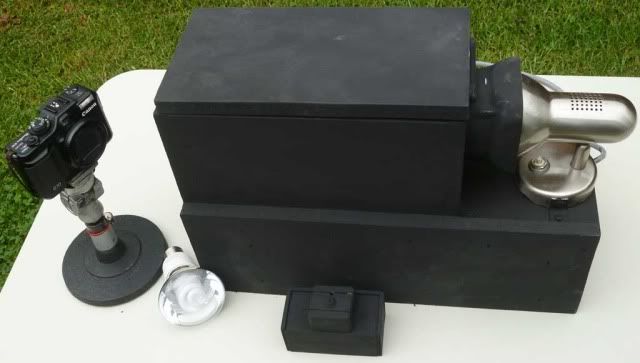
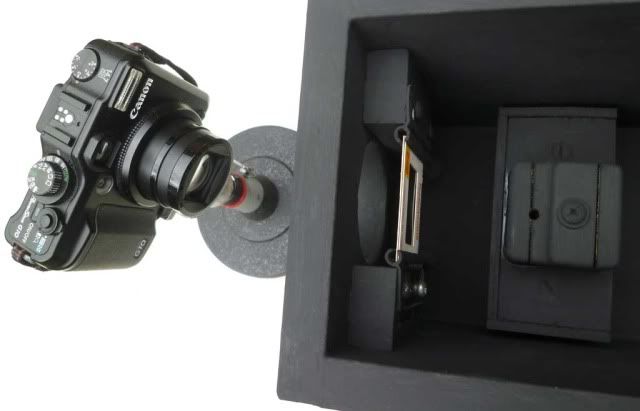
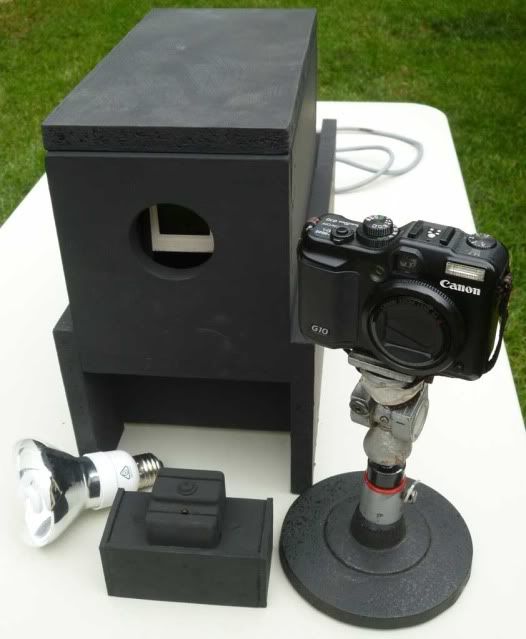
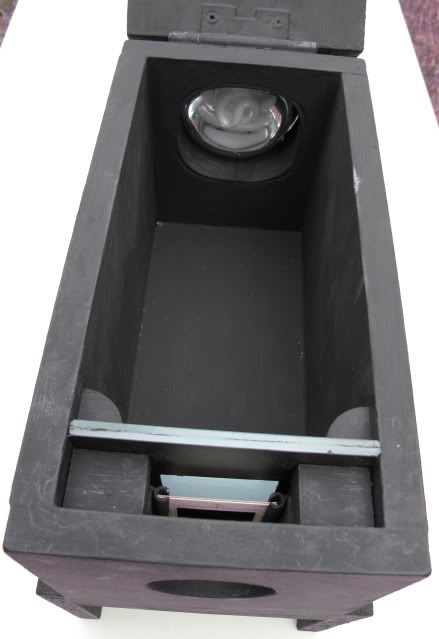
    Reason I ask is that the Nikon PB-4's slide copy adapter uses a plain jane piece of opaque plastic as the light source diffuser .. no texturing.
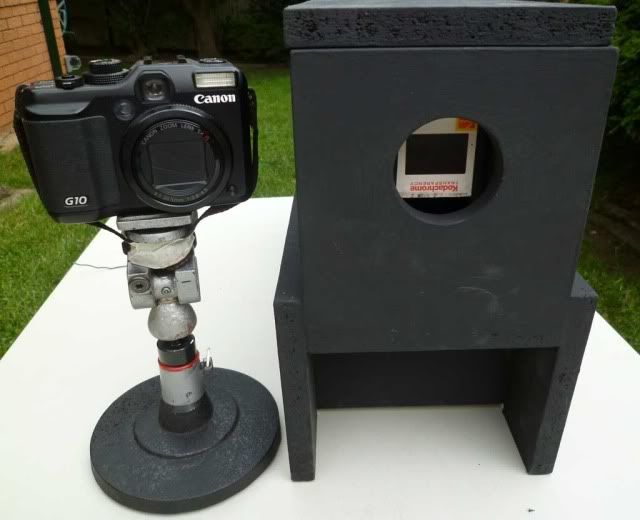
    The size of the diffuser is approx the size of a 35mm frame give or take an unmeasurable mil or so .. so maybe the size is important?

    I had the halogen light source(20W) quite close to the diffuser itself, and while I know they can produce a fair bit of heat, it never became an issue in terms of causing the film or slide adapter to get over hot in any way.

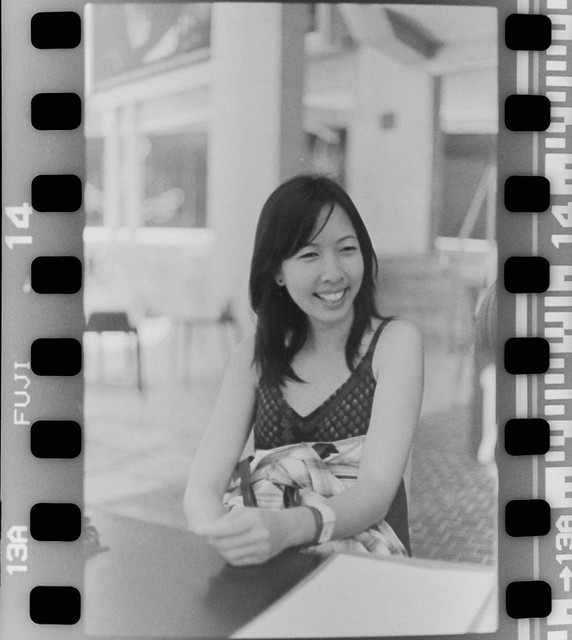
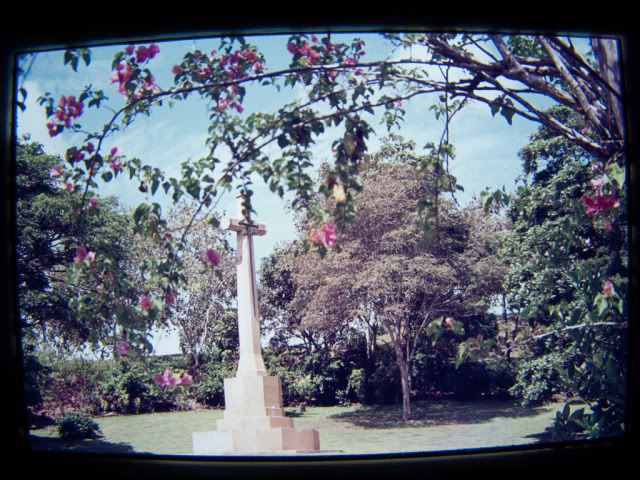
    In terms of exposure, and considering my quick and inexperienced setup method, the images I received back on the camera were all close to perfect.
    My only issue is the inability to invert the negs easily in software.
    Nikon D800E, D300, D70s
    {Nikon}; -> 50/1.2 : 500/8 : 105/2.8VR Micro : 180/2.8 ais : 105mm f/1.8 ais : 24mm/2 ais
    {Sigma}; ->10-20/4-5.6 : 50/1.4 : 12-24/4.5-5.6II : 150-600mm|S
    {Tamron}; -> 17-50/2.8 : 28-75/2.8 : 70-200/2.8 : 300/2.8 SP MF : 24-70/2.8VC

    {Yongnuo}; -> YN35/2N : YN50/1.8N


  2. #22
    Member
    Threadstarter
    Chimbu's Avatar
    Join Date
    28 Dec 2011
    Location
    Penrith / Sydney
    Posts
    166
    Mentioned
    0 Post(s)
    Tagged
    0 Thread(s)
    Arthurking83, my light diffuser hole's currently 8cm in diameter (loosely based on Dick's 3" x 3" hole dimensions, refer; http://www.pbase.com/lowthian/digitizing_old_slides). I could quite easily trial a range of 'superimposed' cardboard cut outs (with the option of also including a 'sandwiched' piece of white paper) and if that's unsuccessful then I'll similarly experiment using a plastic textured light diffuser. Thankfully I love tinkering with all manner of things in my workshop so hopefully I'll soon get it right with a bit of fine tuning.....

  3. #23
    Member
    Threadstarter
    Chimbu's Avatar
    Join Date
    28 Dec 2011
    Location
    Penrith / Sydney
    Posts
    166
    Mentioned
    0 Post(s)
    Tagged
    0 Thread(s)
    I unsuccessfully tried further diffusing the back light by using a 1.5cm x 1cm hole cut into a piece of black plastic and then superimposed over the mentioned translucent glass. In turn, a local light retailer has referred me to a another glazier who apparently also cuts textured perspex light diffusers to size.....I'll check him out first thing on Monday.

  4. #24
    Member
    Threadstarter
    Chimbu's Avatar
    Join Date
    28 Dec 2011
    Location
    Penrith / Sydney
    Posts
    166
    Mentioned
    0 Post(s)
    Tagged
    0 Thread(s)
    I've since tinkered with various light diffuser combinations - the initial translucent laminated sheet, a piece of textured perspex, a cut out piece of black plastic and white paper - as per the following pics, taken with my daughter's hand held Panasonic Lumix DMC-FX68. I've adapted part of an old tripod to a microphone stand's weighted base - super stable and readily positions the lens in line with the lightbox's peep hole. Note, I still haven't been able to take a decent pic of a slide yet - so many setting options compared to my old comparatively simple 35mm Minolta SLR. I'll just keep on experimenting....


  5. #25
    A royal pain in the bum! arthurking83's Avatar
    Join Date
    04 Jun 2006
    Location
    the worst house, in the best street
    Posts
    8,777
    Mentioned
    4 Post(s)
    Tagged
    0 Thread(s)
    First of all, I have to highlight my complete noobness and lack of experience when it comes to photographing slides and so forth, and my only experience is limited to using the Nikon PB-4 bellows.
    But the design differences between it and your box differ in one important way. That is the distance from the light source and the slide.

    Going by the design of the bellows plus film attachment, I'd be inclined to place the opaque plastic sheet right up against the film .. or as close to it as possible.
    The opaque sheet is in effect the light source even tho the lamp itself provides the actual photons, it seems the proximity of the diffuser is probably more important.

    I've tried various distances of the light source to the diffuser on the bellows and it doesn't seem to make a lot of difference other than actual exposure.
    But because of the proximity of the diffuser to the slide, I think is why I there is none of this circular outline of the beam of light.

    The way I'd have set up this box(based on the workings of the slide attachment) is to have the rear of the box fully open for the lamp to peer into, and have that rear wall of the box right up against the back of the slide, including the small window cutout that appears to be present.
    If you could imagine that as the design, you get an idea of how the bellows+film holder look like.

    If you want some images of them for reference .... see HERE. Scroll half way down and look for the device marked PS-4(or 5 or 6.. they're basically the same). Note that there is a bellows between lens and film holder. If you look at the image of both the film holder attached to the bellows the very far end of the device in front of the lens is where the film is held.. ie. right up front and against the diffuser.
    Ambient light is sufficient to capture an image at a half reasonable exposure value, but faster shutter speeds are better. Hence more light of a consistent nature is used.

  6. #26
    Member
    Threadstarter
    Chimbu's Avatar
    Join Date
    28 Dec 2011
    Location
    Penrith / Sydney
    Posts
    166
    Mentioned
    0 Post(s)
    Tagged
    0 Thread(s)
    Arthurking83, sincere thanks regarding your insightful thought of locating the slide closer to the light diffuser - I actually trialled a variation yesterday by mounting the slide in the slotted movable wooden block and positioning it up against the light diffuser at the light end of the box. However, the resulting distance between the lens and the slide was then out of macro focussing range (which allegedly reduces resolution). So I simply reversed the procedure, namely, I positioned the light diffuser directly behind the fixed slide mounting system (at the camera end of the lightbox) thus enabling me to readily use macro focus with the added bonus of completely eliminating the annoying bright light beam which occurred when the slide was similarly mounted but with the light diffuser positioned nearest the light end of the box. I'll tinker some more today with the related light diffuser materials and camera settings - the joys of hands-on investigative learning.

  7. #27
    Member
    Threadstarter
    Chimbu's Avatar
    Join Date
    28 Dec 2011
    Location
    Penrith / Sydney
    Posts
    166
    Mentioned
    0 Post(s)
    Tagged
    0 Thread(s)
    I finally worked out the 'best' light diffuser (the original piece of laminated glass, with a W5cm x H4.5cm 'window' cut out of a piece of black plastic) and it's position relative to the back light source (a 5000K / Cool white 15W Fluorescent screw in globe) and the colour slide (readily mounted for MACRO focussing), refer;


  8. #28
    Still in the Circle of Confusion Cage's Avatar
    Join Date
    25 May 2010
    Location
    Hunter Valley
    Posts
    5,580
    Mentioned
    3 Post(s)
    Tagged
    0 Thread(s)
    Very impressive bit of innovation.

    I've just seen your post with the finished product so came back for another look here.
    Cheers
    Kev

    Nikon D810: D600 (Astro Modded): D7200 and 'stuff', lots of 'stuff'

  9. #29
    Member
    Threadstarter
    Chimbu's Avatar
    Join Date
    28 Dec 2011
    Location
    Penrith / Sydney
    Posts
    166
    Mentioned
    0 Post(s)
    Tagged
    0 Thread(s)
    Thanks Trublubiker, I firmly believe in sharing relevant knowledge / skills etc for the benefit of all. Accordingly, if anyone wants to use any of my lightbox ideas then they're absolutely welcome - as per any construction inquiries etc.
    Cheers, Ross.

  10. #30
    A royal pain in the bum! arthurking83's Avatar
    Join Date
    04 Jun 2006
    Location
    the worst house, in the best street
    Posts
    8,777
    Mentioned
    4 Post(s)
    Tagged
    0 Thread(s)
    Bewdy!

    looks just like the real thing!

    FWIW, the opaque glass has a look very similar to the opaque plastic windows on the Nikon slide attachment.
    it probably has an effect on the colour of the light coming through to the film, but that is easily managed on a raw file with a WB adjustment.

    Happy copying!

  11. #31
    Member KeeFy's Avatar
    Join Date
    18 Mar 2011
    Location
    Newtown
    Posts
    469
    Mentioned
    0 Post(s)
    Tagged
    0 Thread(s)
    With your final product looking really good, i have one little suggestion that may make it better. The inside bit of the box before the glass becoming white instead of black. White will allow the light to bounce around everywhere and give you a more even and efficient lighting rather than a spotlight feel now.

    But awesome awesome job mate!

  12. #32
    Member
    Threadstarter
    Chimbu's Avatar
    Join Date
    28 Dec 2011
    Location
    Penrith / Sydney
    Posts
    166
    Mentioned
    0 Post(s)
    Tagged
    0 Thread(s)
    Keefy, namely, paint all the inside of the 'lightbox' white (flat, satin or glossy) rather than the flat black enamel paint - so as to reflect more of the light from the back light source ??
    Cheers, Ross.

  13. #33
    Member KeeFy's Avatar
    Join Date
    18 Mar 2011
    Location
    Newtown
    Posts
    469
    Mentioned
    0 Post(s)
    Tagged
    0 Thread(s)
    Quote Originally Posted by Chimbu View Post
    Keefy, namely, paint all the inside of the 'lightbox' white (flat, satin or glossy) rather than the flat black enamel paint - so as to reflect more of the light from the back light source ??
    Cheers, Ross.
    Flat white. Glossy will cause hot spots. Maybe before doing so you can try experimenting by covering the insides with 2 layers of A4 paper to see if it helps. The idea is to reflect more light and also give a more even glow. Imagine the idea of a light tent, why they make it white is to allow light to bounce around and give a more even spread.

    If you were to imagine currently the only light source is coming from the bulb, all other light is being absorbed by the black paint but if it was white it will be a very diffused light. Just throwing some thoughts around. I'm thinking of making a portable one soon as well.

  14. #34
    Member
    Threadstarter
    Chimbu's Avatar
    Join Date
    28 Dec 2011
    Location
    Penrith / Sydney
    Posts
    166
    Mentioned
    0 Post(s)
    Tagged
    0 Thread(s)
    KeeFy, the notion of painting the inside of the lightbox flat white rather than black should result in the light being more effectively dispersed. I similarly also considered the idea of lining the lightbox with white paper as an experimental test trial. Accordingly, I randomly chose the following slide of a War Cemetery back home in Port Moresby, PNG - the first being with the white paper lining, and the second as normal with the flat black paint.

    Note, the only PS processing involved the conversion from RAW to JPEG, and then their image size saved at W1024 x H768. I'm not sure about your eyes but I observe little discernible difference between the two slides. Depending on your preference, you could consider the following construction materials for your lightbox - CRAFT wood painted with flat black or white, or white melamine MDF or particleboard. Any related queries are welcome.
    Cheers, Ross.


  15. #35
    A royal pain in the bum! arthurking83's Avatar
    Join Date
    04 Jun 2006
    Location
    the worst house, in the best street
    Posts
    8,777
    Mentioned
    4 Post(s)
    Tagged
    0 Thread(s)
    I would have expected a slight vignetting effect with the black walled internals.
    That would be due to the distance between the light source and the film itself .. reducing this distance would produce more even lighting on the frame.

    If you have access to tin foil to line the insides of the box, I'd be inclined to try that too .. and leave a crinkle finish on it so as to disperse the light around even more.

    Of course I don't have a box such as this to test with, just the bellows. The light source is out in open air, but as I only have a quatz halogen lamp to test with, I need to keep it at a distance from the film so as to not overheat the film itself, and yet I need to keep it close so that I also don't get slight vignetting on the frame.

    I also remember you had access to a diffused pattern sheet. Have you tried a piece of this over the light source too.
    As you are using a CFL type globe, you could easily get closer to the film for a more even light distribution too. They don't produce the same level of heat as halogen or incandescent globes do.

    So far, some of my (actually! .... only two 
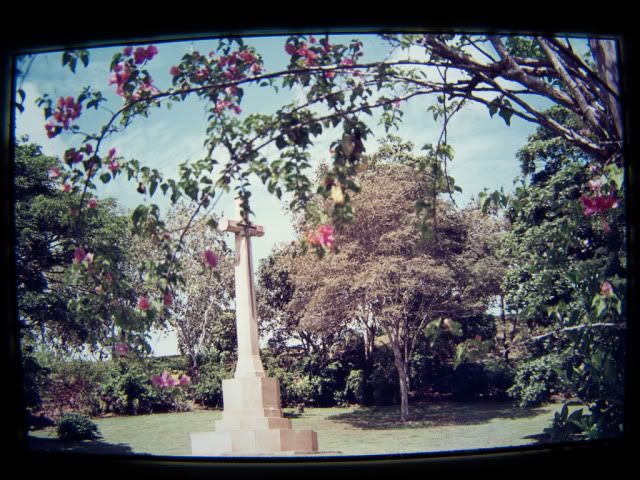
) images have come up ok .. although I have been slack and not really got into as much as I thought I was going too ... but at the moment I'm still in more of a testing phase.
    I've been trying to work out how to transfer my curves graph onto the camera to make it easier overall, so that the neg turns out to be positive at the camera at the time of exposure.
    I think it can't be done as I want it too, even tho I'm this >< close
    The other thing I need is a paddle pop stick to help with evening out exposure of the film .. for a bit of burning .... if that makes sense.

  16. #36
    Member
    Threadstarter
    Chimbu's Avatar
    Join Date
    28 Dec 2011
    Location
    Penrith / Sydney
    Posts
    166
    Mentioned
    0 Post(s)
    Tagged
    0 Thread(s)
    Arthurking83, "I would have expected a slight vignetting effect with the black walled internals. That would be due to the distance between the light source and the film itself .. reducing this distance would produce more even lighting on the frame". This possibly contributes to why the unprocessed digitalised slide images have curved edges, much like an old CRT TV. In relation to trialling the distance between the light source and the slide or film - I'm going to knock up another simplified 'lightbox' assembly by alternatively using a short length of white PVC plumbing pipe, with the light diffuser & slide fixed at one end and the 5000K Cool White 15W CFL low heat globe basically inserted inside the other end, at varying depths, until I achieve an even distribution of light. In the process I'll also re-trial the positioning of the textured perspex (eg. nearest the light source Vs against the laminated translucent glass). In turn, I can also very easily trial different coloured material inside the tubular 'lightbox' (eg. by simply rolling flat black or white cardboard, or an aluminium foil sheet etc). However, I'll also incorporate some sort of protruding collar into which the camera lens is inserted - so as to eliminate external stray light, when MACRO focussing on the slide.
    Last edited by Chimbu; 02-02-2012 at 1:32pm.

  17. #37
    Perpetually Bewildered
    Join Date
    13 Sep 2009
    Location
    Sydney
    Posts
    1,244
    Mentioned
    1 Post(s)
    Tagged
    0 Thread(s)
    Nice job Chimbu. Some of the softboxes made for speedlights (a directional light source) have 2 layers of diffusion material several inches apart - the idea being that any hotspot occurs on the inside layer where it becomes diffused enough so that the light is more even as it comes through the outer layer. So I wonder if an additional piece of diffusion material part way along the box might result in a more even spread of light at the slide end? The trade-off would be some loss of intensity.

    My guess is that the curved edges are a camera issue due to the close shooting distance rather than an issue with the light source.


    [Note that I haven't read the whole thread in great detail so hope this makes sense].


    Cheers.
    Phil.

    Some Nikon stuff. I shoot Mirrorless and Mirrorlessless.


  18. #38
    Member
    Threadstarter
    Chimbu's Avatar
    Join Date
    28 Dec 2011
    Location
    Penrith / Sydney
    Posts
    166
    Mentioned
    0 Post(s)
    Tagged
    0 Thread(s)
    Phil, it's possible that the curved edges are a result of slight lens distortion as the slides are shot in MACRO mode with the front element only about 1cm from the slide - no doubt a dedicated macro lens on a DSLR would be more appropriate compared to my Canon G10's 28-140mm lens. I hope to verify this likely fault by further tinkering with the range of associated variables - eg. the internal colour & length of the PVC pipe 'lightbox', the relative positions of the 2 different types of light diffusers, and the distance between the light source & the diffusers. Once I figure out the most effective system I'll post my findings so that others creatively can set about digitalising their old cherished 35mm slides and film.
    Cheers, Ross.

  19. #39
    A royal pain in the bum! arthurking83's Avatar
    Join Date
    04 Jun 2006
    Location
    the worst house, in the best street
    Posts
    8,777
    Mentioned
    4 Post(s)
    Tagged
    0 Thread(s)
    Definitely what Swifty said about proximity and curved field.
    If you are shooting as such close range and the lens is fully retracted as it appears to be, then the focal length is surely 28mm, which will give you the maximum amount of barrel distortion possible.

    That and coupled to the fact that you are shooting raw may have a lot to do with the barrel distortion.

    Try a few test shots in jpg mode just to see if there is any difference in the curvature.

    Many compacts have the ability to provide in camera tweaks to the image, based on the lens setting used.
    (to do this with a DSLR, is much harder due to the almost infinite possible lenses available for fitment, whereas a P&S/Compact has only 1 lens. This makes it easier to set the image production electronics to produce the image with an easier to determine set of corrections to apply.

    Shooting in raw, should only provide the image(data) with only raw data. Open that raw file with software such as LR3 or CS5 and and you won't see the auto image tweaks and corrections as the non manufacturer software can't see or understand that set of instructions.
    Canon's own software may tho .. but I dunno?

  20. #40
    Member KeeFy's Avatar
    Join Date
    18 Mar 2011
    Location
    Newtown
    Posts
    469
    Mentioned
    0 Post(s)
    Tagged
    0 Thread(s)


    So i was lazy to scan and decided to try something new. Not too bad eh?

Page 2 of 3 FirstFirst 123 LastLast

Posting Permissions

  • You may not post new threads
  • You may not post replies
  • You may not post attachments
  • You may not edit your posts
  •