User Tag List

Thanks useful information Thanks useful information:  17
Results 1 to 18 of 18

Thread: Tutorial : Straightening your photo

  1. #1
    Administrator ricktas's Avatar
    Join Date
    24 Jun 2007
    Location
    Hobart
    Posts
    16,846
    Mentioned
    12 Post(s)
    Tagged
    1 Thread(s)

    Tutorial : Straightening your photo

    Straightening a photo, whether it be horizons in landscapes or straightening up a photo in general, is quite easy to achieve. Often when we take photos, we find that they are not perfectly level, either horizontally of vertically. This small tutorial shows how to straighten a photo in photoshop. I am using a landscape here, just for ease.

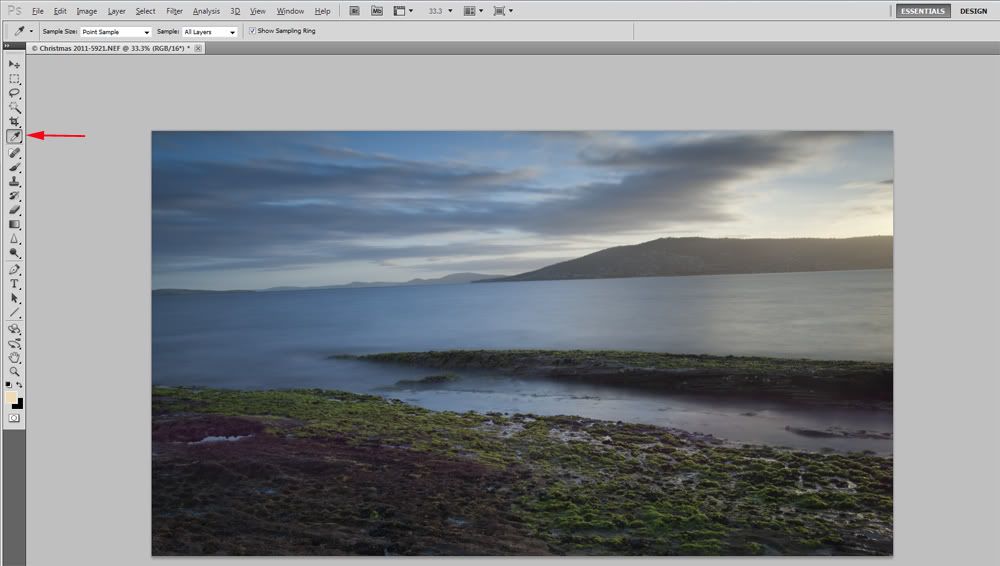
    Open your photo that needs to be straightened, in Photoshop:


    Select the RULER tool, which is located under the eye-dropper tool on your palette.


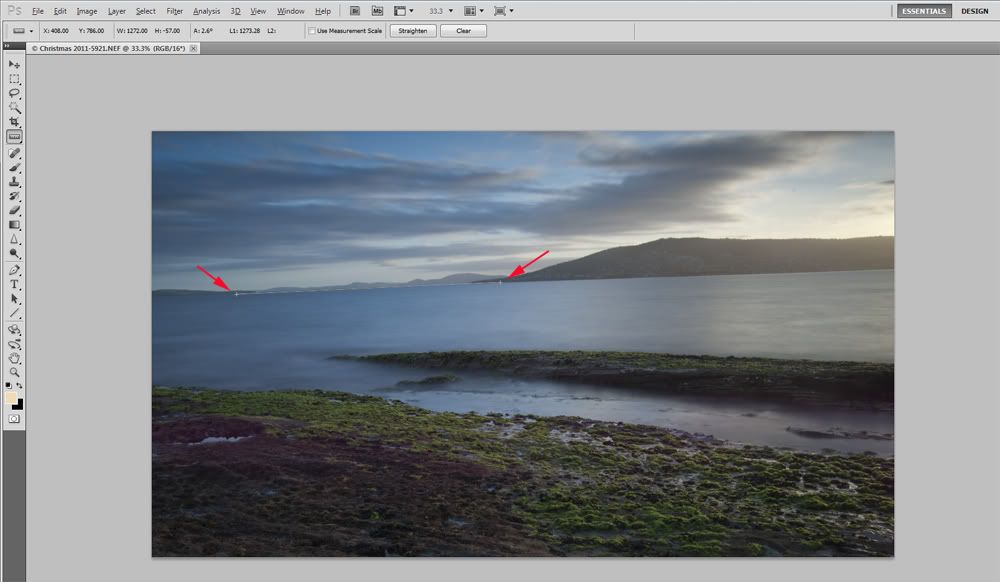
    Then draw a line on your photo that is along the horizon (or any other surface in your photo that should be horizontal or vertical)


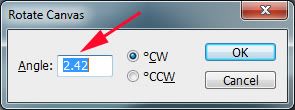
    Once done, using the menu, select: IMAGE > IMAGE ROTATION > ABRITRARY. A pop-up window will appear

    This window has a rotation angle already entered, Photoshop chooses this based on the line you drew with the ruler tool. Just click OK

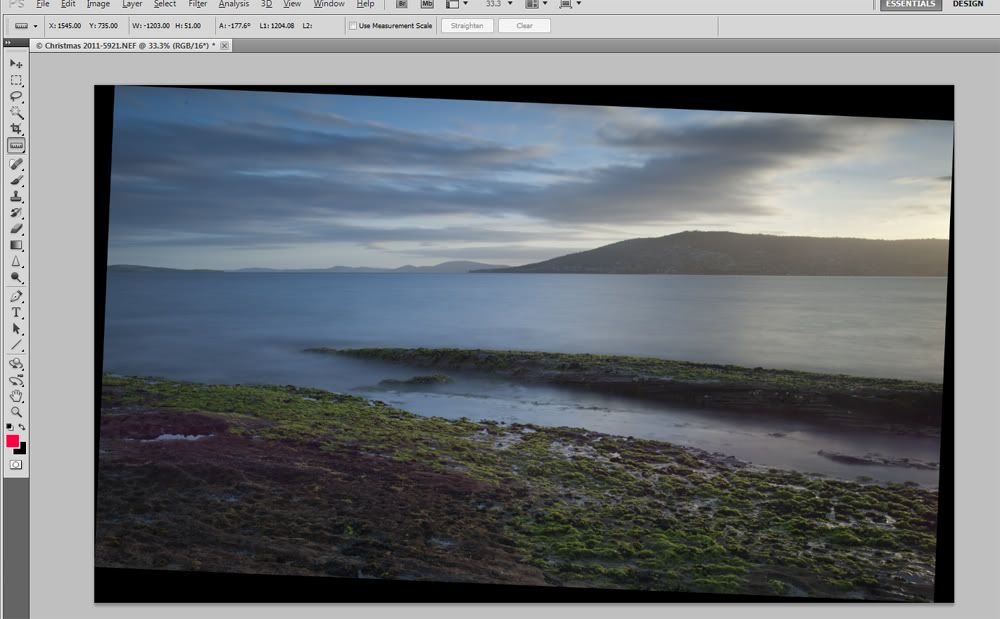
    Your photo will now be 'levelled', but by doing so, you end up with some excess in the corners.


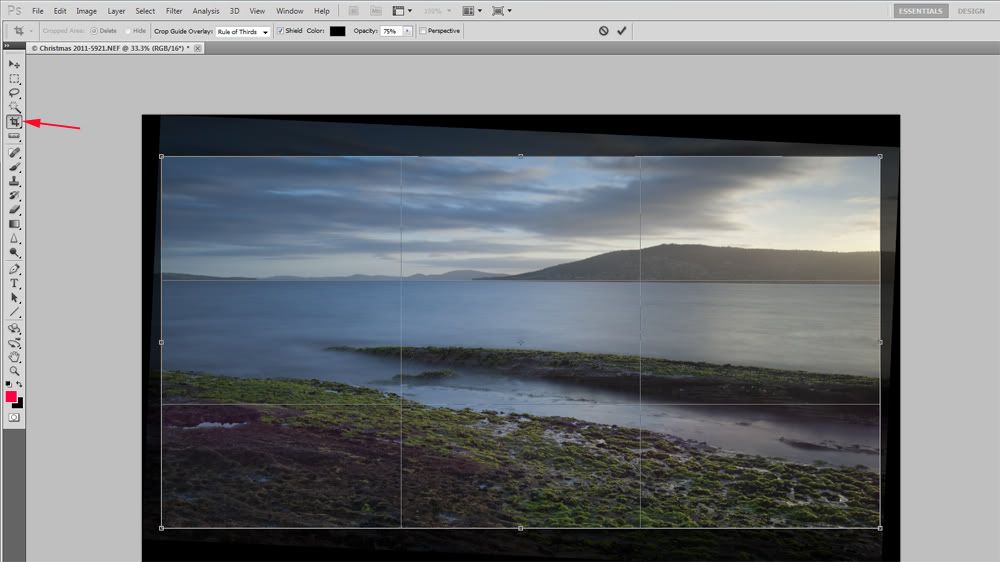
    Now use the Crop Tool on the Palette to crop your photo to remove the excess in the corners.


    and there you have it, your photo has been straightened.


    I hope this small tutorial is of assistance. Straightening a photo does not mean you need Photoshop, all of the editing software available has a method to straighten up a photo. It is just a matter of finding out how your software does it. Generally it is straightforward and fairly simple to achieve, and can make the world of difference to your end result.

    This can also be used vertically to correct vertical lean, on towers etc. However, there is another aspect called perspective, and correcting for perspective distortion is completely different to correcting a crooked photo. Perspective issues generally occur with wider angle lenses, and result in a curvature of the horizon on building etc, rather than just a tilt.
    Last edited by ricktas; 14-01-2012 at 5:14pm.
    "It is one thing to make a picture of what a person looks like, it is another thing to make a portrait of who they are" - Paul Caponigro

    Constructive Critique of my photographs is always appreciated
    Nikon, etc!

    RICK
    My Photography

  2. #2
    Arch-Σigmoid Ausphotography Regular ameerat42's Avatar
    Join Date
    18 Sep 2009
    Location
    Nthn Sydney
    Posts
    23,518
    Mentioned
    24 Post(s)
    Tagged
    0 Thread(s)
    Ta for this, Rick.
    (Up till now I have been using horizontal (and vertical) guides that are dragged across from the rulers (and shifted with the Move tool). Then with the picture selected and in Manual Transform mode I have rotated the image until the horizon lines up with the guide.)

    (Learn something new every day.)
    CC, Image editing OK.

  3. #3
    Who let the rabble in?
    Join Date
    04 Aug 2010
    Location
    Sydney
    Posts
    8,405
    Mentioned
    6 Post(s)
    Tagged
    0 Thread(s)
    Hey wow, Rick. I never knew of that function and I thank you very much for the tuition about it! Luckily, I never have to use it in Photoshop as Capture One has this function at the RAW level, so I do it there. However, I have been caught out a few times and already opened up a converted (to TIFF) file in Photoshop and realised that I missed straightening the horizon and have needed to go back and fix it in Capture One. Now that I know this exists I such an easy from in Photoshop, I have a back up way of achieving a correct horizon.

  4. #4
    Administrator
    Threadstarter
    ricktas's Avatar
    Join Date
    24 Jun 2007
    Location
    Hobart
    Posts
    16,846
    Mentioned
    12 Post(s)
    Tagged
    1 Thread(s)
    thanks Guys,

    Photoshop has the same feature in Adobe Camera Raw, and its also part of Lightroom. The only real difference is how you access the tool on the menu's for both those applications.

  5. #5
    Member
    Join Date
    31 Jan 2010
    Location
    North East
    Posts
    311
    Mentioned
    0 Post(s)
    Tagged
    0 Thread(s)
    Lightroom is quite a bit more streamlined than this though - just draw a line you wish to be horizontal with the spirit level tool (in the crop section) and it straightens & crops automagically.

  6. #6
    Administrator
    Threadstarter
    ricktas's Avatar
    Join Date
    24 Jun 2007
    Location
    Hobart
    Posts
    16,846
    Mentioned
    12 Post(s)
    Tagged
    1 Thread(s)
    Quote Originally Posted by soulman View Post
    Lightroom is quite a bit more streamlined than this though - just draw a line you wish to be horizontal with the spirit level tool (in the crop section) and it straightens & crops automagically.
    Agree, and I am hoping to add to this thread with a Lightroom tutorial in the near future.

    If others want to add to this thread with how to do it, in other software, they are most welcome to.

  7. #7
    Member nuoz2's Avatar
    Join Date
    20 Nov 2010
    Location
    adelaide
    Posts
    308
    Mentioned
    0 Post(s)
    Tagged
    0 Thread(s)
    I look forward to the lightroom tutorial
    Paul

  8. #8
    Member
    Join Date
    16 Sep 2011
    Location
    Canberra
    Posts
    1,217
    Mentioned
    0 Post(s)
    Tagged
    0 Thread(s)
    Smacks forehead, and shouts "D'Oh!!!!"
    I've been using arbitrary rotation and just experimenting, adding another couple of fractions over and over and over until it looks right, and then using the Rectangular Marquee tool to select the area to crop, which is a major PITA because you can't drag the borders if you don't get them right. It's such a pain that I'll often jump out and reopen the image in the RAW editor because of it's much more user friendly straighten and crop tools.
    In fact I nearly didn't even read this because I thought I knew how to straighten. I did ... the hardest possible way to straighten.
    Thanks so much. You've just taken a good couple of minutes per image off my work flow.
    Canon EOS 60D ..... EFS 18-200mm f/3.5 - 5.6 IS - 430 EXII Speedlite - "eBay special" Remote Control Unit - Manfrotto 190XPROB w 804RC2 head.

  9. #9
    Member
    Join Date
    31 Jan 2010
    Location
    North East
    Posts
    311
    Mentioned
    0 Post(s)
    Tagged
    0 Thread(s)
    Quote Originally Posted by Ezookiel View Post
    ...It's such a pain that I'll often jump out and reopen the image in the RAW editor because of it's much more user friendly straighten and crop tools.
    Have you tried Lightroom? Makes this and many other actions so quick.

  10. #10
    Member
    Join Date
    16 Sep 2011
    Location
    Canberra
    Posts
    1,217
    Mentioned
    0 Post(s)
    Tagged
    0 Thread(s)
    Once my photography reaches a level where they don't need major surgery to fix them, and can survive with just a bit of first aid, I'll be getting Lightroom. Not just for the simple work flow, but more for the cataloguing. Photoshop's RAW program is pretty good for the basics if the image doesn't need open heart surgery to fix it.

  11. #11
    Member
    Join Date
    31 Jan 2010
    Location
    North East
    Posts
    311
    Mentioned
    0 Post(s)
    Tagged
    0 Thread(s)
    Fair enough. If you haven't checked it out though, or haven't done so recently, you may find it worth seeing what it can do. I used to use Ps for difficult images, but haven't fired it up for a long time now. Lr is remarkably capable.

  12. #12
    Administrator
    Threadstarter
    ricktas's Avatar
    Join Date
    24 Jun 2007
    Location
    Hobart
    Posts
    16,846
    Mentioned
    12 Post(s)
    Tagged
    1 Thread(s)
    Quote Originally Posted by soulman View Post
    Fair enough. If you haven't checked it out though, or haven't done so recently, you may find it worth seeing what it can do. I used to use Ps for difficult images, but haven't fired it up for a long time now. Lr is remarkably capable.
    So how about doing us a few tutorials then on some LR techniques?

  13. #13
    Member
    Join Date
    29 Nov 2008
    Location
    Traralgon
    Posts
    3,656
    Mentioned
    2 Post(s)
    Tagged
    0 Thread(s)
    Wow I never new that tool existed rick. I normally go straight to image rotation/arbitrary and input numbers until I get the angle right, its hit and miss and is time consuming. I just goes to show that you can teach an old dog new tricks. Much appreciated
    Canon 7d efs 15-85mm, Sigma 150-500mm. Nicon coolpix 5400


  14. #14
    Member
    Join Date
    23 Jan 2011
    Location
    Goolwa
    Posts
    3,775
    Mentioned
    0 Post(s)
    Tagged
    0 Thread(s)
    That is brilliant!!!! I usually do straightening in LR and use the multi-grid to line it up, but sometimes that isn't always accurate. In PSE, the straightening tool is useless. I tried to straighten a photo the other day and it ended up being on an angle that was more like 50 degrees, not vertical!!

    Will use this method from now on.

    EDIT: I don't have that tool in PSE. Does anyone know if I can actually do this in Elements?? I can't find anything similar.
    Last edited by Ms Monny; 29-06-2012 at 10:21am.
    Monika
    Equipment: Canon 60D, Nikon FE, Nikkor 50mm 1.8 lens, Fancier FT-662A tripod, 18-55mm kit lens, 55-250mm kit lens, 30mm 1.4 Sigma lens, LR4, PS Elements
    Check out my Flickr photos ... http://www.flickr.com/photos/missmonny/
    ... and then you can like me on www.facebook.com/PhotoByMB or see my shop on http://www.redbubble.com/people/msmonny


  15. #15
    Ausphotography irregular Mark L's Avatar
    Join Date
    21 Nov 2010
    Location
    magical Mudgee
    Posts
    21,586
    Mentioned
    34 Post(s)
    Tagged
    1 Thread(s)
    FWIW Monica and Dave, its not hard to straighten in DPP.
    Select photo. At top of screen click on Tools> Start Trimming/Angle Adjustment tool. Check grid (on right side) makes it easier to get right. Hover mouse over black area outside the photo, hold left mouse button down, move mouse and straighten.(Is that called click and drag??)
    Click OK to save. Go play in your preferred software with straightened photo!
    "Enjoy what you can do rather than being frustrated at what you can't." bobt
    Canon 80D, 60D, Canon 28-105, Sigma 150-600S.

  16. #16
    Member
    Join Date
    16 Sep 2011
    Location
    Canberra
    Posts
    1,217
    Mentioned
    0 Post(s)
    Tagged
    0 Thread(s)
    DPP does do a quick easy job if you're good at judging by eye whether the image is straight. But one thing it does even better is cropping. I've not seen anywhere else that you can crop to an exact set of X,Y Coordinates, to an exact height and width, which is fantastic if you want the exact same crop on a series of shots you intend to turn into an animated gif. To do that they have to be the exact same size, and you really need to keep the start and finish points of the crop identical. Being able to crop by typing in the x,y coordinate and the height and width, makes it way easier than trying to do it with a mouse.

  17. #17
    Administrator
    Threadstarter
    ricktas's Avatar
    Join Date
    24 Jun 2007
    Location
    Hobart
    Posts
    16,846
    Mentioned
    12 Post(s)
    Tagged
    1 Thread(s)
    As always try and get it right in camera.

    Have you ever zoomed right into a photo on your monitor? Each pixel is a small square of colour . Note how I said SQUARE. Now if your photo is not level and you rotate it, what happens to a square tipped on its side? it sort of ends up looking a bit like a diamond, right?

    Now when you do rotate a photo to level an horizon, zoom in again, each pixel is not a diamond, it is still a square. Huh, where did the bits at the corners of your diamond shaped pixels go?

    When you rotate a photo, all the bit in the corners of your pixel are removed and any blank bits are filled in by the software with whatever that pixel was made up of. ie computer generated colours. This is achieved by getting rid of all the data that made the original square pixel, a slightly diamond shape. Yep 'getting rid of' as in removing/deleting/discarding and replacing it as needed (well with what your software thinks it needs). Now do you want pixel data from your photo just dumped? Most likely not.

    Rotating a photo can also cause it to become slightly softer (less sharp).

    So rotating a photo (other than in 90 degree steps) means you are losing something each time you do it. So try and get your horizons level, in camera.

    If you do need to do a rotation, do it once. If you are not happy, undo and start again, do not rotate and then rotate a bit more, and the rotate a bit more etc, cause each time you do so, you lose just a little more pixel data.
    Last edited by ricktas; 30-06-2012 at 10:05am.

  18. #18
    Member
    Join Date
    23 Jan 2011
    Location
    Goolwa
    Posts
    3,775
    Mentioned
    0 Post(s)
    Tagged
    0 Thread(s)
    Quote Originally Posted by soulman View Post
    Lightroom is quite a bit more streamlined than this though - just draw a line you wish to be horizontal with the spirit level tool (in the crop section) and it straightens & crops automagically.
    I didn't know what that little spirit level did!!! Woo hoo! Now it won't be so hit and miss in LR (I usually use the multi-grid and roughly guess). Thanks

    - - - Updated - - -

    Thanks Rick....I read about this very thing a while ago and, even though it made sense, I really didn't realise what the cropping did to the pixels. Certainly not like film, where cropping only cropped the image and didn't do anything to the clarity and sharpness (depending on how much you crop!!) of the image.

    A good lesson for all beginners who are starting out in digital, I think. Maybe even photographers who have been around for a few years don't even know this!

Posting Permissions

  • You may not post new threads
  • You may not post replies
  • You may not post attachments
  • You may not edit your posts
  •