


 Thanks useful information:

As it was school holidays, my girls and I spent a week away in the Blue Mountains... this is our story...
Note: this thread is pretty image heavy and it has for many of the images a summary of the technique used (recipe) to create the images - which many of you might find ho hum - however some friends asked me to describe what I did, so since I was doing it for my blog I included it here and hopefully someone, someday will find it useful.
We had pretty good weather during the week were were staying in the Blue Mountains - it was very cold (ambient temperatures of between 0 and 8 degrees but with wind chill it probably felt like -5) and a little breezy at times but we didn't have any rain and we missed all the bad storms and cyclonic winds so thats a definite plus. Most days we had clear blue skies (which isn't so fantastic for the photos) or a little overcast.
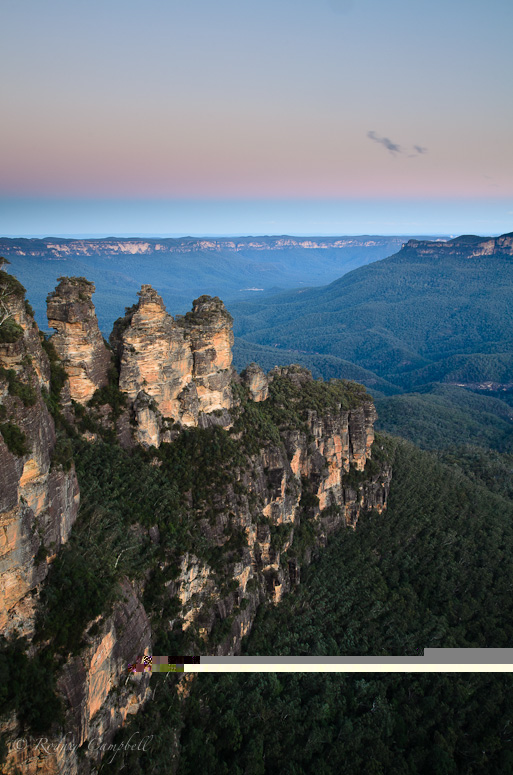
On our first evening in Katoomba we braved the bitter cold and wind to walk down to Echo Point from where we were staying to photograph sunset over Jamison Valley and the Three Sisters.
The technique here is pretty simple:
- a tripod for good stability (especially with some gusting winds)
- a small aperture for good depth of field
- I used a graduated neutral density filter (3 stop) to darken the sky so it didn't overexpose
- lock the ISO at the native default (ISO 100) for cleaner images
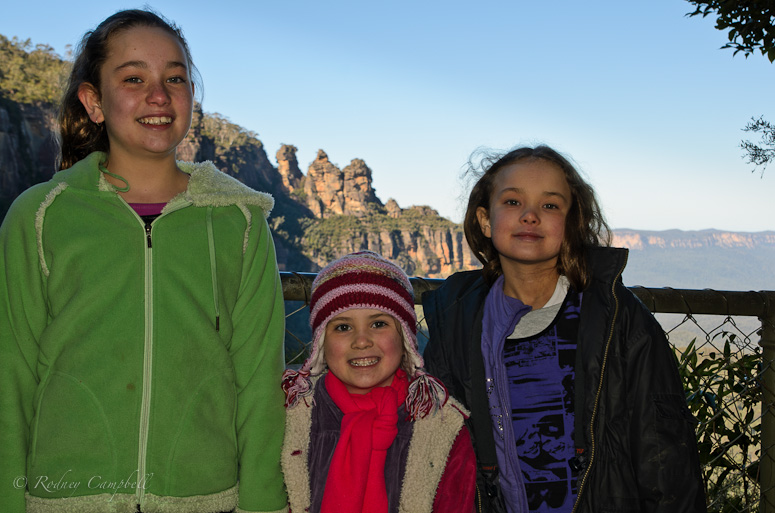
We went bushwalking (a very long walk which the girls did admirably) on the second day - again walking down to Echo Point to start.
We walked along The Three Sisters Footpath to the Three Sisters themselves and then down the 880 (as counted by my daughters
We then followed the Federal Pass along the base of the cliffs around past the lower part of Katoomba Falls and then back up out of the valley via Furber Steps and Witches Leap and finally up to Katoomba Falls Kiosk for a very late lunch.
This image of the three sisters in front of the Three Sisters was a hard image to take in near impossible conditions - there was very little room to manoeuvre on the small ledge we were on - perhaps only a metre and a half deep.
The technique:
- I had to underexpose the ambient exposure (the background) by 2 or 3 stops so it didn't all blow out to white
- since the girls themselves were in dark shadow I used the on camera fill flash set at max one stop overexposure to try and fill in
It was then a relatively short walk around parts of the Prince Henry Cliff Walk and past the Katoomba Cascades back to where we were staying. All up the trip took about 5 hours with some very strenuous parts (especially the very long, steep and exposed steps in and out of the valley).
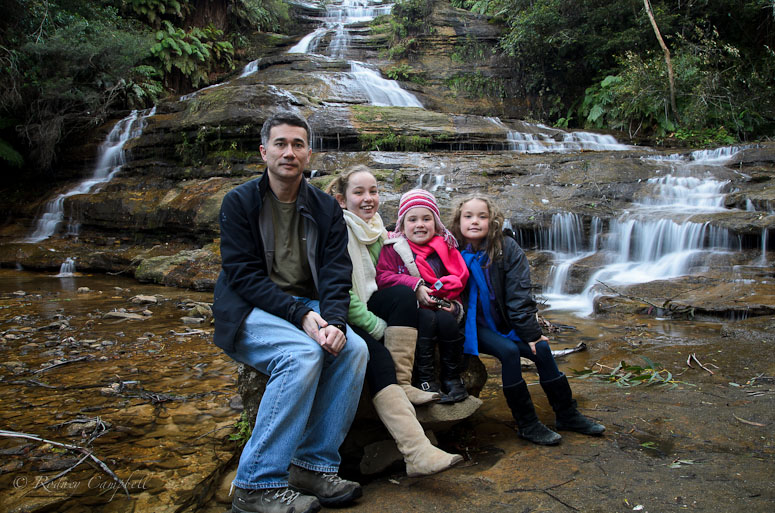
The technique for this image taken at the Katoomba Cascades:
- start off by treating it as if you were just photographing the waterfall scene
- lock the ISO at the native default (100) for cleaner images
- a circular polariser to cut down on reflections and glare (on the rocks and water)
- even if I wasn't going to use the self timer to get into the image I'd be using a tripod for stability because
- we want a reasonably long ambient exposure to get silky looking flowing water on the falls (1 second)
- then use fill flash (set to rear curtain) to attempt to clearly freeze the people in the shot at the end of the exposure
- we still had to try and remain reasonably still for the whole exposure though (no mean feat with kids
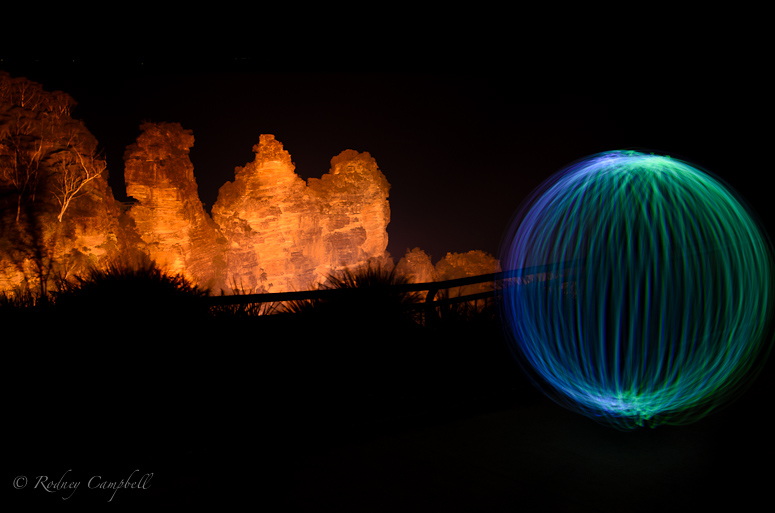
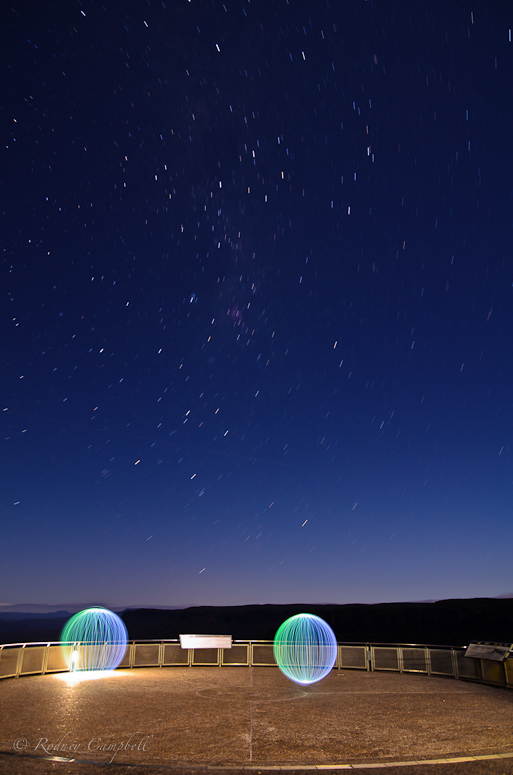
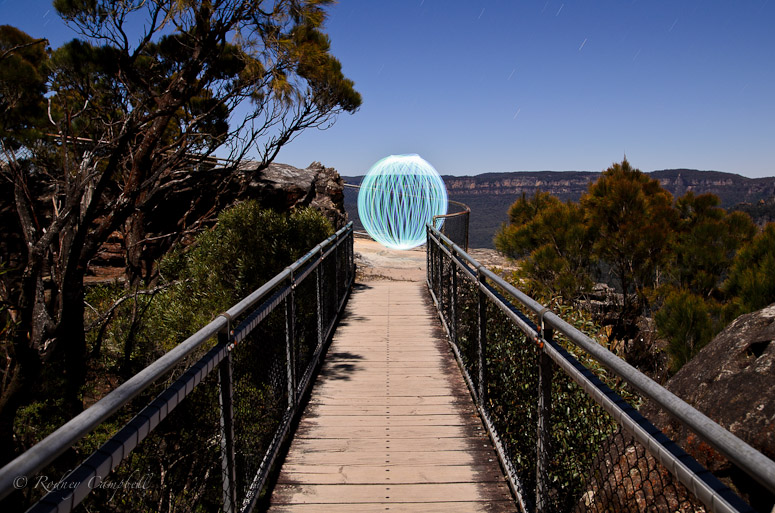
That night I decided to try some Orb of Light images down at Echo Point (the moon was heading towards a full moon (80% waxing gibbous this night) and the sky was clear) so I walked down just before 9PM and setup my tripod down on the lower viewing area. The following is the very first image I took - for which I basically estimated (guessed) the exposure as a starting point (3 minutes @ f/11 @ ISO 100) and low and behold is was nearly perfect - job done, time to go home (in truth I was very tempted - it was bitterly cold and blowing a gale). I moved up to the upper viewing area and tried a some more shots to get night sky star trails with colour in the sky and then I was done.
The technique:
- a tripod for stability (with camera bag on the bag hook for added weight and stability)
- I set a shutter speed long enough to allow me to move into the scene and paint the orb of light (multiple minutes)
- set an appropriate aperture to allow the ambient light levels of the scene to light the rest of the scene (the background landscape) - in the first there are large bright floodlights lighting the three sisters so I had to stop down to a smaller aperture (f/11) so it wasn't too bright (overexposed); in the second the moonlight itself was providing the only background illumination (and it isn't very bright) so I had to open the aperture up (f/4.0) to allow more light in (and more time to expose the landscape and sky)
- lock the ISO at a low level for cleaner images - ISO 100 for the first and I bumped it to 200 for the second so I didn't have to either shoot an 8 minute exposure or open the aperture even wider to f/2.8
- use the programmable remote trigger to have both a countdown before starting the exposure (15 to 30 seconds in this case) and then run a timed long exposure (three minutes for the first and four for the second)
- as soon as I press start I walk into the scene to the appropriate location (that I had predetermined beforehand) and start spinning my home made orb light (a modified battery powered LED christmas light string) and when it's in motion switch it on and keep spinning the light whilst shuffling in a circle for a reasonable amount of time and rotations (somewhere between one and two minutes) and then turn it off and walk out of the scene
- with the second image I walked to a second spot and spun another orb
I was thinking that the girls might be sore and tired after our strenuous walk the previous day and would want to rest - I was wrong
I actually took the following image of the Three Sisters with the moon rising behind them late in the afternoon (3:30PM) from inside the Scenic Cableway cable car through the window as it moved from the valley floor up to the top station.
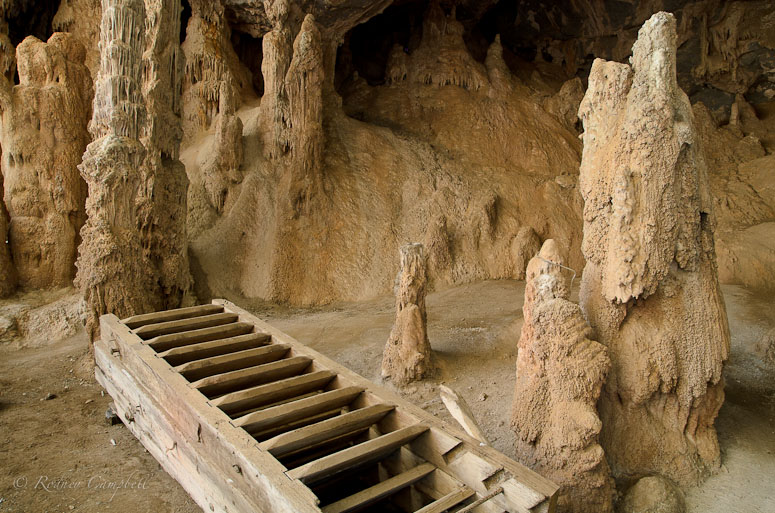
We moved to a nice house in Leura for the rest of our stay in the Blue Mountains at this point and I booked a cave tour at Jenolan Caves (the girls checked out the brochure and decided on the Diamond Cave) for the next day - however the tour started at 10:30 so we needed to leave Leura very early (by around 8:30) to ensure we got there in time.
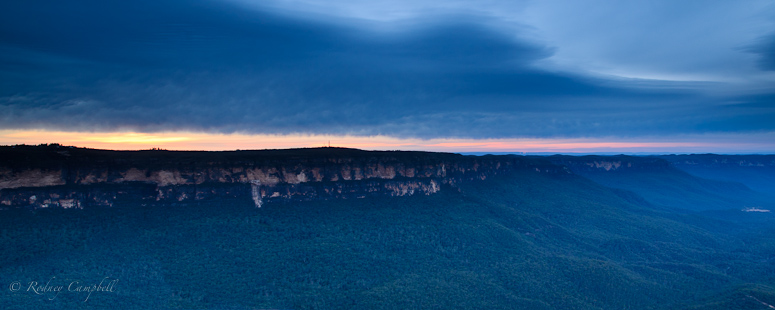
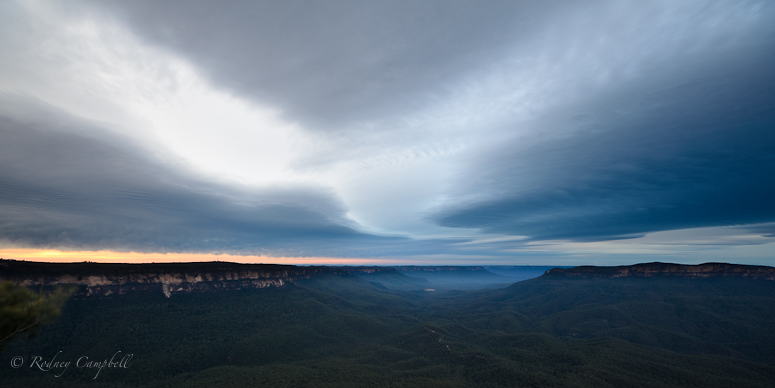
Since we needed to get up early anyway, we actually got up very very early (around 5:30AM) so that we could watch the sunrise from Sublime Point (which we'd never been to). We were there before sunrise (6:45ish) for the pre dawn show but unfortunately the cloud cover was too heavy so we didn't really get a spectacular sunrise. It was of course very cold and breezy and we took a lot of photos anyway and we did see some very cool cloud formations in the sky that day
The technique here:
- again a tripod (and camera bag on bag hook) for stability
- lock the ISO at the native default (100) for cleaner images
- a small aperture for good depth of field
- a graduated neutral density filter (3 stop) to darken the sky so it didn't overexpose (which I couldn't use for the second shot as I used my ultra wide angle lens which has a bulbous front element and can't have filters attached)
We spent much of the rest of the day at Jenolan Caves and travelling.
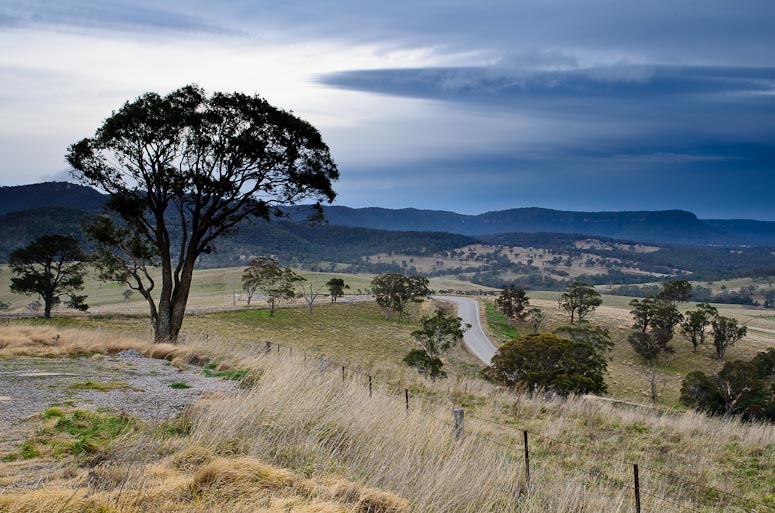
The technique for all these landscapes is pretty much the same as what I use for the sunset and sunrise images (low ISO, tripod, small aperture, grad ND if needed which generally results in a slow shutter speed - too slow to handhold cleanly).
We stopped on the side of the road for this first image because I liked the interesting menacing clouds, the curvy road, the hills and the tree
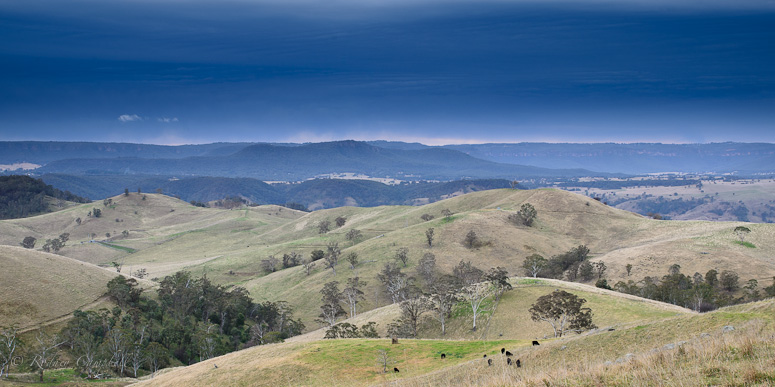
This image of the rolling hills was taken along Jenolan Caves Road on the way to the caves - I liked the soft clean undulating hills, the mountains in the distance and the interesting clouds.
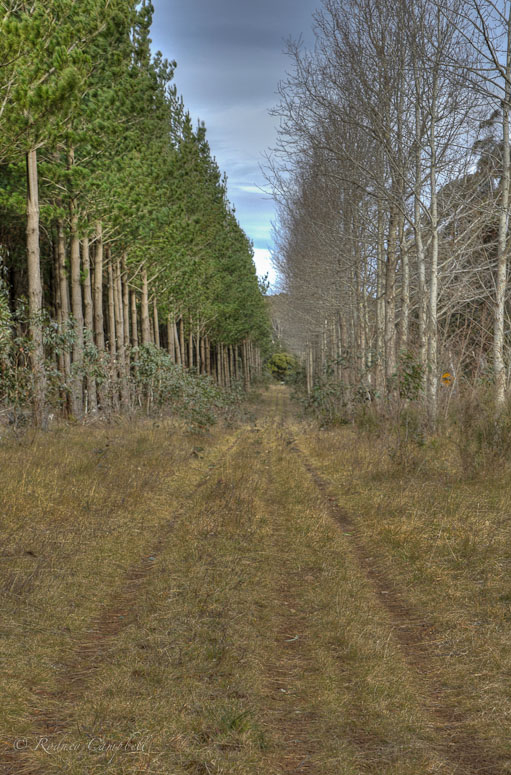
On the way back from the caves we saw these interesting rows of trees - the living green plantation pines on the left and the leafless row of trees on the right. This image is actually a high dynamic range (HDR) image processed from three bracketed images taken handheld at 0, -2 and +2EV.
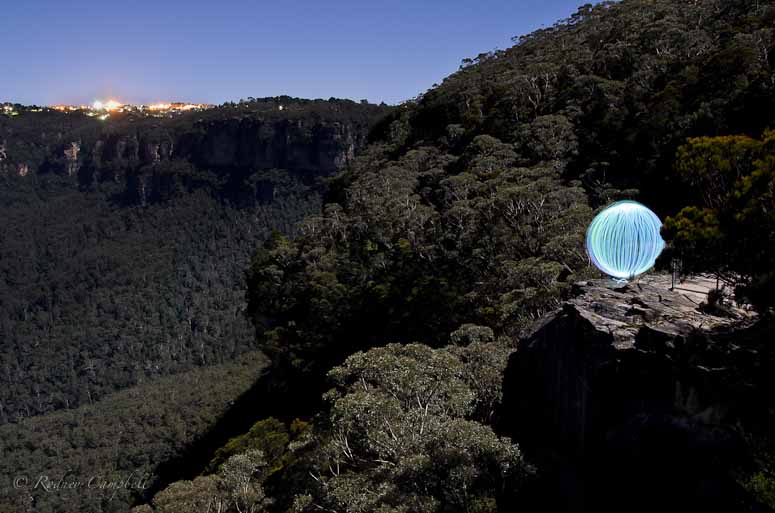
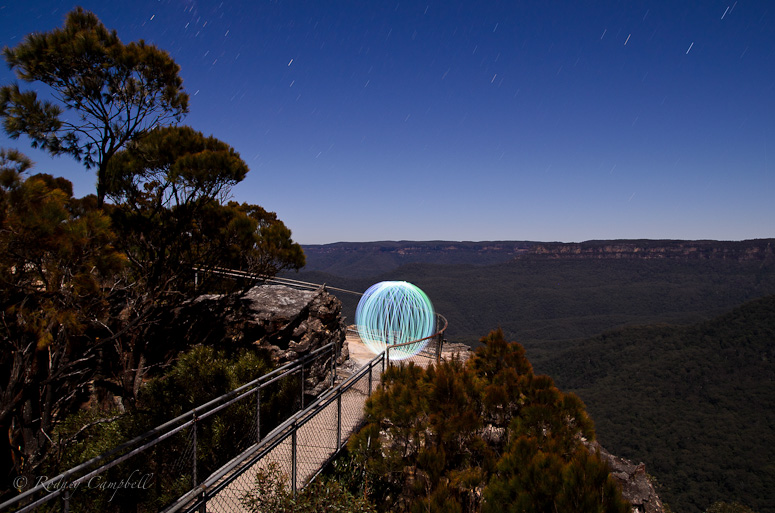
On our last night in the mountains I again braved the cold to try some further Orbs of Light at Sublime Point. It was the night before the Full Moon (98%) so it was quite bright out. What you see here are landscapes lit completely by the moonlight with me painting the orbs of light (using my LED lights) during the long exposures.
The first image is looking back from the Sublime Point lookout with Katoomba city atop the ridge on the left.
The technique here is essentially the same as the second of the other orb images the previous evening with me using a wideish aperture (f/5.6) on a wide angle lens to give a reasonable depth of field and enough light to let the moon expose the landscape and I traded off ISO between 200 and 320 so that I didn't have to use exposure times longer than 4 minutes. If I wanted to bother waiting much longer for each image and have much longer star trails in the photos I could have set ISO to 100 and used exposures of anywhere between 8 and 30 minutes (with perhaps some adjustments to aperture) to achieve this.
Our last day - we spent the morning at the Everglades Gardens in Leura - it's a very pretty place and it must be spectacular when the flowers are in full bloom.
The technique for the first image:
- use a wider aperture (f/4.0) for shallower depth of field
- use a longish focal length
- get very close to the subject - I was near the minimum focusing distance for this (non macro) lens - about 30cm
- the above three conspire to generate a small depth of field which throws the background out nicely and turns the flower beds behind into nice bokeh


 Reply With Quote
 Add To Bookmarks


 Threadstarter


