User Tag List

Thanks useful information Thanks useful information:  11
Results 1 to 13 of 13

Thread: Panoramic Photography Tutorial

  1. #1
    Administrator ricktas's Avatar
    Join Date
    24 Jun 2007
    Location
    Hobart
    Posts
    16,846
    Mentioned
    12 Post(s)
    Tagged
    1 Thread(s)

    Panoramic Photography Tutorial

    This tutorial is a basic guide on panoramic photos, what they are and how they can be taken and edited.

    What is a panoramic photo?

    A panoramic photo is a photo with an elongated field of view. Most frequently these photos are horizontally longer than they are taller,
    but vertical panoramic photos can be striking and effective, if less common than their horizontal counter-parts.It is generally accepted
    that a photo that is 2:1 or larger can be classified as a panoramic photo. Thus it is at least twice as long as it is high, or twice as high
    as it is long.

    How can a panoramic photo be taken

    1. In-camera
    Some camera's have a 'panoramic' function where the photographer sets the camera to panoramic mode and then is guided on screen
    to take a series of photos that overlap, and then the camera software processes them into a panoramic single photo. This feature is
    more common in advanced point and shoot camera's than DSLR.

    2. Single shot - cropped.
    The method involves taking a single photo and then cropping the result in editing software to turn the usual aspect ratio of the photo
    into a panoramic

    3. Multi shot stitched
    Multi shot panoramic photos allow the photographer to create extremely large panoramic photos, even up to full 360 degree views.
    The photographer takes a series of overlapping frames then joins them together (usually called 'stitching' or 'merging') in photo
    editing software.

    Software

    Most good quality photo-editing software has a stitch or merge feature to allow the creation of panoramic photos. You will need
    to learn how to use your particular software to achieve the results you want.

    There are also many panoramic specific software options available and a quick google search will reveal them.

    Now onto the how to:

    This tutorial will look at two methods, the single shot cropped panoramic and the multi-shot merged panoramic.

    Single shot panoramic

    This involves taking your photo in a single frame, using a wide angle lens can assist here as it allows you to capture more of the
    scene in a single shot, but using other lenses is quite acceptable and the photographer will need to determine what lens focal
    length they wish to use based on what they want to include in their panoromic photo.

    You then open your photo in your editing software and the easiest method to create a panoramic photo is to simply use the crop tool.

    Once cropped and edited as you see fit, just save the panoramic.

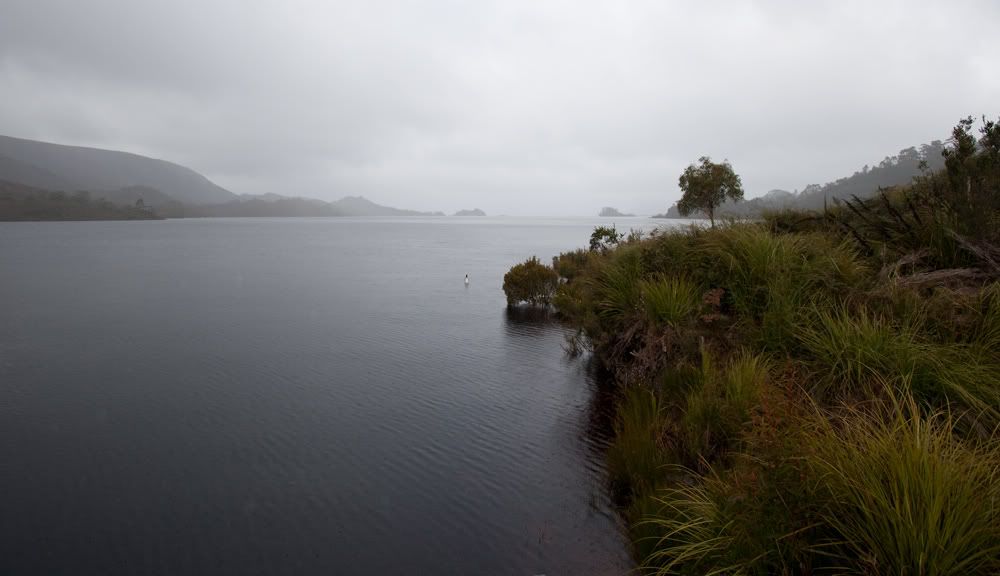
    Copy of the Original RAW file


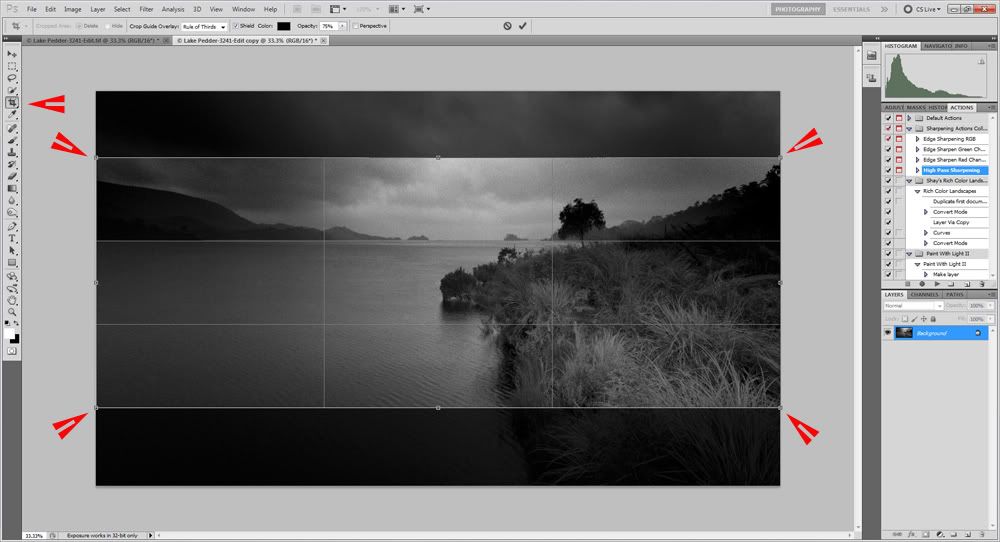
    Using Photoshop and the cropping tool to create a panoramic from a single photo


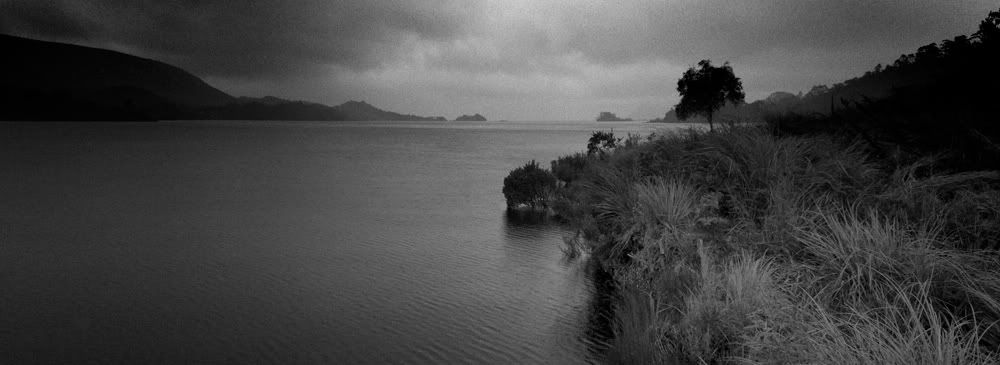
    Final Panoramic Photo


    Creating a Panoramic Photo from a series of separate photos

    Firstly, with taking a multi-shot panoramic series, it is worthwhile taking the photos in portrait aspect as this gives you more
    height to work within for your final result. Here I have taken a series of nine photos each one overlaps the previous and they
    pan from left to right across the scene that I want to turn into a single panoramic result. The more overlap between each frame
    the better the software seems to be at aligning them.

    To ensure a good result, always take multi-shot panoramic frames in manual mode. This ensures the exposure of each frame
    is the same as all the others. Using an auto, or semi-auto mode can result in different settings being selected by the camera
    for each frame, which can make the blending between frames more obvious in the final photo. It is also advisable to not use a
    polarising filter as these work based on direction to the sun and as each frame is taken, the angle to the sun changes and thus
    the intensity of the polariser result can change from frame to frame, and a patchwork result at the end of the merging process.

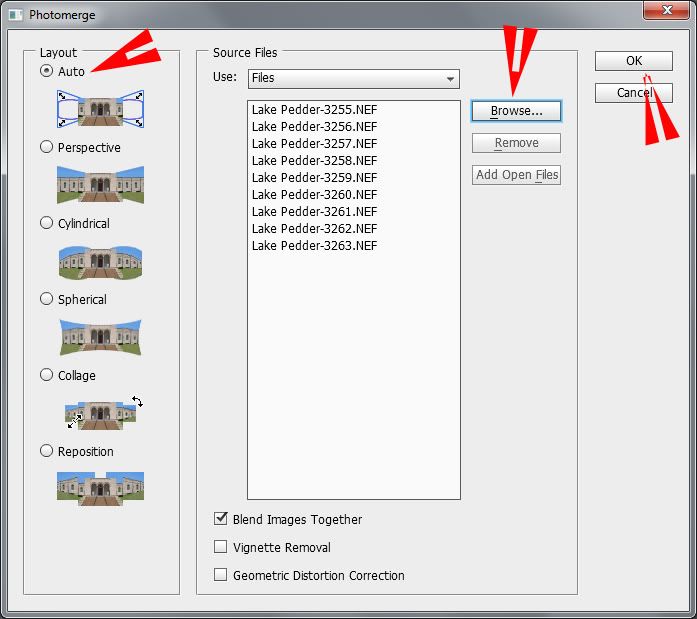
    Now onto the stitching/merging. In Photoshop it is referred to as 'photo-merge' and it can be found under the FILE menu.
    Basically you click the menu item, select your photos that you have taken specifically to be merged into a single panoramic
    and click OK, and Photoshop does the rest (to an extent). Once the automated merge is complete you are left with the result.

    So here are my 9 original photos, taken in portrait aspect, that are to be merged into one final panoramic photo.


    To merge these in Photoshop we open each file inside the Photo-Merge menu item. (File>Automate>Photomerge)
    Leave settings as AUTO (You can play with these to see how they affect the result). Once you have your files chosen
    and in the list, click OK to begin the merge process.


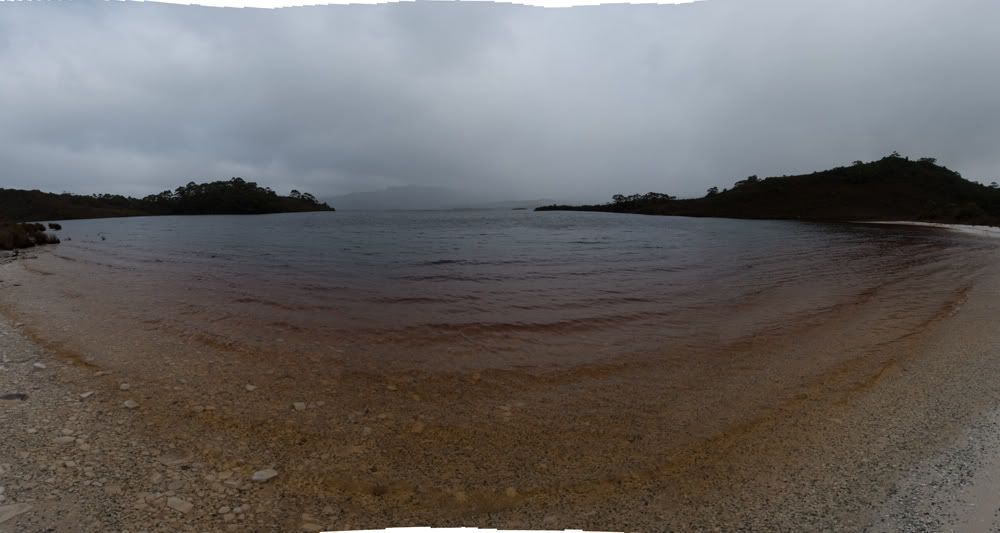
    Once photoshop completes the merge you end up with a result like this (note that depending on your computer's processing power, a merge can take
    photoshop quite some time to complete).


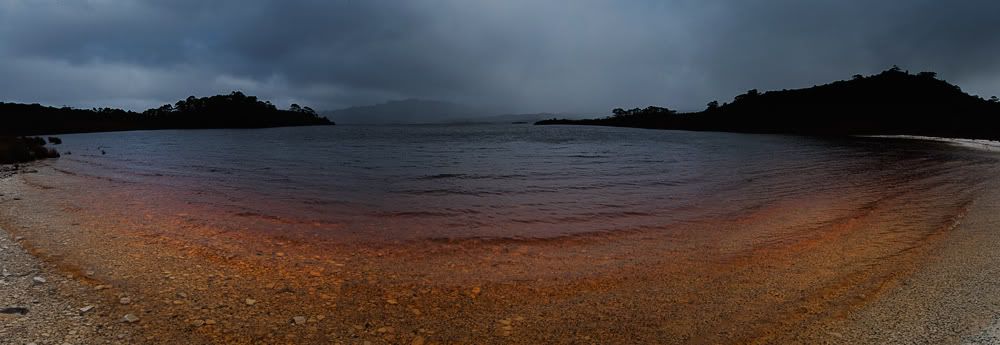
    It is then just a matter of cropping your merged panoramic photo and editing it as you see fit


    Some notes on equipment:

    You can take 'free standing shots" by simply holding your camera in your hand and panning between each shutter press,
    but using a tripod is a better option.If you want to get serious about panoramics, you can invest in a specific panoramic
    tripod head that ensures your camera remains on the nodal point between frame adjustments, to ensure a perfect result.
    Panoramic photography, like all other photography benefits from practice.
    Last edited by ricktas; 27-05-2011 at 6:35pm.
    "It is one thing to make a picture of what a person looks like, it is another thing to make a portrait of who they are" - Paul Caponigro

    Constructive Critique of my photographs is always appreciated
    Nikon, etc!

    RICK
    My Photography

  2. #2
    Member
    Join Date
    10 Jul 2010
    Location
    Gold Coast
    Posts
    6,346
    Mentioned
    0 Post(s)
    Tagged
    0 Thread(s)
    Well written and set out Tutorial Rick, Very informative , This should help some members greatly , How did you upload the images and text, Using FTP ? I've got to upload a Tute , But was thinking the Sandpit in the Library might be the go for me
    Canon : 30D, and sometimes the 5D mkIII , Sigma 10-20, 50mm 1.8, Canon 24-105 f4 L , On loan Sigma 120-400 DG and Canon 17 - 40 f4 L , Cokin Filters


  3. #3
    Administrator
    Threadstarter
    ricktas's Avatar
    Join Date
    24 Jun 2007
    Location
    Hobart
    Posts
    16,846
    Mentioned
    12 Post(s)
    Tagged
    1 Thread(s)
    Quote Originally Posted by William View Post
    Well written and set out Tutorial Rick, Very informative , This should help some members greatly , How did you upload the images and text, Using FTP ? I've got to upload a Tute , But was thinking the Sandpit in the Library might be the go for me
    Hi William, No I store my photos on photobucket and then just link them in to AP using the IMG tags. The text is just written in Word, then copied to my thread, formatted and then I insert the IMG links in the appropriate spots.
    Last edited by ricktas; 27-05-2011 at 4:36pm.

  4. #4
    Ausphotography Regular Mat's Avatar
    Join Date
    17 May 2010
    Location
    San Remo
    Posts
    965
    Mentioned
    0 Post(s)
    Tagged
    0 Thread(s)
    Hi Rick, good tut but you left out the amount of overlap. I find that a minimum of 50% works ok but normally I overlap around 70% to give the software more room when stitching.
    Mat.

    [SIGPIC][/SIGPIC] K-x, Sigma 18 - 125, Vivitar 100 - 300, RICOH KR10Super & KR10M (film), Filters, Tubes
    Flickr, RedBubble, Facebook


  5. #5
    Member
    Join Date
    24 Jun 2009
    Location
    Sydney
    Posts
    218
    Mentioned
    0 Post(s)
    Tagged
    0 Thread(s)
    Rick,

    Thank you. This is great, seriously great.

    "Life should not be a journey to the grave with the intention of arriving safely in a pretty and well preserved body, but rather to skid in broadside in a cloud of smoke, thoroughly used up, totally worn out, and loudly proclaiming "Wow! What a Ride!"
    — Hunter S. Thompson

  6. #6
    I am older than I look.
    Join Date
    31 Oct 2009
    Location
    Tura Beach, NSW
    Posts
    3,654
    Mentioned
    0 Post(s)
    Tagged
    0 Thread(s)
    Great write up Rick.

    With multi-frame panoramas, I have had problems with too much overlap. I generally find 25% to 33% to be about right. Too much overlap means you are shooting more frames than you need and the auto-stitching often gets mucked up.

    One thing you DO need is something in the overlapping area that provides a key for the auto-stitching. A long expanse of a sea horizon with no features is impossible for auto-stitching to deal with.

    You also need far more in the foreground, and to a lesser extent in the sky, than you generally bargain for. How often do you do a panorama and you are missing that little bit in the centre bottom or the mountains run out the top of the frame when there was sky there before.
    Cheers

    PeterB666


    Olympus Pen F with Metabones Speed Booster and Laowa 12mm f/2.8 or Voigtlander 10.5mm f/0.95 or Nikon D800 with the Laowa 12mm f/2.8. The need to keep in touch with the past is a Nikon Photomic FTn or Nikon F2A and a Nikkor 25-50mm f/4 AI

  7. #7
    Member
    Join Date
    21 May 2011
    Location
    Sydney
    Posts
    41
    Mentioned
    0 Post(s)
    Tagged
    0 Thread(s)
    Very helpful info here many thanks

  8. #8
    Member
    Join Date
    21 May 2011
    Location
    Sydney
    Posts
    41
    Mentioned
    0 Post(s)
    Tagged
    0 Thread(s)
    ok this info is very helpful thanks.... but for example if I want to merge say six frames(photo's) do I have to use Panorama mode???????
    or can I just select Portrait and take six photo's?? I am not sure??

  9. #9
    Administrator
    Threadstarter
    ricktas's Avatar
    Join Date
    24 Jun 2007
    Location
    Hobart
    Posts
    16,846
    Mentioned
    12 Post(s)
    Tagged
    1 Thread(s)
    Quote Originally Posted by tonimcp View Post
    ok this info is very helpful thanks.... but for example if I want to merge say six frames(photo's) do I have to use Panorama mode???????
    or can I just select Portrait and take six photo's?? I am not sure??
    When I said Portrait Aspect, I meant turning your camera on its side, so that the resultant photos are taller than they are wide, this means that once the stitching process is complete if you need to crop top and bottom, it leaves you with more pixels left, than if you took the shots with your camera held in its normal manner.

  10. #10
    Member
    Join Date
    21 May 2011
    Location
    Sydney
    Posts
    41
    Mentioned
    0 Post(s)
    Tagged
    0 Thread(s)
    ricktas thanks for that info... I have one problem here, my camera say's PAN IN DIRECTION OF ARROW. Well that's all good but when I tilt the camera to take a PANO the arrow is facing up or down???
    I really don't get this?? I can't take a PANO with the camera tilted because the arrow is pointing up or down? It don't work.

  11. #11
    Member
    Join Date
    12 Feb 2008
    Location
    Brisbane
    Posts
    7,830
    Mentioned
    0 Post(s)
    Tagged
    0 Thread(s)
    Panoramas work well with group people shots too, so, dont just limit the technique to landscapes

    D30_6015-Edit.jpg
    Darren
    Gear : Nikon Goodness
    Website : http://www.peakactionimages.com
    Please support Precious Hearts
    Constructive Critique of my images always appreciated

  12. #12
    Member namrog477's Avatar
    Join Date
    03 Jul 2008
    Location
    Melbourne, Vic
    Posts
    6
    Mentioned
    0 Post(s)
    Tagged
    0 Thread(s)
    Thanks for the tip regarding shooting in manual mode. I've tried panoramas previously using Av mode and the exposure turns out differently for each frame which gave an unimpressive pano result.

  13. #13
    Member
    Join Date
    27 May 2010
    Location
    Bellara
    Posts
    147
    Mentioned
    0 Post(s)
    Tagged
    0 Thread(s)
    Thank you for this instruction!!! It was very helpful! I've posted a very simple quick version of my first pano in the CC section, land and seascape, only two photos together, but at least I know how to do it. It's not as difficult as I thought!!! Thanks again!
    Janice

    'Life is like a camera. Focus on what's important, capture the good things, develop from the negatives, and if things don't work out, just take another shot.'

Posting Permissions

  • You may not post new threads
  • You may not post replies
  • You may not post attachments
  • You may not edit your posts
  •