User Tag List

Thanks useful information Thanks useful information:  6
Page 1 of 3 123 LastLast
Results 1 to 20 of 56

Thread: (NTP) : Aperture Challenge : 2011

  1. #1
    Administrator ricktas's Avatar
    Join Date
    24 Jun 2007
    Location
    Hobart
    Posts
    16,846
    Mentioned
    12 Post(s)
    Tagged
    1 Thread(s)

    (NTP) : Aperture Challenge : 2011

    What better way to start 2011 with a new series of challenges for the AP members learning how to use their cameras. So if you are New To Photography, give these challenges a go, learn to get off Auto Mode, and understand how camera features work, and interact with each other.

    This challenge to our members that want to learn to take control of their digital camera is based on the Learning Centre topic : Experimenting with Aperture. You can also use the f-stop guide to understand more : http://www.ausphotography.net.au/for...y:f_stop_chart

    We would like you to set your camera to Aperture mode (sometimes called A or Av mode). Check your camera manual in need, on how to set your camera to Aperture mode.

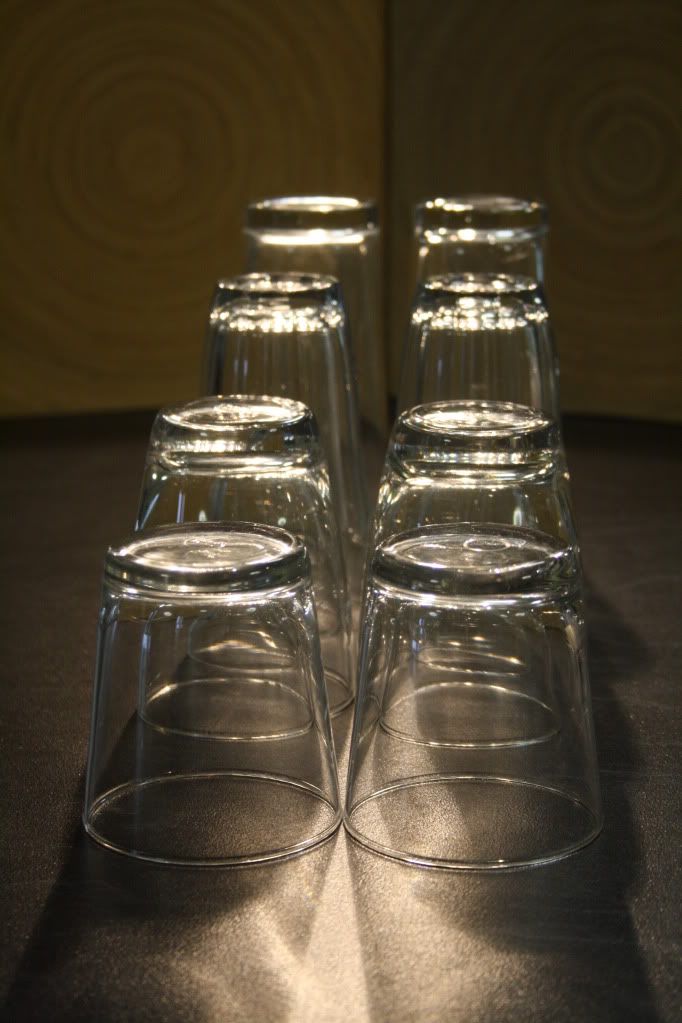
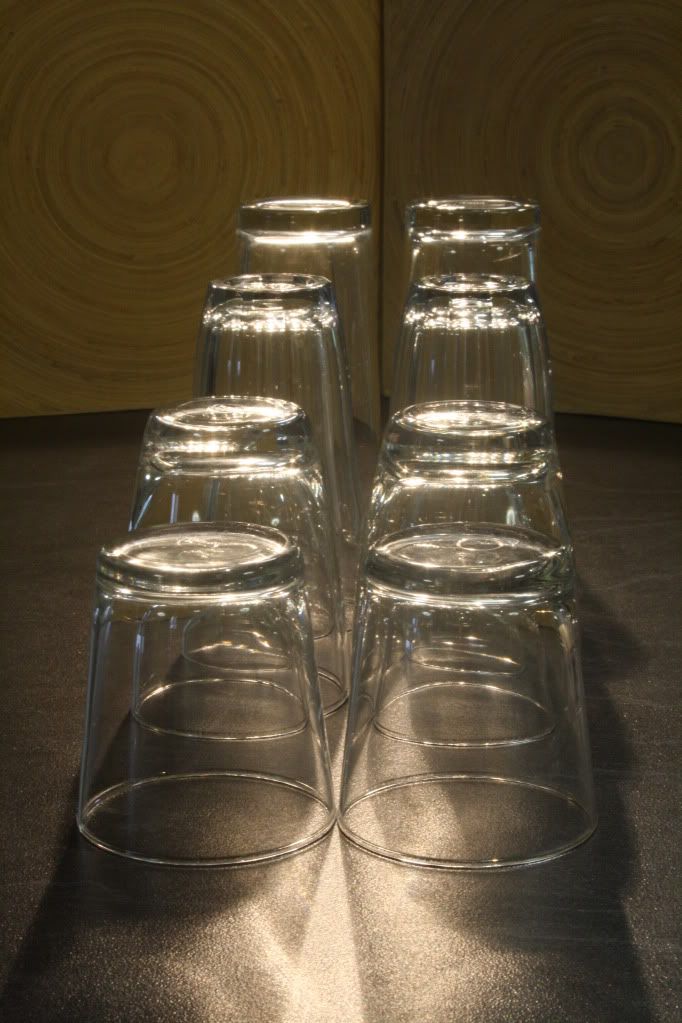
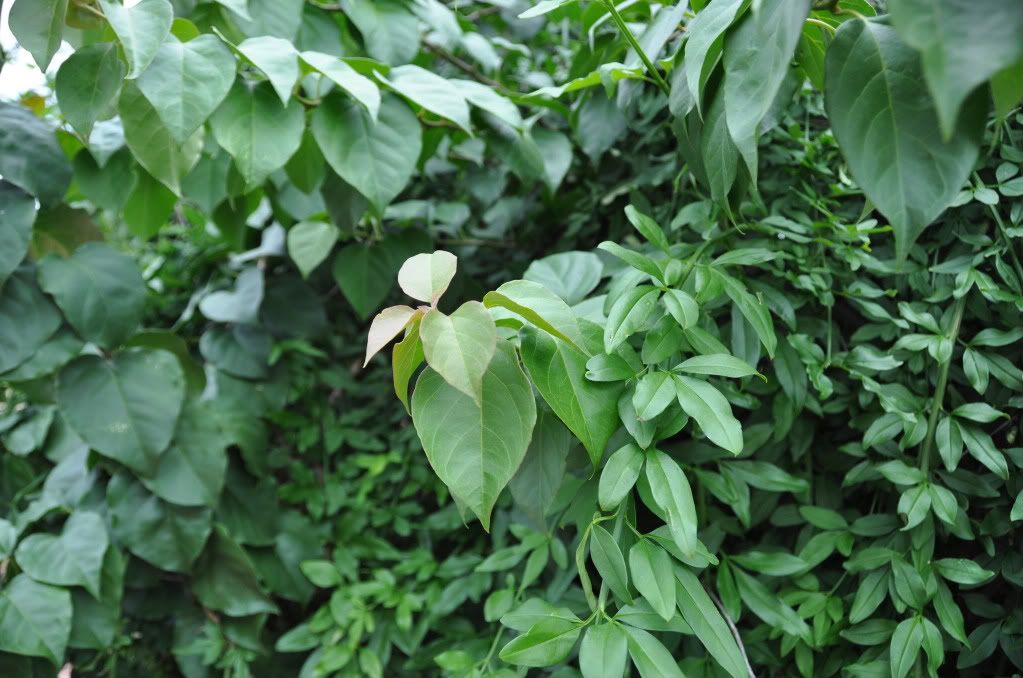
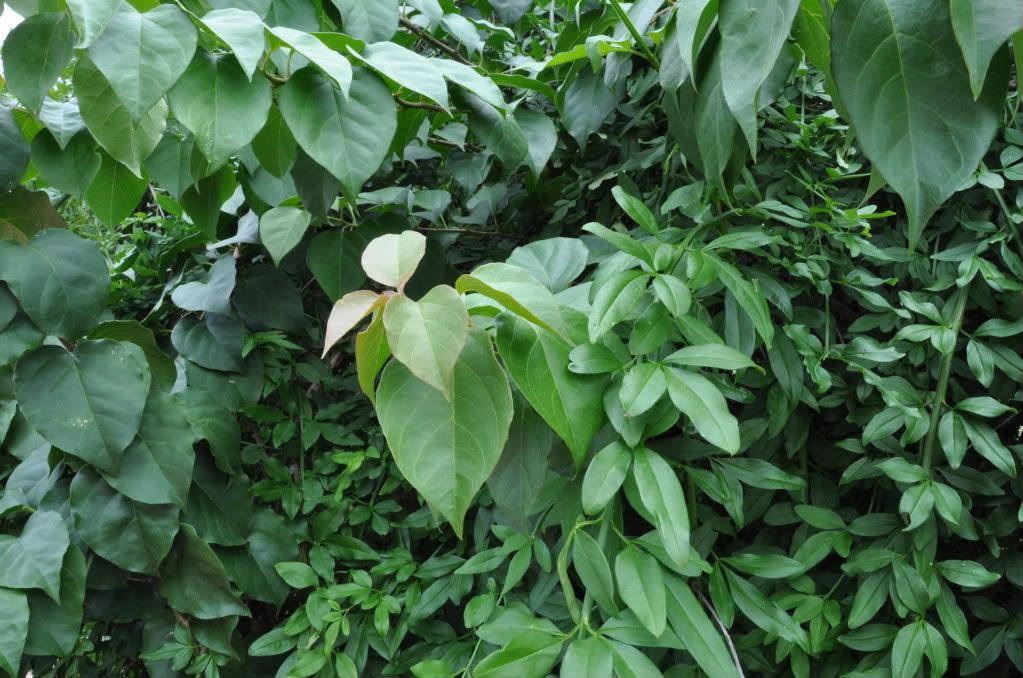
    THE CHALLENGE: We want you to go out and take two photos of the same subject. One at the largest aperture your lens will allow and one at the smallest. So take one photo at f4.5 (or larger - remember smaller F stop numbers are actually bigger apertures) and one at f22, of the same subject. Post both photos in this thread, with comments about what differences you notice between the two photos , what the effect of aperture had on the shutter speed, and how you could use this difference to make your future photography more creative.

    The full New To Photography Learning Centre is in the Ausphotography Library, under New To Photography

    Looking forward to seeing your two photos presented for the challenge and your discussions about what you have learnt from the challenge, and how changing the aperture setting can visually affect the resultant photos. Also remember to look at what changing the aperture does to the other camera settings. What happens to the shutter speed, and why does it happen
    Last edited by ricktas; 14-01-2011 at 9:33am.
    "It is one thing to make a picture of what a person looks like, it is another thing to make a portrait of who they are" - Paul Caponigro

    Constructive Critique of my photographs is always appreciated
    Nikon, etc!

    RICK
    My Photography

  2. #2
    Member
    Join Date
    17 Nov 2010
    Location
    central highlands
    Posts
    1,863
    Mentioned
    0 Post(s)
    Tagged
    0 Thread(s)


    I used my 18-200 vr lens
    first shot F3.5 18mm 1/250s ISO 200 (auto)
    sec shot F22 18mm 1/8s ISO 200(auto)
    The wider aperture F3.5 has a blurred background and the F22 is in focus. The shutter speed for the F22 was much slower.
    When you zoom in on the wider aperture to select a part,the background is blurred and the bit you selected stands out.
    Whe you zoom in with the F22 aperture the picture is still in focus with no blurring background. You can also take this picture from a lot further away right up to 200mm and still get focus with the F22 but the F3.5 only works at 18-20mm for me. Unless I am missing something. The F3.5 can be zoomed in later in the photo editing and you still get the blurred background.
    I fiddle with all the modes all the time and take the same shot if I can. Probably a slow learning process!! I really appreciate this opportunity to actually have someone explain why. These were just random shots before we headed off and so were in the middle of the day.
    Thanks Kathy
    Last edited by ricktas; 14-01-2011 at 10:35pm.

  3. #3
    Member Balance's Avatar
    Join Date
    17 Jan 2011
    Location
    Nowra
    Posts
    62
    Mentioned
    0 Post(s)
    Tagged
    0 Thread(s)

    Aperture Challenge 2011 - Chiilis

    My first shot was with a with an F number 36, and an exposure time of 18sec. Hence everything is clearly in focus (including the fence behind). I was taking these pictures in the shade at or near sunset, which is why I am assuming I could have such long exposure time (and obviously with a tripod).

    2011 Jan 15 097.jpg

    My second shot was with an F number of 5.6 and a exposure time of 1/2 seconds.

    2011 Jan 15 096.jpg

    It was exciting to see how aperture changed the depth of field. With the wide aperture setting on the subject is clearly in focus and the background is blurred. With the small aperture setting everything is in focus. One day I hope to understand the physics behind this (and for now I just hope I have explained the right way round).
    Last edited by Balance; 17-01-2011 at 9:04pm.

  4. #4
    Administrator
    Threadstarter
    ricktas's Avatar
    Join Date
    24 Jun 2007
    Location
    Hobart
    Posts
    16,846
    Mentioned
    12 Post(s)
    Tagged
    1 Thread(s)
    Good work guys. The reason you got such a long exposure relates purely to the aperture. At F36 the lens is 'closed down' so that only a tiny hole exists for the light to enter, thus to get enough light onto the sensor to get a correct exposure, the shutter needs to be open for a longer time.

  5. #5
    Member Balance's Avatar
    Join Date
    17 Jan 2011
    Location
    Nowra
    Posts
    62
    Mentioned
    0 Post(s)
    Tagged
    0 Thread(s)
    Thanks Rick, now you explain it that makes sense. When you are use to snapping in fully auto, having the camera take 18 sec to take the photo feels very weird - but in a fun way. Can't wait for the next challenge.

  6. #6
    Member Noisysprite's Avatar
    Join Date
    13 Nov 2010
    Location
    South West
    Posts
    74
    Mentioned
    0 Post(s)
    Tagged
    0 Thread(s)
    rainy day today so setup some random objects from around the house to complete this challenge. Unfortunately I was unable to get open tof 4.5 so settled with f5.6 for the first shot. Second was at the recommended f22.


    I notice that the circles in the timber are definetly less distinct in the f5.6 sot compared to the F22 one meaning that there is a shallower DOF. This will certainly be useful for shooting where the background is of less interest than the foreground - Portaits for example?

    I also note that as I was shooting under artifical light the effect of the brightness in the photos was also affected by the choice of aperture. Even thought the F22 is less open than the f5.6, the camera compensated by the amount of time the lens was opened. It is interesting to see that the f22 shot was actually brighter than the f5.6 shot. Since I work during the day, shooting often takes place late afternoon, the impact of aperture is important to take clear photos in waning light (as I'm finding out!).

    Thanks for the challenge Rick, putting what you read into proactice then trying to document your results is an interesting exercise.

  7. #7
    Administrator
    Threadstarter
    ricktas's Avatar
    Join Date
    24 Jun 2007
    Location
    Hobart
    Posts
    16,846
    Mentioned
    12 Post(s)
    Tagged
    1 Thread(s)
    Good work everyone. I hope this starts to lead you onto understanding how going from Auto to semi-auto lets you start to control the results from your cameras. Rather than the camera choosing the settings, you can get creative and have an impact on the results of your photos. You are on your way to understanding how to control a camera so that you control the creativity.

  8. #8
    Member
    Join Date
    10 Nov 2010
    Location
    Sydney
    Posts
    595
    Mentioned
    0 Post(s)
    Tagged
    0 Thread(s)
    Oh I did mine, just haven't uploaded yet. I was experimenting and it wasn't an overly nice image. Just the plants out the back.

    Thanks Rick- looking forward to the next challenge


    Sent from my iPhone using Tapatalk
    "I press buttons and hope for the best!"
    Check out my Flickr page


  9. #9
    Administrator
    Threadstarter
    ricktas's Avatar
    Join Date
    24 Jun 2007
    Location
    Hobart
    Posts
    16,846
    Mentioned
    12 Post(s)
    Tagged
    1 Thread(s)
    Quote Originally Posted by Danielle10 View Post
    Oh I did mine, just haven't uploaded yet. I was experimenting and it wasn't an overly nice image. Just the plants out the back.

    Thanks Rick- looking forward to the next challenge


    Sent from my iPhone using Tapatalk
    Just the plants out the back, is fine, remember this isn't about getting a competition entry, it is about learning and discovering how your camera works, with you in control!

  10. #10
    Member
    Join Date
    08 Oct 2010
    Location
    Greenwich
    Posts
    1,704
    Mentioned
    0 Post(s)
    Tagged
    0 Thread(s)
    This is an excellent excercise Rick, and is a trick I use often in product photography.
    It gets you to think about how you want the shot to come out, and to realise that the human eye is a such a magnificent lens, far better than any glass lens ever made, in that it can capture a huge depth of field at any time, which your camera can not.
    When you look at the subject you want to photograph, think about whether you want the background in focus, or if would look better a bit blurry, or even a lot blurry (excuse my poor English here).
    By using the widest aperutre you can (smallest number on your lens), you will only get the object in focus and anything behind it will be blurred quite a bit.
    By closing your lens down a bit, say mid-way on your aperture scale, you will get the object and some items behind it in focus, with the background blurred.
    Using the smallest opening will more or less, get everything in the shot to be clear and unblurred.

    Think about how you want the photo to come out, remembering that a camera does not see things in exactly the same way you do, and adjust your aperture accordingly.

    This is why when you see a professional at work, they will often think about the settings on his camera for a little while before he takes the photo - especially those older photographers who are used to using film cameras.

    You should all practice this.
    Set up your tripod in front of a nice flower for example, with some depth behind it which has some foliage or whatever behind it, then take a shot at the widest opening, then do a few more shots at various other openings until you do one at the narrowest opening of your lens, then plug your camera into your computer and look at the images side by side and see the difference to the DOF (depth of field).
    By understanding this you will be able to break free of your fears of using the manual settings on your camera and get you to think about what you are shooting and how you want it to come out.
    Let's face it, the only thing you can loose is some pixels!
    All my photos are taken with recycled pixels.
    Knowledge is knowing that a tomato is a fruit.
    Wisdom, is knowing not to serve it in a fruit salad.

  11. #11
    Member
    Join Date
    06 May 2010
    Location
    Newcastle
    Posts
    290
    Mentioned
    0 Post(s)
    Tagged
    0 Thread(s)
    A mode - f16 at 1/6 sec gives sharp background through fence, whereas f5 at 1/60s gives blur background through fence.


    Nikon D90, Nikkor 50mm, Nikon 18 - 105mm

  12. #12
    Member PaulJ's Avatar
    Join Date
    20 Jan 2011
    Location
    Brunswick West
    Posts
    11
    Mentioned
    0 Post(s)
    Tagged
    0 Thread(s)
    I used M Mode to control ISO and aperture and adjusted shutter speed to give indicated correct exposure for both shots.

    Lens used was a Pentax-F 35-70mm f/3.5-4.5 zoom set at 1:4 "macro" or more accurately close up.

    f/4.5 ISO100 1/160 sec
    Aperture22_web.jpg

    f/22 ISO100 1/8 sec
    Aperture45_web.jpg

    f/4.5 gives a very narrow DOF - only a very small portion of the flower is in focus.
    f/22 gives much wider DOF - it's possible to make out surface texture on the bars behind the flowers and the entire flower is sharp. The f/22 shot seems to be a bit darker overall than the f/4.5 and looks like it needs an extra stop of exposure.

    Paul

  13. #13
    Member
    Join Date
    06 May 2010
    Location
    Newcastle
    Posts
    290
    Mentioned
    0 Post(s)
    Tagged
    0 Thread(s)
    Quote Originally Posted by ricktas View Post
    Good work guys. The reason you got such a long exposure relates purely to the aperture. At F36 the lens is 'closed down' so that only a tiny hole exists for the light to enter, thus to get enough light onto the sensor to get a correct exposure, the shutter needs to be open for a longer time.
    Thanks for this I have been struggling to understand this concept. I think I need to take lots of shots in various conditions to truly 'get it', eg sunrises etc

  14. #14
    Member arj's Avatar
    Join Date
    22 Jan 2011
    Location
    sydney
    Posts
    5
    Mentioned
    0 Post(s)
    Tagged
    0 Thread(s)
    IMG_2285_.jpgIMG_2286_.jpg

    Hi everyone,

    Here are my two pics, taken in the back garden close to dusk.

    The first is at f/1.8, while the other was at f/22.

    There are the obvious differences in depth of field - the leaves are blurry in the one with the larger aperture (f1.8), with those at the very bottom of the image the blurriest.

    What I noticed most was how noticeably slower the shutter speed was at f/22. It was sufficiently slower for me to actually notice the difference in my hand. I checked the data afterwards, and at f/1.8 the shutter was 1/60 and at at f.22 it was 1/4. Looking at the f/22 image closely, i clearly wasnt able to hold the camera still enough for that longer shutter speed, and the result is its not sharp at all. that tells me that in poorer light, if i want a smaller aperture in order to get greater DOF, i'll probably need to use a tripod (might have to chuff over to the gear forums now for recommendations!)

    Lastly ... looking at the data again, I was interested to note that on the f/22 shot, the ISO used by the camera was 3200, compared to 400 at f/1.8. I imagine thats again the result of the camera needing higher ISO to try and make the most of the poor light. thats my guess but perhaps someone with more experience can confirm/explain?
    Cheers,
    Arj

    Canon 550D with EF-S 18-55mm (Kit lens) and EF 50mm F1.8 II

    *Keen for any and all constructive criticism*

  15. #15
    Member itybitypieces's Avatar
    Join Date
    03 Jan 2011
    Location
    newcastle
    Posts
    61
    Mentioned
    0 Post(s)
    Tagged
    0 Thread(s)
    this shot i used the highest aperature i could,being f5.6

    f5.6 by 31e63ff63eeff23824220cd93dda29c2, on Flickr

    the next shot the aperture was at f22

    f22 by 31e63ff63eeff23824220cd93dda29c2, on Flickr

    the first shot i took i notice that the amount of area that is in focus is smaller then the amount of in focus area of the second shot .
    the shutter speed of the second shot was noticeably longer which was probably compensating for the smaller aperture to be able to get a correct exposure.

  16. #16
    Member arj's Avatar
    Join Date
    22 Jan 2011
    Location
    sydney
    Posts
    5
    Mentioned
    0 Post(s)
    Tagged
    0 Thread(s)
    nice shots itybitypieces.

    the second shot (f22) looks a lot "whiter" and brighter to me than the first. eg. look at the colours of the eggs. Can someone explain why?

  17. #17
    Member itybitypieces's Avatar
    Join Date
    03 Jan 2011
    Location
    newcastle
    Posts
    61
    Mentioned
    0 Post(s)
    Tagged
    0 Thread(s)
    i went back and had a look at the exif data and thought maybe the iso had changed ,but then i remembered that i locked it to 200.the f5.6 shot shutter speed was 1/10 where as the shutter for the f22 was 1 second.
    only thing i thought it was,was available light from the window on the right side had changed from the cloud cover .

  18. #18
    Administrator
    Threadstarter
    ricktas's Avatar
    Join Date
    24 Jun 2007
    Location
    Hobart
    Posts
    16,846
    Mentioned
    12 Post(s)
    Tagged
    1 Thread(s)
    ARJ, you probably have your camera set to auto-ISO, this means the camera will adjust the ISO as well. For this exercise (and in general) turn Auto-ISO off, as you will then see the results of changing apertures more effectively. I suggest an ISO of 100 as a good starting place for general photography.

  19. #19
    Member itybitypieces's Avatar
    Join Date
    03 Jan 2011
    Location
    newcastle
    Posts
    61
    Mentioned
    0 Post(s)
    Tagged
    0 Thread(s)
    ricktas. had already put iso in 200 iso as i only have a k100d super and im pretty sure thats its lowest.auto was off for this .

  20. #20
    Administrator
    Threadstarter
    ricktas's Avatar
    Join Date
    24 Jun 2007
    Location
    Hobart
    Posts
    16,846
    Mentioned
    12 Post(s)
    Tagged
    1 Thread(s)
    Quote Originally Posted by itybitypieces View Post
    ricktas. had already put iso in 200 iso as i only have a k100d super and im pretty sure thats its lowest.auto was off for this .
    Sorry I was replying to the member above yours (post), who's username is Arj!

Page 1 of 3 123 LastLast

Posting Permissions

  • You may not post new threads
  • You may not post replies
  • You may not post attachments
  • You may not edit your posts
  •