


 Thanks useful information:
All,
It's time for another tutorial from me.
This lengthy tutorial covers the making and post-processing of a creative, night light painting image. I posted this on my blog, but I've reproduced it here.
I hope you enjoy it.
In November of 2009 I attended the first of Brent Pearson's light painting workshops, which consisted of an afternoon of theory, followed by an evening of creative light painting landscape photography.
Fire or Flood? was my image of the night, created as a result of a collaborative effort at the capture phase. Here it is:

In this article I will explain how I created this image, from the capture phase to the post-processing.
Capture Phase
Firstly, this image is a composite of four images of identical exposure, selectively blended together in post-production to result in what you see. More on the post-processing later.
The lighting effects were all produced in camera.
Here is a view of the four exposures I used to create the final image:
Each image was captured with a Canon EOS 5D camera and Canon EF 16-35mm f/2.8L II USM lens at 16mm.
The camera was mounted on a tripod, and each exposure was triggered with my Canon TC-80N3 remote shutter release.
For each of the four images, I'll now explain:
- the exposure settings;
- how the lighting was created; and
- how the image would be used in post-processing.
First Image
The first image (top left) was exposed for 13 seconds at f/8 and ISO 200. The purpose of this white-light image is for a base exposure. The idea is to paint the entire scene with light, and use it later in post-processing for texture details. While this is considered the base image, when I processed these images, I didn't use it as my base layer, but the image turned out to be quite important. (More on that later.) The light source was a 48W fluorescent light globe powered by 240V AC in a belt pack I was wearing. The 240V AC was supplied by a 350W inverter taking a DC feed from a 12V rechargeable battery.
Second Image
The second image (bottom left) was exposed for 60 seconds at f/5.6 and ISO 200. This was to be one of the creative lighting exposures to be used for the dramatic lighting in the final image. There are three interesting elements in this image: the fire, the night sky with blurred cloud movement, and the warm glow on the surrounding concrete as a result of the fire. I created the fire by going into the room on the left of the corridor and spraying a can of deodorant into a cigarette lighter for two or three seconds.
Third Image
The third image (top right) is another variation on the second image. It was also exposed for 60 seconds at f/5.6 and ISO 200. One of the other participants in the shoot (there were four of us in the group) took the can of deodorant and cigarette lighter into another room on the right, and sprayed flames all throughout the doorway during the minute-long exposure.
Fourth Image
The fourth and final image (bottom right) was quite fun to create, and very dramatic on camera. Like the second and third images, it was exposed for 60 seconds at f/5.6 and ISO 200. The funky blue lighting, which resembles smoke, was created by myself and another member of the group using a length of electro-luminescent (EL) wire. This is a fibre optic-like neon cable which emits a rich blue light. When it is wiggled around, resembling the movement of a slithering snake, it produces a smokey, misty effect during a long exposure. The two of us wiggled the EL wire near to the ground from the front of the scene to the top of the stairs in the distance.
More About the Images
I actually captured many more exposures using the fluorescent light, a length of red EL wire, and camera flashes with pink gels attached. I manually fired these inside the windows on the left to produce a rich pink glow from behind the bars. However, I didn't use any of those other exposures for the final image.
What's important to note is that during some of the exposures, I was either in the scene and visible to the camera, or in the scene but hidden from the camera's view.
For the base exposure, I stood behind or beside my camera when I painted the scene with light. In this image the bright light source was not visible to the camera. The fluorescent light in an otherwise pitch-dark scene is very bright, hence the shorter exposure time and narrower f/stop. The exposure was around one eighth of the other three exposures.
For the fire shots, myself and another photographer were hidden inside the rooms along the moody corridor.
For the smokey shot with the EL wire, another photographer and myself were walking along the corridor in plain view of the camera. We did not appear in the image because it was a long exposure and we were constantly moving.
The fire and EL wire images are examples of images where the light source is visible to the camera, as is the effect. In the base exposure, only the effect of the light source, rather than the light source itself, is visible.
And that brings me to the end of the capture phase.
The capture phase was all about creatively illuminating a scene with a variety of lighting effects during multiple long exposures.
Now, onto the post-processing.
Post-Processing
I loaded my four images into Adobe Camera Raw for raw conversion (where I also applied white balance, clarity and saturation adjustments) and then dropped them into Photoshop.
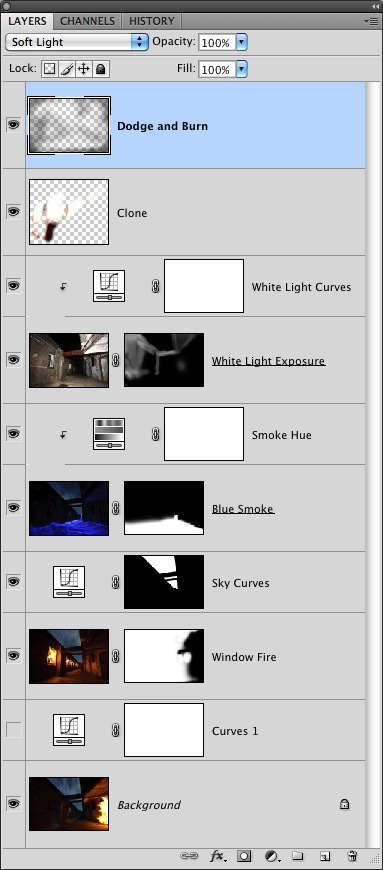
Let's first look at my layer stack, and then I'll explain the different layers.
Here is my Photoshop layer stack:
First Layer - Fire in the Doorway
I used the third image (fire on the right) as my bottom layer. In hindsight, looking at how my post-processing has developed since then, and considering that I only used a small portion of that frame, it didn't make sense to use that as the bottom layer, but at the time it probably did make sense.
Second Layer - Lightening Curve
As can be seen above, the second layer is a curves adjustment layer whose visibility is switched off (no eye icon to the left). That layer was a lightening curve to brighten the flames on the left and the surrounding walls illuminated by the flames, but I decided it was too much, having lost details in the flames, so I didn't use it.
Third Layer - Fire in the Hall
The third layer is the second image, containing the fire on the left of the scene. I used almost the entire image, but masked away the flames on the right, which I preserved from the bottom layer. See why the bottom layer doesn't make sense in that capacity?
At this point I had a composite of the two exposures containing the flames.
Fourth Layer - Punching the Sky
The fourth layer is a curves adjustment layer, which I used to add punch to the sky. I masked out everything except the sky and applied a reasonably dramatic S-curve to boost the saturation and contrast in the sky and clouds.
Fifth Layer - Smokin'
The fifth layer is my blue smoke exposure. I added a layer mask, inverted it, and brushed in only the blue "smoke" from that exposure.
At this point my composite image consisted of the two fire images blended with the blue smoke image. It was starting to look exciting, but there was more work to be done.
Sixth Layer - Got the Blues
The problem I had at this point was that the rich blue in the "smoke" was a completely different blue to the rich blue in the sky. Two different blues, which are both appealing, yet distinctly different, causes what I consider to be a visual clash.
To get around this, I added a hue/saturation adjustment layer and created a clipping mask to bind the layer mask to the previous layer, in which only the smoke was visible. This eliminated the need to manually create another mask, as I'd already done the work previously.
I adjusted the hue setting to -17 to bring the blue more in line with the blue in the sky.
Seventh Layer - White Light
Remember the white-light base exposure I made with the 48W fluorescent light? Here's where I made use of it.
Up to this point, I had a blend of three exposures: two containing the fire and warm glow on the surrounding concrete, and one containing the blue "smoke".
The problem was that there was a very dark, detail-less mass of black on the wall near the far left edge of the frame. That wall occupies most of the left third of the frame, so it was a significant amount of darkness.
There was also considerable darkness in the concrete at the top right of the frame, as well as the rusty beam in the centre of the image.
Using the white-light exposure and a layer mask, I brushed in the rich, gritty textures I had captured in that base exposure, which achieved two things: firstly, it eliminated the large expanses of black throughout the image, and secondly, it provided great texture detail which shows the grittiness and character of Middle Head Fort.
Eighth Layer - White Curve
The next adjustment I made was the addition of a curves adjustment layer to tweak the white light I had brushed into my image in the previous layer. I again made use of the clipping mask feature to re-use the layer mask I had created in layer seven, so as to apply the adjustments onto the concrete and beam where I had brushed in my white light.
I applied a gentle, semi-straight S-curve to marginally darken the white light textures and pop the contrast.
Ninth Layer - A Handy Removal
My ninth layer was somewhat necessary, as my hand (and the deodorant spray can) was captured when I was creating flames in the left-most window.
I added a new layer and then made use of the clone tool to remove (as best I could) my hand and the spray can. I did this in a separate layer so as to maintain my non-destructive processing workflow.
I think I did a bad job of the cloning, but it wasn't an easy task, and while it's certainly not perfect to my eyes (and probably wouldn't be noticed unless you looked hard or knew it was there), it looks less obvious than it would have done had I not performed the cloning.
Tenth and Final Layer - Dodge and Burn
The final layer of this image is another plain layer, whose blend mode I changed to soft light. I then used the white and black brush with 10-20% opacity to dodge and burn respectively. I lifted the brightness of some areas and darkened others.
Fait Accompli
This brings me to the end of the making of Fire or Flood?. I hope you have enjoyed learning about what went into the production at this image, both behind (and in front!) of the camera, and behind the computer screen.


 Reply With Quote
 Add To Bookmarks

 Threadstarter


