User Tag List

Thanks useful information Thanks useful information:  33
Page 1 of 4 1234 LastLast
Results 1 to 20 of 61

Thread: Landscape Workflow part 1.

  1. #1
    Shore Crawler Dylan & Marianne's Avatar
    Join Date
    21 Mar 2009
    Location
    Adelaide
    Posts
    9,333
    Mentioned
    1 Post(s)
    Tagged
    0 Thread(s)

    Landscape Workflow part 1.

    This is an attempt to write a tutorial on how I go about editing a typical landscape photo.
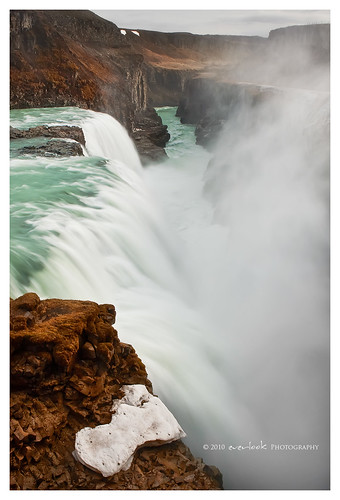
    In this case, Gullfoss from iceland. It's not about taking the image -rather trying to bring out the most of a landscape image.
    The final image here:


    1. Lightroom steps:
    - I import RAW files into lightroom and correct a few things in preference to using photoshop
    - Cropping is much easier for me in lightroom
    - White balance correction is best done in lightroom
    - Recovery , exposure and fill light are all done with sliders and is easier though with less control than in photoshop.
    - dust bunny removal is also easy in lightroom.

    The original raw:


    The original raw with lightroom edits:
    - particularly exposure (see the histogram)
    - minor colour changes


    2. After exporting the image as a 16bit TIFF at 300 DPI with no sharpening, I open in Photoshop and duplicate a layer (so I never lose the original TIFF as a fallback) - On this layer I usually do a minor shadow highlight correction if the image needs it. In this case, the rocks were a tad dark, there weren't any blown highlights so highlights needed no adjustment.
    I find that adjusting the slider too much usually results in the dreaded banding of colour particularly when there is blank sky.


    3. Next, I usually create 2 new layers that will affect the whole image: one for vibrance and one for levels. (sliders adjusted to varying degrees depending on image)


    4. Next, I work on the colour of the images using adjustment layers for different colours. The steps to creating each of these layers are:
    - Select a specific colour using the dropdown menu as in this image: In this example, I wanted to boost aquas of the water.


    - The icon for adjustment layers can either be navigated from the top dropdown bars or from the bottom right of screen with the layers panel.
    - I chose a colour balance adjustment layer for the aquas
    - a levels layer for the whites in the image to be a little brighter
    - a colour balance layer for the browns in the image.
    - the end result is a bunch of adjustment layers which can all be turned on and off and adjusted to varying degrees with the opacity slider.
    - hopefully the image is looking a little better than originally at this stage!


    5. Next up : non destructive dodge and burn!
    - Create a new layer in overlay mode, fill it with 50% neutral colour as per this image


    -Next, select the brush tool (B) and set the brush to very small increments and with a soft edge : typically I use 10% opacity and fill, 0% hardness for this layer.
    - Then , select the colour you with to brush with from the palette on the toolbar.
    - White for dodging, black for burning
    - Sometimes to accentuate a colour, I might click on the palette, use the dropper on a colour on the image and use that colour as my brushing tool.
    - The advantage of using this technique to dodge and burn is that you're not destroying anything in the image. And , the layer itself takes up less memory than another merged layer of the image ( I should probably upgrade my pc RAM!)


    6. Coming to the end : Sharpening
    -I've come to favour using high pass sharpening but all of the other methods have their pros and cons over this one.
    - To do this, duplicate your background layer, select filter>other>highpass
    - I don't usually go over 2 pixels as it may result in over sharpening
    - You'll end up with a gray mess but in this state, you can see the attempted areas photoshop is trying to sharpen.
    - You can then change the blend mode to vivid light -overlay or soft light depending on how harsh you want the sharpening to appear. I usually stay with overlay or soft light.
    - There are some areas that you don't need to sharpen - like pure blue skies , smooth water etc. high pass will sometimes introduce noise into these areas, so I create a layer mask and remove these parts from the sharpening layer .
    - hopefully the images below help explain!


    A preview of what is being sharpened


    Masking out what doesn't need to be sharpened (roughly in red)


    7. I've actually done more to this image but usually I would end here by :
    - convert file to 8 bit mode
    - save as TIFF or PSD with all the layers in tact
    - then flatten away and the rest of it

    -resizing for web
    -repeat sharpen (Unsharp mask)
    -border, watermark
    - upload!

    I hope that was helpful to someone!
    Just remember, this is the workflow that I've developed and have found works best for me.
    There are so many different paths you can get to the same result and each of them has their utility for different images.
    Last edited by Lani; 10-06-2010 at 4:13pm. Reason: Added Dylan's corrections.
    Call me Dylan! www.everlookphotography.com | www.everlookphotography.wordpress.com | www.flickr.com/photos/dmtoh
    Canon EOS R5, : 16-35mm F4 L, 70-200F4 canon L, 24-70mm 2.8IIcanon L, Sirui tripod + K20D ballhead + RRS ballhead. |Sony A7r2 + Laowa 12mm F2.8, Nisi 15mm F4
    Various NiSi systems : Currently using switch filter and predominantly 6 stop ND, 10 stop ND, 3 stop medium GND
    Post : Adobe lightroom classic CC : Photoshop CC. Various actions for processing and web export

  2. #2
    Member kaiser's Avatar
    Join Date
    18 Dec 2008
    Location
    Laidley
    Posts
    898
    Mentioned
    0 Post(s)
    Tagged
    0 Thread(s)
    Thanks Dylan for taking the time to write this tutorial. Much appreciated!
    Nikon D750
    Olympus m/43
    Rolleicord IV


    My SmugMug

  3. #3
    Account Closed Wayne's Avatar
    Join Date
    07 Dec 2009
    Location
    Eastside
    Posts
    1,633
    Mentioned
    0 Post(s)
    Tagged
    0 Thread(s)
    For someone like me with almost no PP skills, you have just opened a few doors that will hopefully help me in future. Thanks for taking the time to do this and share.

  4. #4
    Member
    Join Date
    12 Feb 2008
    Location
    Brisbane
    Posts
    7,830
    Mentioned
    0 Post(s)
    Tagged
    0 Thread(s)
    Very interesting, and very useful. Way past what I've ever done also
    Darren
    Gear : Nikon Goodness
    Website : http://www.peakactionimages.com
    Please support Precious Hearts
    Constructive Critique of my images always appreciated

  5. #5
    Shore Crawler
    Threadstarter
    Dylan & Marianne's Avatar
    Join Date
    21 Mar 2009
    Location
    Adelaide
    Posts
    9,333
    Mentioned
    1 Post(s)
    Tagged
    0 Thread(s)
    No worries guys - I forgot to mention that these steps don't really take as long as it seems - on the right side of the screen shots there's a bunch of actions that make each layer a 1 click affair !

  6. #6
    Member
    Join Date
    22 Apr 2009
    Location
    VIC
    Posts
    95
    Mentioned
    0 Post(s)
    Tagged
    0 Thread(s)
    Good on you for writing this tutorial, it's very informative. For someone like me with no PP skills it's great. Thanks!

  7. #7
    Member SnowA's Avatar
    Join Date
    17 Apr 2010
    Location
    Sydney
    Posts
    319
    Mentioned
    0 Post(s)
    Tagged
    0 Thread(s)
    Another huge thank you! While I don't use LR, the steps and ideas are very helpful.
    SA

    Canon 7D | Canon 30D | EF-S 17-55mm f/2.8 | EF 50mm f/1.4 | EF 70-200mm f/2.8L (non-IS) | 580EX II

  8. #8
    Account Closed Travelm8's Avatar
    Join Date
    05 Apr 2010
    Location
    Bunbury
    Posts
    52
    Mentioned
    0 Post(s)
    Tagged
    0 Thread(s)
    I really appreciate the tutorial, the steps you have described will help me enormously with some of my post editing, look forward to tutorial #2.
    must go have to open up lightroom and play..

    Cheers
    John

  9. #9
    Shore Crawler
    Threadstarter
    Dylan & Marianne's Avatar
    Join Date
    21 Mar 2009
    Location
    Adelaide
    Posts
    9,333
    Mentioned
    1 Post(s)
    Tagged
    0 Thread(s)
    Thanks guys - I just noticed a couple of typos/omissions

    Step 2 : is open in photoshop not lightroom !
    Last step I missed out a couple of things too
    - convert file to 8 bit mode
    - save as TIFF or PSD with all the layers in tact
    - then flatten away and the rest of it

  10. #10
    Member
    Join Date
    10 Feb 2009
    Location
    Bendigo
    Posts
    253
    Mentioned
    0 Post(s)
    Tagged
    0 Thread(s)
    From the Landscape Guru himself! Thanks for sharing how you perform PP.

  11. #11
    Member
    Join Date
    12 Feb 2008
    Location
    Brisbane
    Posts
    7,830
    Mentioned
    0 Post(s)
    Tagged
    0 Thread(s)
    what do you use for the framing Dylan ?

  12. #12
    Shore Crawler
    Threadstarter
    Dylan & Marianne's Avatar
    Join Date
    21 Mar 2009
    Location
    Adelaide
    Posts
    9,333
    Mentioned
    1 Post(s)
    Tagged
    0 Thread(s)
    Quote Originally Posted by kiwi View Post
    what do you use for the framing Dylan ?

    Currently :
    Canvas size increase 4% width , 6% height increase with white edge for 3X2 aspect
    or adjust the proportions according to the dimensions eg: 2.7% width 4.8% height for a 16X9 image.


    I've got a preset action for the drop shadow one which requires layers(which I've stopped using because a lot of people comment negatively on that itself and not the image presented)

  13. #13
    Member Lincolnbl's Avatar
    Join Date
    28 Apr 2009
    Location
    **Suburb/Town Required**
    Posts
    19
    Mentioned
    0 Post(s)
    Tagged
    0 Thread(s)
    Really appreciate people going to the trouble of writing these. Certainly an area I would like to improve on and this is a great step-by-step insight. Thanks!

  14. #14
    Member
    Join Date
    26 May 2008
    Location
    Launceston
    Posts
    2,011
    Mentioned
    0 Post(s)
    Tagged
    0 Thread(s)
    Quote Originally Posted by dtoh View Post
    Thanks guys - I just noticed a couple of typos/omissions

    Step 2 : is open in photoshop not lightroom !
    Last step I missed out a couple of things too
    - convert file to 8 bit mode
    - save as TIFF or PSD with all the layers in tact
    - then flatten away and the rest of it
    Hey Dylan, great thread.
    I edited your original post to reflect the above....hopefully....let me know if it doesn't.
    Cheers, Lani.
    Bodies: Nikon D700, D300 Primes: Nikon 50mm 1.4, 85mm 1.4G, 105mm VR 2.8, 300mm f4. Zooms: Nikon 14-24 2.8, 24-70 2.8, 70-200VR II 2.8, Sigma 10-20mm Processing: Photoshop CS5 extended, LR 3.2.


  15. #15
    Shore Crawler
    Threadstarter
    Dylan & Marianne's Avatar
    Join Date
    21 Mar 2009
    Location
    Adelaide
    Posts
    9,333
    Mentioned
    1 Post(s)
    Tagged
    0 Thread(s)
    o thanks lani!

  16. #16
    Account Closed
    Join Date
    25 Oct 2009
    Location
    Melbourne
    Posts
    59
    Mentioned
    0 Post(s)
    Tagged
    0 Thread(s)
    Just wondering why you convert to 8-bit before flattening and saving. Seems to defeat the purpose of working in 16-bit from the start as your adjustment layers will now only be working on the 8-bit data causing minor posterisation (may or may not be noticeable in the image depending on how far you go with adjustments).

  17. #17
    Member lonnie's Avatar
    Join Date
    10 Jun 2010
    Location
    ACT
    Posts
    4
    Mentioned
    0 Post(s)
    Tagged
    0 Thread(s)
    Bookmarking this so I can give it a go later. Thanks!
    lonnie
    Canon EOS 30D, 35-80mm, 10-22mm

  18. #18
    Ausphotography Regular
    Join Date
    03 Dec 2009
    Location
    Brisbane
    Posts
    1,930
    Mentioned
    1 Post(s)
    Tagged
    0 Thread(s)
    Thanks Dylan. I'm very much looking forward to Part 2!

    Step 5, creating the dodge/burn layer, do you have to hold down alt when clicking on the new layer icon?
    Craig

  19. #19
    Member
    Join Date
    25 Jan 2010
    Location
    Toodyay
    Posts
    75
    Mentioned
    0 Post(s)
    Tagged
    0 Thread(s)
    Many thanks will put in my keep box
    Wayne

    CC always welcome.

  20. #20
    Shore Crawler
    Threadstarter
    Dylan & Marianne's Avatar
    Join Date
    21 Mar 2009
    Location
    Adelaide
    Posts
    9,333
    Mentioned
    1 Post(s)
    Tagged
    0 Thread(s)
    Quote Originally Posted by JazzXP View Post
    Just wondering why you convert to 8-bit before flattening and saving. Seems to defeat the purpose of working in 16-bit from the start as your adjustment layers will now only be working on the 8-bit data causing minor posterisation (may or may not be noticeable in the image depending on how far you go with adjustments).
    firstly for space reasons - with all of those layers
    you're right though - 16 bit would allow more leeway but secondly, because the printing people I use (and am happy with) only print 8 bit files so I'd like to know if there is any artifacts in 8 bit before I end up with a messy 20X30
    I guess really, I should be working in 8 bit to start off with but anecdotally, I've found that that leads to more posterisation during processing as opposed to converting at the end - no hard info to back that statement up though.

    Step 5, creating the dodge/burn layer, do you have to hold down alt when clicking on the new layer icon?
    yar that's right craig - I've been using the action so long I've forgotten about the alt part of it - thanks for pointing it out!
    Last edited by Dylan & Marianne; 10-06-2010 at 10:27pm.

Page 1 of 4 1234 LastLast

Posting Permissions

  • You may not post new threads
  • You may not post replies
  • You may not post attachments
  • You may not edit your posts
  •