User Tag List

Thanks useful information Thanks useful information:  13
Page 1 of 2 12 LastLast
Results 1 to 20 of 23

Thread: How do i make my photographs pop

  1. #1
    Member firefly's Avatar
    Join Date
    16 Jan 2009
    Location
    Central Coast
    Posts
    16
    Mentioned
    0 Post(s)
    Tagged
    0 Thread(s)

    How do i make my photographs pop

    I am after some tips to help me get my images to pop a little more. I feel as if they are lacking something when i look at some of the other work getting around out there both on this forum and outside. I know I probbly should nto compare myself to those who have several years more expirence than myself but i am always looking to develop myself.

    It could be something little that i have never thought of before or something old that my pregnant brain has tossed out to allow for more information. what ever it is any form of helpwould be great.

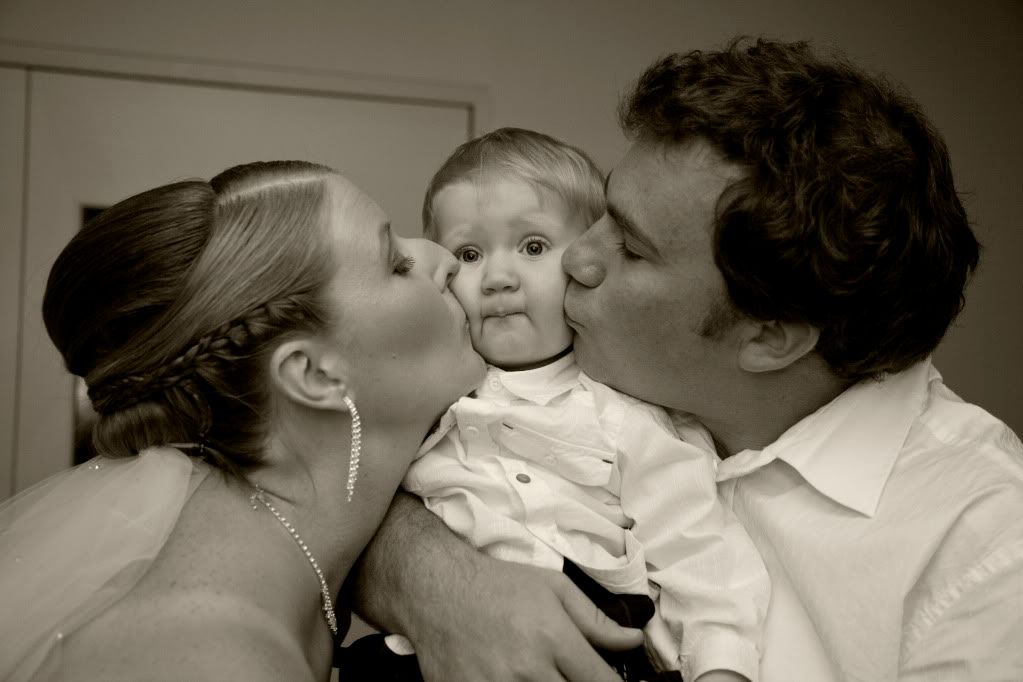
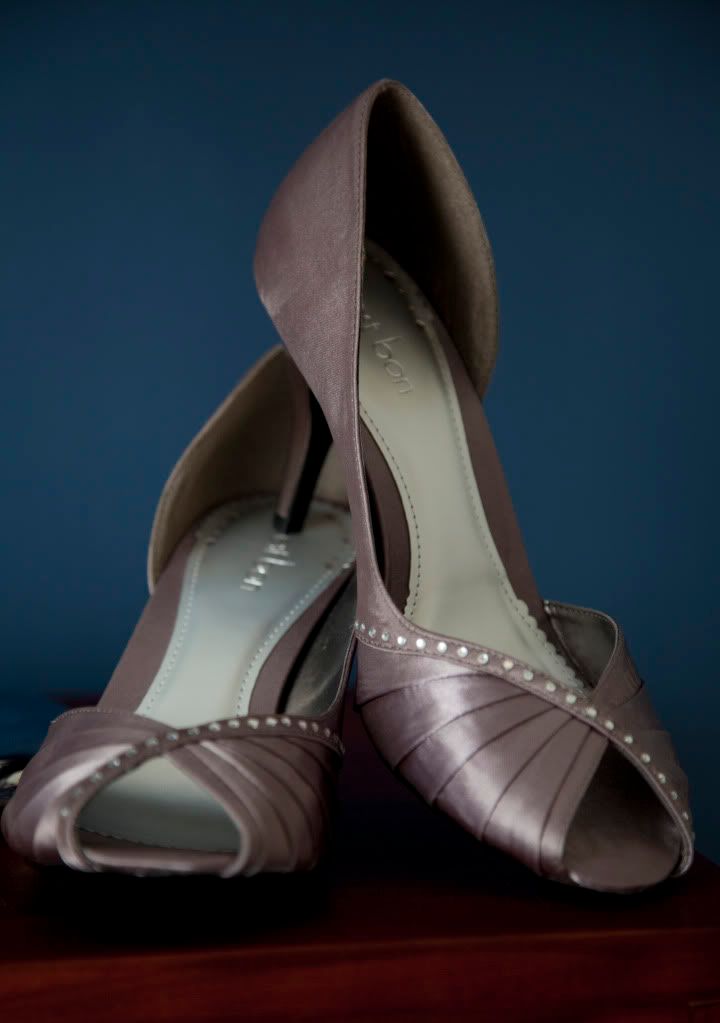
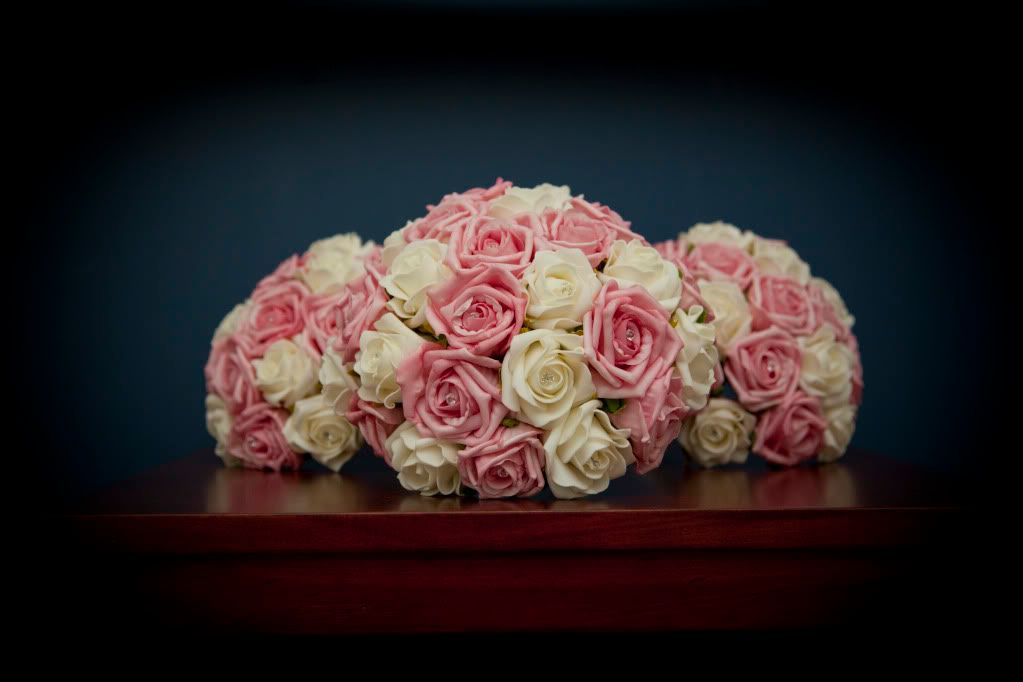
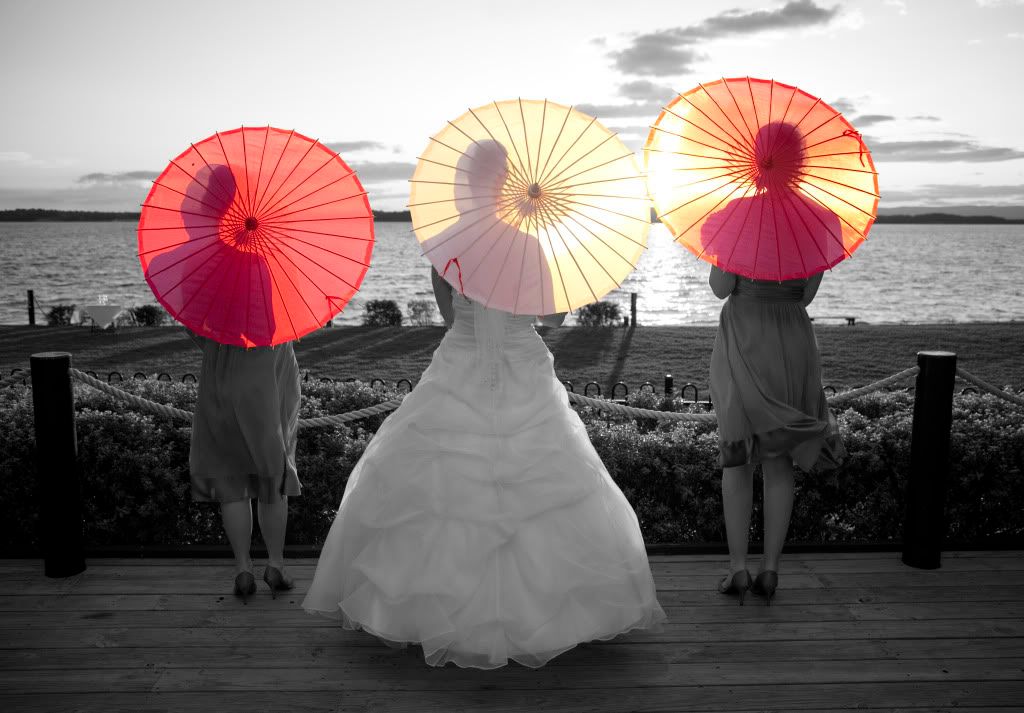
    Below are just a few images I took at a firends wedding


  2. #2
    Ausphotography Regular
    Join Date
    27 Feb 2008
    Location
    Brisbane
    Posts
    653
    Mentioned
    0 Post(s)
    Tagged
    0 Thread(s)
    Hi Firefly

    I think a lot just has to do with practise and experience - keep taking pictures, remember how you composed the image and what settings you used, and check afterwards what works and what doesn't. Also post images for comment on AP and take onboard the experience of other members. Its a long and winding road, can't expect massive strides overnight. Consider re-examining your own past images annually - you might be surprised at what steps forward you have made.

    Also, I think there is a lot to be gained through judicious post-processing of images, like balance adjustment, sharpening and saturation control. You obviously do some of this already, but learning when / how much to do is an art in itself.

    Looking at the specific images you posted, my thoughts would be:

    #1 The focus seems to be on the back of the shoe, making the front appear soft. I think focus should either be on the front of the shoe or the entire shoe. By using such a wide aperture (f/4), you've ended up with very narrow depth of field. Maybe f/10 with focus on the little jewelly things at the front would be my suggestion. The lighting is also a bit dull and dark, and your image looks 1 stop underexposed. Ultimately its all about the quality of light... Maybe take the same picture with the shoes sat on a table next to a window with natural sunlight diffused through white curtains (or a white sheet)?

    #2 I like the image and composition, but the exposure has been set for the sun rather than the couple, hence they've come out dark. If you'd done the opposite (ie expose for the couple), then the sky and sun would probably have been blow out. I would have considered taking several bracketed pictures in quick succession (with camera on tripod), and then in photoshop merging one image exposed correctly for the sun and one exposed for the couple. Alternatively, you could have used some 'fill-in flash' to light up the couple.

    #3 Not the most interesting of subjects! (but a must at a wedding, I guess!). Not sure why you are using ISO 400? I'm presuming you're using a tripod for this shot, so I would have used ISO100 for maximum image quality and again used a higher f/stop for greater sharpness (most lenses are best around f/5.6 to f/8). This would have resulted in a much lower shutter speed, but that's fine when using a tripod to capture a static subject such as this one.

    #4 I love this image! The only thing I would have changed is to ask the girl on the right to lower her umbrella a little, so that the bride's umbrella is the highest, with her two bridesmaid's umbreallas a little lower. But excellent image as it stands, with lots of POP in my opinion!

    #5 Excellent candid! Perhaps clone out the door frame (?) in the background, as its distracting. Also the top right corner is dark whilst the left isn't - I would make the vignetting symmetrical.

    Looking back, I notice that nearly all your shots use the same ISO speed, shutter speed and aperture... presumably as you've used a flash throughout? Aside from not using a flash unless you really need to, I really think you need to tailor the exposure settings for each image, in order to have full control of the output. I think you might benefit from a book such as Bryan Peterson's "Understanding Exposure" - link here. Bryan is very good at explaining what exposure settings to use to achieve the creative effect you're looking for.
    Last edited by Tricky; 09-10-2009 at 5:05pm.
    Richard
    Canon 5D4 & 7D2 | 11-24 f/4 L | 24-105 f/4 L | 100-400 L II | 85 f/1.2 L | 35 f/1.4 L II | 100 f/2.8 L macro | MP-E 65 f/2.8 macro | 1.4x | 580EX2 | MT-24 Twin Lite | Manfrotto


  3. #3
    Member
    Join Date
    06 Jul 2009
    Location
    Brisbane
    Posts
    420
    Mentioned
    0 Post(s)
    Tagged
    0 Thread(s)
    I'm sure Firefly is not the only one who will benefit from such in depth and helpful feedback. Thanks Tricky.

  4. #4
    Member
    Threadstarter
    firefly's Avatar
    Join Date
    16 Jan 2009
    Location
    Central Coast
    Posts
    16
    Mentioned
    0 Post(s)
    Tagged
    0 Thread(s)
    Thanks for that Tricky, I do constantly look back at my images and already i can see that i have grown I guess and how my style has changed. I know it isnt an overnight thing and being only 26 I guess i have plenty of years ahead of me for more practive and growth. I understand what you are saying with image #3 however this bride was rather particular with what she wanted and she liked the shiloutted images is was one of her big things. However i have always wanted to play around with layering images in different exposures to create the perfect image. Something i will be deffinalty playing around with in the future. I probbly stuck with ISO 400 as I was afraid of stuffing up her picks and being a friend i didnt want to reuin the friendship so i figured that 400 was the safest thing, but i do however understand what you are talking about. With these helpful tips in mind I will revisit these picks and hopefully i can make them much better thanks to you help.
    Please keep the posts coming.
    Thanks again everyone

  5. #5
    Member tomtom's Avatar
    Join Date
    09 Jun 2009
    Location
    **Suburb/Town Required**
    Posts
    15
    Mentioned
    0 Post(s)
    Tagged
    0 Thread(s)
    ahh i was having the same problems....thanks mate

  6. #6
    Administrator ricktas's Avatar
    Join Date
    24 Jun 2007
    Location
    Hobart
    Posts
    16,846
    Mentioned
    12 Post(s)
    Tagged
    1 Thread(s)
    I would also add that learning how to use levels and curves adjustment layers can be (in my opinion) one of the best ways to improve your photos.

    I have written a basic levels tutorial here, and curves I need to get done, but haven't done one yet. But there are plenty of curves tutorials out there. Get on youtube and search for photoshop curves tutorial.

    As an example, I took your flower shot (hope you do not mind). Did a levels adjustment and moved the right slider in to where to histogram started to rise, and then did a curves adjustment creating a slight S curve. All up, took under a minute to do these adjustments. Levels and curves adjustments can make a big difference to the POP of your photos and can be relatively quick and easy.
    Attached Images Attached Images
    "It is one thing to make a picture of what a person looks like, it is another thing to make a portrait of who they are" - Paul Caponigro

    Constructive Critique of my photographs is always appreciated
    Nikon, etc!

    RICK
    My Photography

  7. #7
    It's all about the Light!
    Tech Admin
    Kym's Avatar
    Join Date
    15 Jun 2008
    Location
    Modbury, Adelaide
    Posts
    9,632
    Mentioned
    23 Post(s)
    Tagged
    0 Thread(s)
    I had a look at your EXIF data,
    These images are in all in AbobeRGB, and as a result they will look flat in Internet Explorer (Firefox 3.5.x will look correct),
    so use sRGB for web publishing!

    http://www.ausphotography.net.au/for...ad.php?t=40305
    regards, Kym Gallery Honest & Direct Constructive Critique Appreciated! ©
    Digital & film, Bits of glass covering 10mm to 500mm, and other stuff


  8. #8
    Ausphotography Regular
    Join Date
    29 Nov 2008
    Location
    River Murray
    Posts
    728
    Mentioned
    0 Post(s)
    Tagged
    0 Thread(s)
    well Kym's mantra on his avatar says it all; it's all about the light and how you can make it work for you, whether it is natural light, or controlled light. The following are two shots, both taken inside. One has dynamice lighting which makes the subject pop, the other produces a flatter image.


    Of course, as mentioned above, post processing needs to be done correctly, but you have to make it work in camera first.

  9. #9
    Member nexus's Avatar
    Join Date
    01 Sep 2009
    Location
    Sydney
    Posts
    59
    Mentioned
    0 Post(s)
    Tagged
    0 Thread(s)
    To OP:

    #1: The colours look a little dull to me, and as what previous posters have mentioned it would've been nicer IMHO if the focus was on the tip of the shoe or had more DOF to bring the entire shoe in focus, currently it looks like the right shoe's heel is in focus. It also looks underexposed to me? The dull pink on the shoe doesn't really stand out from the blue background..

    #2: Maybe it'd be a better shot if the couple were exposed, or if they were totally dark silhouettes

    #3 I really like this though!

    #4,5 I have nothing new to add

    I'm a newbie myself so take any advice with a grain of salt

    Quote Originally Posted by ricktas View Post
    I would also add that learning how to use levels and curves adjustment layers can be (in my opinion) one of the best ways to improve your photos.

    I have written a basic levels tutorial here, and curves I need to get done, but haven't done one yet. But there are plenty of curves tutorials out there. Get on youtube and search for photoshop curves tutorial.

    As an example, I took your flower shot (hope you do not mind). Did a levels adjustment and moved the right slider in to where to histogram started to rise, and then did a curves adjustment creating a slight S curve. All up, took under a minute to do these adjustments. Levels and curves adjustments can make a big difference to the POP of your photos and can be relatively quick and easy.
    Hmm does it look abit blown out?


    Quote Originally Posted by TOM View Post
    well Kym's mantra on his avatar says it all; it's all about the light and how you can make it work for you, whether it is natural light, or controlled light. The following are two shots, both taken inside. One has dynamice lighting which makes the subject pop, the other produces a flatter image.

    http://farm4.static.flickr.com/3543/...6daeb1c0_o.jpg

    http://farm4.static.flickr.com/3490/...115d49bd_o.jpg

    Of course, as mentioned above, post processing needs to be done correctly, but you have to make it work in camera first.
    I think the 2nd image would benefit from a fill flash, no? I've just acquaried a 430EX II and it is very very useful! I took a picture on a boating trip yesterday with the sun over the top (1pm) and without fill flash, some faces were totally in shadows (wearing a cap) and a fill flash lightened it up. I'm not sure if some people think it looks.. unnatural though.

  10. #10
    Site Rules Breach - Permanent Ban
    Join Date
    09 May 2009
    Location
    Melbourne
    Posts
    146
    Mentioned
    0 Post(s)
    Tagged
    0 Thread(s)
    3 is a really nice image!

    I agree with Tom, the biggest difference in making an image pop or not is the light it was taken in. You could have something taken in bad light, run through the entire spectrum of exposure, contrast, saturation possibilities and the image would still look crap. But when you have image like 3 taken in good light, a bit of PP like WB correction or local contrast will greatly enhance the image, like what Rick has done about

  11. #11
    Member beaco's Avatar
    Join Date
    21 Mar 2010
    Location
    MEL
    Posts
    46
    Mentioned
    0 Post(s)
    Tagged
    0 Thread(s)
    also looks like contrast is a little low on some of the pics.

  12. #12
    Ausphotography Site Sponsor/Advertiser OzzieTraveller's Avatar
    Join Date
    12 Oct 2009
    Location
    Forster- Tuncurry, eastern Australia
    Posts
    1,598
    Mentioned
    0 Post(s)
    Tagged
    0 Thread(s)
    G'day Firefly

    You ask about putting some extra "POP" into your images

    Doing a wedding is not easy, and as with all things, each of us wants do do our best and deliver the best we can. Your pics show a fair knowledge of PS operations, but as Rick says, it seems that you have missed some info regarding Levels. May I continue from Rick's comments ... and I'll put on my "trainer's hat"

    May I take the image of the shoes as the example?

    1- Looking at the image, Levels [Ctrl+L to activate] shows me that the bulk of your exposure is at the LHS (dark) end of the scale


    2- Sliding the RHS marker till it kisses the RHS of the Histogram, the image becomes...


    3- Using the individual Red Green Blue channels (click below the RGB header), and sliding each colour channel marker till it kisses the RHS of the histogram, the image becomes ...


    So hopefully from this small example you can see one way of "Popping" your images fairly easily and quickly


    Hope this helps a bit
    Regards, Phil
    Of all the stuff in a busy photographers kitbag, the ability to see photographically is the most important
    google me at Travelling School of Photography
    images.: flickr.com/photos/ozzie_traveller/sets/

  13. #13
    In Training MarkChap's Avatar
    Join Date
    09 Jan 2008
    Location
    Widgee,
    Posts
    2,587
    Mentioned
    2 Post(s)
    Tagged
    0 Thread(s)
    Number 2 would have been a much better image in my opinion had you shot it at f11 or f16 to create the star effect from the sun.

    f16 would still have allowed a shutter speed of 1/500 so would have still been plenty fast enough to hand hold.
    Smoke Alarms Save Lives, Install One Today
    I shoot Canon
    Cheers, Mark


  14. #14
    Member
    Join Date
    26 Nov 2008
    Location
    Booval, Qld (near Ipswich)
    Posts
    2,018
    Mentioned
    0 Post(s)
    Tagged
    0 Thread(s)

    How do i make my photographs pop

    The two tips that helped me produce much better images were these:

    Expose to the right;
    And, rely on the histogram NOT the LCD.

    When you take a picture, do you look at the LCD and say that looks good, or do you view the histogram and say I captured as much Dara as possible? I recommend the second every time. If your histogram is mainly on the left like the shoe example above, then you missing a lot of valuable data. Adjust the settling to allow more light in (iso, aparture, or shutter) moving the histogram so that it just touches the right hand side. Then your resulting images will include more vibrant colours and much more detail. Best thing is to try it though before hand.

    Another tip, a very commercial look that works, meter the background, then stop down a stop or two then use flash to fill your subject. This takes a lot of practice to master but is well worth knowing.


    Sent from my iPhone using Tapatalk

  15. #15
    Member clickclick's Avatar
    Join Date
    07 Jun 2010
    Location
    Gold Coast
    Posts
    54
    Mentioned
    0 Post(s)
    Tagged
    0 Thread(s)
    Very interesting to read for a noob like me too.. great tips!

  16. #16
    Account Closed DigiView's Avatar
    Join Date
    08 Aug 2009
    Location
    Perth
    Posts
    17
    Mentioned
    0 Post(s)
    Tagged
    0 Thread(s)
    great topic,

    I have to learn t use the histogram more often

    ray

  17. #17
    Member jlay's Avatar
    Join Date
    25 Aug 2010
    Location
    Hillside
    Posts
    1
    Mentioned
    0 Post(s)
    Tagged
    0 Thread(s)
    Great thread guys, very helpful to someone like me who is new photography. I'm not sure whether this is a stupid question or not but I'm going to ask it anyway, how do I create that vignetting effect like picture #3? Is it photoshoped?

  18. #18
    Administrator ricktas's Avatar
    Join Date
    24 Jun 2007
    Location
    Hobart
    Posts
    16,846
    Mentioned
    12 Post(s)
    Tagged
    1 Thread(s)
    Quote Originally Posted by jlay View Post
    Great thread guys, very helpful to someone like me who is new photography. I'm not sure whether this is a stupid question or not but I'm going to ask it anyway, how do I create that vignetting effect like picture #3? Is it photoshoped?
    Vignetting can be done with controlled lighting, some lenses cause it, or in post processing. In Photoshop go filters, distortion, lens correction and there is a vignette section with sliders in there.

  19. #19
    Member
    Join Date
    26 Nov 2008
    Location
    Booval, Qld (near Ipswich)
    Posts
    2,018
    Mentioned
    0 Post(s)
    Tagged
    0 Thread(s)
    here is another technique to create vignette: http://graphicssoft.about.com/cs/pho...psvignette.htm

  20. #20
    Member Cheach's Avatar
    Join Date
    14 Sep 2009
    Location
    Melbourne
    Posts
    61
    Mentioned
    0 Post(s)
    Tagged
    0 Thread(s)
    Thank you all for your tips.

Page 1 of 2 12 LastLast

Posting Permissions

  • You may not post new threads
  • You may not post replies
  • You may not post attachments
  • You may not edit your posts
  •