User Tag List

Thanks useful information Thanks useful information:  39
Page 1 of 5 1234 ... LastLast
Results 1 to 20 of 93

Thread: Watermarking your photos using Photoshop (brush method)

  1. #1
    Administrator ricktas's Avatar
    Join Date
    24 Jun 2007
    Location
    Hobart
    Posts
    16,846
    Mentioned
    12 Post(s)
    Tagged
    1 Thread(s)

    Watermarking your photos using Photoshop (brush method)

    It often gets raised on AP. "How do I add a custom watermark to my photos"

    Well here is a tutorial to show you the way.

    1. Open Photoshop
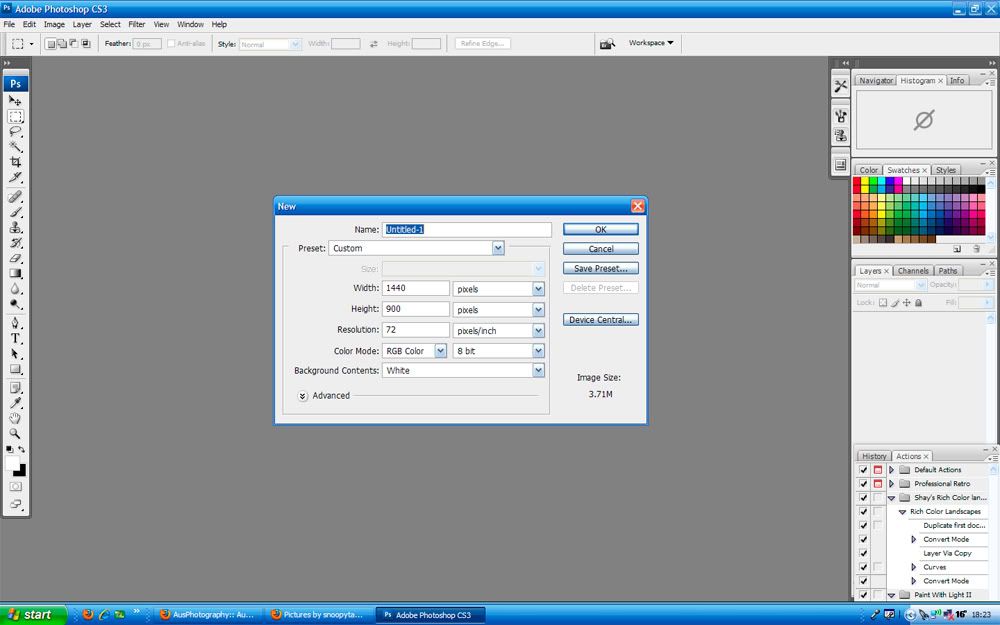
    2. Create a NEW blank document (File>New). You will need to set it a few hundred pixels wide by a couple of hundred high (minimum)

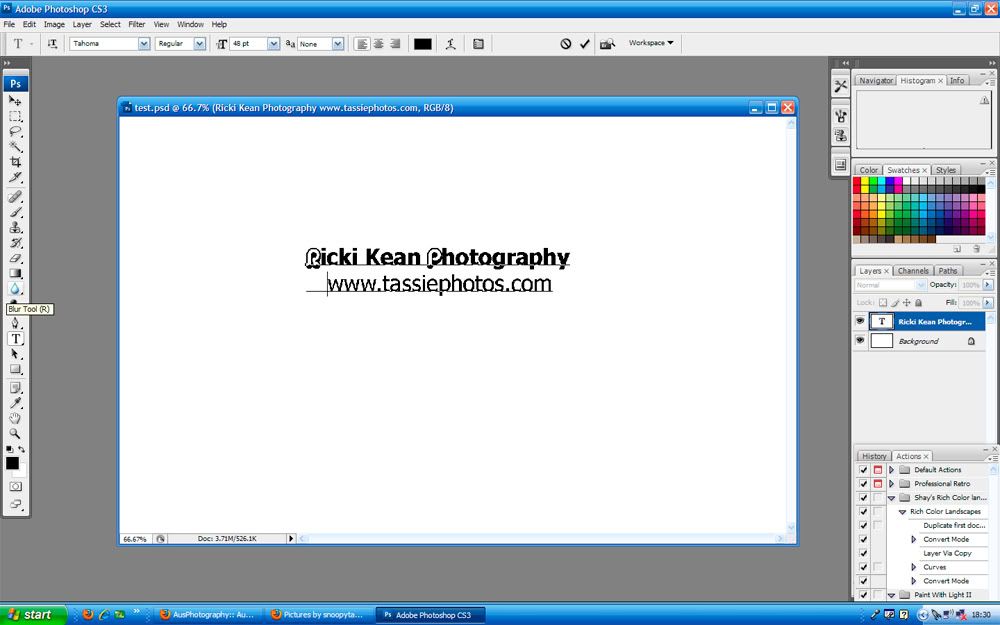
    3. Using the Text tool, find a font and size that is suitable, then type out what you want your watermark/signature to say, using black as the font colour.

    4. You can 'funky' it up by using a different font for the first letters, change font size, bold, underline etc. Add some lines under it, draw a box around it. Really it is up to you.

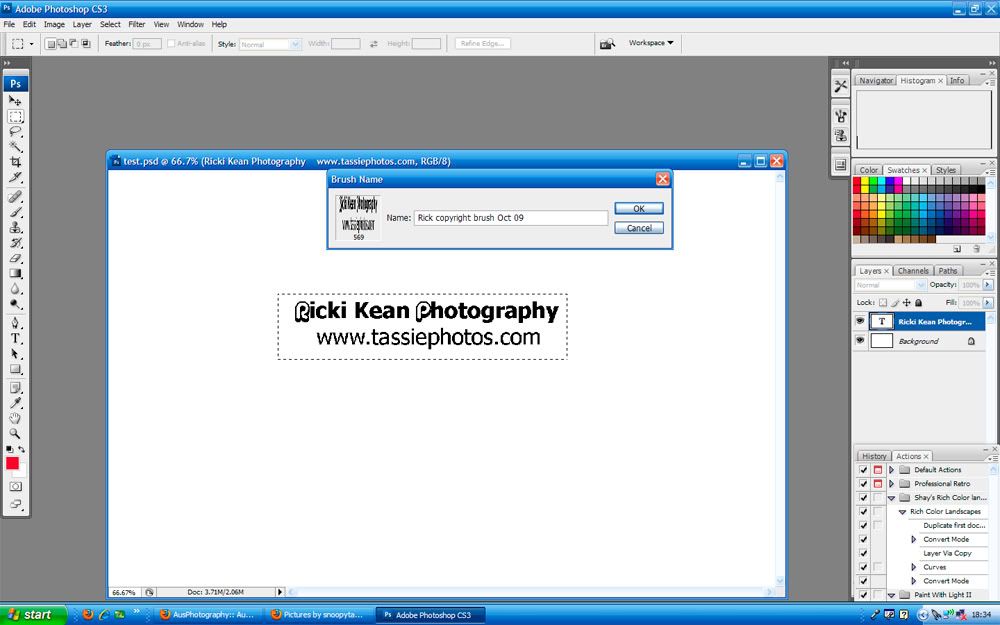
    5. Now to turn your text into a brush so you can use it as a watermark. Using the selection tool draw a selection around your text.

    6. Click on EDIT > Define Brush Preset.
    7. Give your new brush a name and click OK

    You now have your watermark set as a brush so using it is as easy as

    1. Open you photo in Photoshop
    2. Click on the brush tool
    3. Select your watermark brush from the brush selection menu (it is usually right down the bottom of the selections)
    4. Set the size opacity and flow
    5. Resize your watermark using the [ key to decrease, or the ] key to increase its size.
    6. Locate where you want your watermark to appear on your photo and click your left mouse button.

    Examples:


    Notes:
    Don't try and make your watermark to complex, it will just look odd when stamped on a photo.
    You can change the colour of your watermark by selecting a different colour just before you select your watermark brush
    You can use the eye-dropper to select a colour that exists in your photo, so that your watermark is in that colour

  2. #2
    A. P's Culinary Indiscriminant
    Join Date
    21 Mar 2009
    Location
    Cronulla, Sydney
    Posts
    8,935
    Mentioned
    14 Post(s)
    Tagged
    0 Thread(s)
    thanks Rick. Mongo tried this by using a downloaded "action" recently. Worked fine but noticed it changed the contrast of the original photo when applied so Mongo immediately stopped using it.

    Your tutorial has come just at the right time.
    Nikon and Pentax user


  3. #3
    Administrator
    Threadstarter
    ricktas's Avatar
    Join Date
    24 Jun 2007
    Location
    Hobart
    Posts
    16,846
    Mentioned
    12 Post(s)
    Tagged
    1 Thread(s)
    You can also do a 'hand-written' one. Sign your name or what ever you want as your watermark onto a clean piece of A4 white paper. Scan it, open in photoshop and then use the selection method at step 5, and continue on from there.
    "It is one thing to make a picture of what a person looks like, it is another thing to make a portrait of who they are" - Paul Caponigro

    Constructive Critique of my photographs is always appreciated
    Nikon, etc!

    RICK
    My Photography

  4. #4
    Ausphotography Regular
    Join Date
    01 Apr 2008
    Location
    Launceston Tasmania
    Posts
    1,176
    Mentioned
    0 Post(s)
    Tagged
    0 Thread(s)
    This is something I have wanted to do for ages, thanks for the guide Rick

    Paul

  5. #5
    Member
    Join Date
    06 Jul 2009
    Location
    Brisbane
    Posts
    420
    Mentioned
    0 Post(s)
    Tagged
    0 Thread(s)
    Thanks for that great tutorial Rick, I'll give that a go.
    Until now I've been using the "Add Text" function in Picasa, as I'm one of those people who is Photoshop Challenged.

  6. #6
    Member matilda's Avatar
    Join Date
    20 Nov 2008
    Location
    Stawell, Vic
    Posts
    483
    Mentioned
    0 Post(s)
    Tagged
    0 Thread(s)
    this is a brilliant tutorial. I have already made 3 water marks out of it

    thanks again.

  7. #7
    Ausphotography Regular
    Join Date
    14 Sep 2008
    Location
    Melbourne
    Posts
    740
    Mentioned
    0 Post(s)
    Tagged
    0 Thread(s)
    Good tutorial Rick, thankyou.
    Margaret

    Fuji XT2 Manfrotto MF 055XPROB Pro Tripod & gynbal head, Fuji 18-55 mm, Fuji 14 mm, Fuji 55-200 mm, Fuji 80 mm macro, Fuji 60mm macro, Fuji 100-400 mm, SB600 Speedlight, Photoshop, Lightroom on a Mac, Critiques welcomed


  8. #8
    Member Nicalum's Avatar
    Join Date
    19 Sep 2009
    Location
    Indooroopilly
    Posts
    49
    Mentioned
    0 Post(s)
    Tagged
    0 Thread(s)
    Just on time, thanks!

  9. #9
    Member Nic076's Avatar
    Join Date
    05 Jan 2008
    Location
    Adelaide
    Posts
    137
    Mentioned
    0 Post(s)
    Tagged
    0 Thread(s)
    Thanks Rick - been meaning to do this for some time, now there is no excuse.
    Olympus E-510 | Kit lenses Olympus 14mm- 42mm, 40mm- 150mm & newly acquired 50mm f/2
    Photoshop Elements 6 | Velbon Tripod |FL-36 Electronic Flash

    Next on the hit list is Sigma 10mm - 20mm

    Any comments and critique welcome.

  10. #10
    A. P's Culinary Indiscriminant
    Join Date
    21 Mar 2009
    Location
    Cronulla, Sydney
    Posts
    8,935
    Mentioned
    14 Post(s)
    Tagged
    0 Thread(s)
    Great tut. Rick but unfortunately for Mongo, he can not get this method to work after trying many times. MOngo uses CS3. He thinks the it all goes wrong at the stage where the text is supposed to be recognised. for some reason it will not do that and only recognises the black colour of the text but not the text. It also fails to establish a new watermark brush in the new brushes. So Mongo has given up on getting this to work.

  11. #11
    Administrator
    Threadstarter
    ricktas's Avatar
    Join Date
    24 Jun 2007
    Location
    Hobart
    Posts
    16,846
    Mentioned
    12 Post(s)
    Tagged
    1 Thread(s)
    Quote Originally Posted by mongo View Post
    Great tut. Rick but unfortunately for Mongo, he can not get this method to work after trying many times. MOngo uses CS3. He thinks the it all goes wrong at the stage where the text is supposed to be recognised. for some reason it will not do that and only recognises the black colour of the text but not the text. It also fails to establish a new watermark brush in the new brushes. So Mongo has given up on getting this to work.
    You are using the Selection tool, not the crop tool to select your text? If you are inadvertently using the crop tool, it will not work

  12. #12
    The Commander
    Join Date
    27 May 2009
    Location
    Lowood, Queenland
    Posts
    4,742
    Mentioned
    0 Post(s)
    Tagged
    0 Thread(s)
    Works pretty much the same in PS Elements 7 - thanks again Rick
    Please be honest with your Critique of my images. I may not always agree, but I will not be offended - CC assists my learning and is always appreciate

    https://mikeathome.smugmug.com/

    Canon 5D3 - Gripped, EF 70-200 L IS 2.8 MkII, , 24-105 L 4 IS MkI, 580 EX II Speedlite, 2x 430 Ex II Speedlite


  13. #13
    Member
    Join Date
    18 Jan 2010
    Location
    Sydney
    Posts
    45
    Mentioned
    0 Post(s)
    Tagged
    0 Thread(s)
    Thankyou so much Rick. I have always wanted to do this. The tutorial is so easy. Fantastic.

  14. #14
    Member
    Join Date
    30 Oct 2006
    Location
    Bris Vegas
    Posts
    1,102
    Mentioned
    0 Post(s)
    Tagged
    0 Thread(s)
    hmmmm

    i use an action and use the "place" command in PS3 / 4 to put my water mark on the photo in the top left hand corner, and i have now given it 85% opacity so its not as powerful

    i do like this idea though if you were doing a few pics only... and wanted to place it in different spots...

    M
    www.pbase.com/mcphotographics loooots of pictures!
    hmmm Eq list... 1D II, 5D II, 7D, 100-400 LIS F4.5-5.6, 70-200 F2.8L, 135 F2, 85 F1.8, 24-70 F2.8L, 16-35 F2.8L, 420EX, 580EX II x2 ST-E2 Cir polar filters and much much more all in a neat back pack that kills my back!

    Adobe CS5
    Week 16 Sheep Winner
    If you have a question about car / action / sports photography or Canon Cameras PM me...

  15. #15
    Member
    Join Date
    11 Jan 2010
    Location
    Bunbury
    Posts
    36
    Mentioned
    0 Post(s)
    Tagged
    0 Thread(s)
    Thanks Rick, I'm going to give this a go right now!

  16. #16
    Member
    Join Date
    11 Jan 2010
    Location
    Bunbury
    Posts
    36
    Mentioned
    0 Post(s)
    Tagged
    0 Thread(s)
    And the results were great!! So easy to follow your instructions.
    Thanks again


  17. #17
    Member
    Join Date
    18 Feb 2010
    Location
    Perth
    Posts
    40
    Mentioned
    0 Post(s)
    Tagged
    0 Thread(s)
    your tutorial was exactly what I have been looking for ... so easy, simple and amazingly effective.

    Thank you for sharing your knowledge ... sincerely appreciated.

    Kind regards
    Ruth
    Ruthie

    http://www.wix.com/berniemumble/Quin...al-Photography

    ' To photograph truthfully and effectively is to see beneath the surfaces and record the qualities of nature and humanity which live in all things .... ' Ansel Adams

    Canon 5D MkII, 70-200mm L series, 50mm, 24mm L series, 100mm hybrid macro L series, 580XII flash, grip, monopod, tripod, wireless transmitter. Techy things: CS4, iMAC, wacom tablet

  18. #18
    Site Rules Breach - Permanent Ban
    Join Date
    08 Jan 2010
    Location
    Lake Cathie
    Posts
    66
    Mentioned
    0 Post(s)
    Tagged
    0 Thread(s)
    Good stuff, I have always wanted an easy way to do it...thanks

  19. #19
    Member
    Join Date
    16 Jan 2010
    Location
    Wollongong
    Posts
    73
    Mentioned
    0 Post(s)
    Tagged
    0 Thread(s)
    Rick i think im in love with you now, thanks heaps for this, have been looking everywhere on the net for easy to follow instructions
    Mel

    Olympus E300,E30,35mm macro,14-45mm,14-54mm,40-150mm,70-30mm.

  20. #20
    Member nudge2325's Avatar
    Join Date
    07 Feb 2010
    Location
    Brisbane
    Posts
    32
    Mentioned
    0 Post(s)
    Tagged
    0 Thread(s)
    Thanks Rick. awesome tutorial

Page 1 of 5 1234 ... LastLast

Posting Permissions

  • You may not post new threads
  • You may not post replies
  • You may not post attachments
  • You may not edit your posts
  •