


 Thanks useful information:


Unsure of how to set your white balance? Doubtful of the colours you get from outdoor shots using the in-camera JPG? Always fiddling around with your raw converter wondering if your colours are about right? Wondering if you need to use a grey card? Or do you just leave your camera set to AUTO white balance and hope for the best? Well, here is my guide to correct white balance for mugs.
First, WHAT IS WHITE BALANCE?
White light ain't white light! At least not usually. Sometimes the light you see by really is "white", but most of the time it has a reddish or blueish tinge. Late afternoon light is quite red; the light that makes it through an overcast is mostly blue-tinged, shadows are a deeper blue, and so on. We tend not to notice this with the naked eye as the human brain is very adaptable and provides a sort of auto-compensation. But the camera sees the different colours of light very well indeed, and when we look at a photograph on screen or as a print, our brain does not do the auto-compensation thing, and the photograph looks "wrong".
Why is the "white" light not white? Because white light is made up of many different wavelengths all mixed together, and different light wavelengths are differently able to pass through or go around obstructions like air, dust, and moisture. This is why sunsets are red and the sky overhead is blue. Oh, and it is also why colour photography works at all. Every photographer should know some basic physics, because if you don't understand light you will never understand photography. If you are a bit vague about this stuff, refresh your memory with some reading, such as why is the sky blue?
Let's work an example. It's very early in the morning. You take a picture of a Sulpher-crested Cockatoo (which has pure white plumage). Because the light coming from the rising sun is red-tinged, the light reflecting off the cockatoo is also red-tinged, so the picture recorded by your camera is red-tinged, and it looks more like an oversized Major Mitchell's Cockatoo ..... and when you say "look Mum, I took a picture of a white bird!" you look like a Galah! That's the theory, anyway.
To make a photograph look "normal", the theory goes, you need to do one of three things:
- Use really white light (not the reddish light of a sunrise or the bluish white of deep shade, you need a white white light).
- Use a filter of the opposite colour to the colour cast of the light. If the light is blue-tinged ("cold"), use a "warm" (reddish) filter. If you selected the right filter, you will take away just enough of the extra blue to balance things up again. If the light is too red, use a cold filter to counterbalance it.
- Adjust your white balance in-camera (or later on during post-processing). This is essentially the same thing as using a filter, only easier. You are telling the camera to ignore some of the red light (because there is too much red in the "white" light you are shooting by), and thus get a "correct" result.
Now, let's consider AUTO WHITE BALANCE.
How does it work? Essentially, the camera needs to know what colour the light falling on the scene is, so that it can compensate by the right amount. But all it actually knows is the colour of the light being reflected from the scene - which isn't always the same thing! Suppose you are taking a picture of a red car on a cloudy day. The light is bluish, so the camera needs to ignore some of that blue light and concentrate on the red light. But the camera doesn't see the colour of the light faling onto the car, it can only see the colour of the light being reflected from the car, and because that's mostly red, the camera has no choice but to assume that the illuminating light is red .... and so it does exactly the wrong thing!
Auto white balance works quite well maybe 80% or even 90% of the time because most scenes you point a camera at just happen to have very roughly equal amounts of red and green and blue in them. Where the scene on average is roughly grey (roughly equal R & G & B), auto white balance works OK. But where it doesn't, it's a shocker! And you can't always predict what the camera will do with any given scene. Modern cameras do more than just average the light being reflected when they calculate white balance, they do some clever tricks that the manufacturers don't talk about to try to figure out what colour the light really is ... and when clever tricks go wrong, they go really wrong!
The real problem with auto white balance, however, isn't so much what happens when it goes wrong, it's what it does to your pictures when it goes right. It makes them all the same! It robs them of flavour and the subtle tones that make a morning picture look like early morning and a winter afternoon shot look like a winter afternoon.
If you shoot natural creatures, scenes and landscapes by natural light, you want that natural light in your pictures! And this brings me to the point of my post:
HOW TO GET NATURAL COLOURS ALL THE TIME
It's really, really easy. Simply set your camera to DAYLIGHT white balance and leave it there. That's it. Nothing more to do, nothing more to learn. Set it to daylight, and then let the colour of the light in the sky make your picture look like what you saw. If it's a gloomy day, your picture will show a gloomy day. If it's a fresh spring morning, your picture will look like a fresh spring morning. If it's the last red light before dusk, you will get a picture showing that last red light.
Set it to DAYLIGHT. Don't change it.
(Oh. Before I go on, what if you shoot artificial things by artificial light? Will this magic method of mine still help? Nope. But if you mostly shoot cars and people and artificial indoor scenes by artificial light, then you are a fundamentally boring sort of person and I don't care.)
WORKING AN EXAMPLE
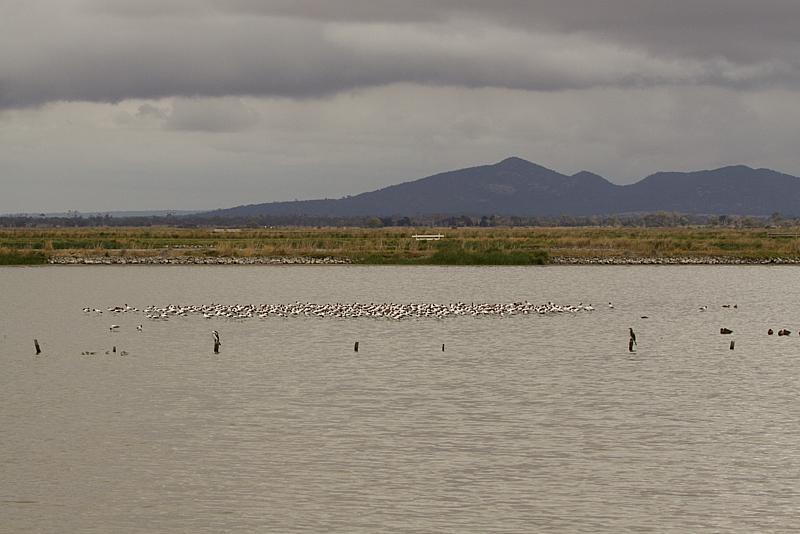
These are all versions of the same shot, taken on a cold and windy day with drizzle coming and going. I've just processed them differently to illustrate correct white balance and why it mattters. The only PP I have done is to alter the WB settings in Camera Raw. No cropping, curves, levels, or anything else. This was taken with a Canon 50D at ISO 400 and a Canon 100-400mm lens. Before we start, we need to remember that the 100-400L has a noticable blue cast to it, certainly at the shorter focal lengths. (I'm not sure if it does at longer lengths too, or whether I only notice it at 100mm or so. Either way, the same shot taken with my 60 macro or my 24-105 would not look so blue.)
Here is the in-camera JPG, using my magic method. It does look cold and gloomy. By using the DAYLIGHT setting, we have retained the blueness of the actual scene. In this example, it's quite a bit too blue, and there are two reasons for that. First, the 100-400 has a mild but noticable blue colour cast. Secondly, the Canon factory default daylight setting is a tiny bit too blue. (I should adjust my cameras to set a manual white balance that is just a fraction warmer than the standard Canon setting.) Still, the shot below is at least reasonably close to correct, and the factory in-camera DAYLIGHT setting is usually pretty good. For most shots with most lenses, it will give you the best result. This example is an exception.
-------------------------------------------
Now another way to get a standard daylight setting. This is using Camera Raw, and telling it to reproduce the scene "as shot" - i.e., to follow the instructions given to it by the camera, which in this case was set to DAYLIGHT. So, in theory, this should be exactly the same as the in-camera JPG. In reality, as you can see, it isn't. It's quite different. Same recipe + different chef = different meal! If I had used Canon's DPP to do the raw conversion with this setting, the result would be the same as the in-camera JPG. (Because DPP is designed to do exactly that, where Camera Raw is uses its own tone curves to do its own thing. Of course, you can manually set any WB you like in any decent raw converter, but for this thread I'm just staying with the variopus pre-sets.) But this version of this shot is clearly too blue.
-------------------------------------------
Yet a third way of getting a standard daylight setting. This one is using the Adobe Camera Raw DAYLIGHT pre-set, which is usually noticably too warm. In this case, however, it has (very conveniently) compensated for the blue lens cast we had to start with and this is the best version of the image you will see in this thread. Maybe just a tiny, tiny bit too warm, but pretty close. It will do.
-------------------------------------------
Now let's try Camera Raw's AUTO WB. This often gets things horribly wrong, for the same reason that in-camera auto WB gets things wrong, but in this particular case it is .... hmmm ... just wrong, not completely horrible. It's obviously too warm (look at the colour of the water, or compare the colour of the birds with a real avocet), but it is at least somewhere very vaguely in the general ballpark. (In-camera auto WB - I don't have an example for this shot, but you can take my word for it - is often just as bad, sometimes worse.)
-------------------------------------------
But aren't we supposed to be using the correct white balance setting? If it's a cloudy day, then we should be using a CLOUDY white balance, yes? Let's try it. Yuk! Everything is pink! Not even remotely close to the grey, miserable daylight I saw down at Werribee on that day! Forget the damn book! Set your camera to DAYLIGHT and leave it there!
-------------------------------------------
Just for completeness, here is the scene again with Camera Raw set to SHADE. Yup, it's even worse. But even the book doesn't recommend you do this, and neither do I.
-------------------------------------------
The moral of the story? How do you get white balance right day in and day out?
Set your camera to DAYLIGHT and leave it there.
Tony


 Reply With Quote
 Add To Bookmarks


