User Tag List

Thanks useful information Thanks useful information:  0
Results 1 to 14 of 14

Thread: Edits

  1. #1
    Member
    Join Date
    03 Aug 2006
    Location
    Lilli Pilli
    Posts
    40
    Mentioned
    0 Post(s)
    Tagged
    0 Thread(s)

    Edits

    You all well know in the amazing world of digital photography one of the best things about it is you can edit your image. Whether it be deletions or colour enhancement to basic sharpness or grain these days anything goes.

    So lets see some of your latest editing efforts. Maybe a brief description of the program and tools used to achieve your desired result would be good for all members to see and perhaps learn from.

    I'll start the ball rolling with this one, it's one I posted here a few days ago. Simple shot ...car on road (although it is indeed an awesome car!), but the other cars parked behind distracted from the image, same with the letter box and half a person on the RHS.

    A quick edit in PS mainly using clone tool and healing brush tool helped this image alot.

    Original:


    Edit:


    This is not about showcasing an edit to pat yourself on the back. It's more about encouraging everyone here to help one another learn and pick up tips from eachother. If you think my edit is crap .....say so in this thread and let me know how you would have approached it.

    So post em up here and lets talk about what weve done and how we did it. I'm all ears!! The more I learn and know the better my results will be in the end. What you think is a tip not worth mentioning may mean the world to someone else.
    Last edited by thing; 15-12-2006 at 6:14pm.
    Nikon D200
    Nikon D70
    Nikkor AF-S VR 70-200 2.8
    Nikkor 50mm 1.8
    Nikkor 18-70 kit lens
    Nikon SB800 Speedlite
    and other stuff


    I view stupidity as a virtue.....well it works for me anyway!
    Australian Photography Competitions- Have you voted yet?

  2. #2
    Member
    Join Date
    10 Oct 2006
    Location
    Canberra
    Posts
    34
    Mentioned
    0 Post(s)
    Tagged
    0 Thread(s)
    how did you get the chrome more chrome? is it just saturation?

  3. #3
    Member
    Threadstarter

    Join Date
    03 Aug 2006
    Location
    Lilli Pilli
    Posts
    40
    Mentioned
    0 Post(s)
    Tagged
    0 Thread(s)
    Thanks for your reply SSSchwing,

    Chrome untouched. It may be an optical thing after the crop. Because both images are 800 pixels on the longest edge the chrome may appear more in your face than before the crop?

  4. #4
    Member
    Join Date
    10 Oct 2006
    Location
    Canberra
    Posts
    34
    Mentioned
    0 Post(s)
    Tagged
    0 Thread(s)
    hmmm, possibly... nice work either way. I wouldn't have even know if you hadn't posted the original.

    I will attempt some edits and post my results and how I went about them. I need the practice

  5. #5
    New Member
    Join Date
    03 Jun 2006
    Location
    Perth Western Australia
    Posts
    7
    Mentioned
    0 Post(s)
    Tagged
    0 Thread(s)
    Great idea thing, will definately help me looking at what other people do

    Jackaroo
    Canon EOS 400D SLR, EOS 650 SLR, Kodak DX4530
    Speedlight 580 EX II
    EF 50 mm f/1.8
    , EFS 18-55mm f/3.5 - 5.6 , EF 35 - 70 mm f/3.5 - 4.5 , EF 75 - 300 mm f/4 - 5.6
    Remote Switch RS-60E3
    Manfrotto 190XPROB + 804RC2


  6. #6
    Member
    Join Date
    14 Aug 2006
    Location
    Sanctuary Point - 2 hours south of Sydney
    Posts
    237
    Mentioned
    0 Post(s)
    Tagged
    0 Thread(s)
    Thing, I can understand the use of the clone tool and I noticed that the shadows where the letterbox and person were is consistent. I have not thought to use the healing tool in this type of edit. Is it used to maintain the tonal quality of the cloned area. Please elaborate?
    Brian

    My two pet hates are male chauvanists and women who won't do as they are told

    Canon 60D - Canon 17-40mm f4 L USM - Canon 70 - 200mm F4 L IS USM - CANON 24-105MM f4 IS USM - Sigma EF-500 DG Super Flash - Lightroom 4.4 - Photo Elements 11 ****

  7. #7
    Member
    Join Date
    21 Jun 2006
    Location
    In a barracks somewhere
    Posts
    32
    Mentioned
    0 Post(s)
    Tagged
    0 Thread(s)
    hrrrm... maybe this is a throwback to my film days, but I'm not a fan of photoshopping images, I mean sure it is useful but one can find themselves reling on the 'cloning' technique a little too much.

    This might sound like I am completley against using photoshop for editing, but I have cloned some stuff out of a few images - not too many but a few.

    I dunno, I just feel that with the advent of photoshop more and more people are calling themselves photographers, when in fact, they are nothing more than graphic designers - please don't consider this an attack or defamation of anyone who edits, alters, clones, etc. their images hardly any of my photos are touched by more than levelling and contrasting. All the things I used to do in my darkroom.

    End Rant.

    Sorry guys if this is a bit longwinded.
    http://www.flickr.com/photos/indigophoto-au/ <-- My flickr, show me some likes!

    Leica M8 | Voigtlander Nokton 40mm f1.4 | Summacron 50mm f2

    No edits without permission, please.


  8. #8
    A royal pain in the bum! arthurking83's Avatar
    Join Date
    04 Jun 2006
    Location
    the worst house, in the best street
    Posts
    8,777
    Mentioned
    4 Post(s)
    Tagged
    0 Thread(s)
    totally true


    I'm the same, while I have cloned a bit of stuff(where I'd otherwise delete the image) most of my cloning is for dust,.
    I'll generally do an exposure adjustment, curve adjustment or sharpen, hence my reasoning for using(sticking with) Capture.

    It basically does what the 'in camera' enhancements allow.


    Nikon D800E, D300, D70s
    {Nikon}; -> 50/1.2 : 500/8 : 105/2.8VR Micro : 180/2.8 ais : 105mm f/1.8 ais : 24mm/2 ais
    {Sigma}; ->10-20/4-5.6 : 50/1.4 : 12-24/4.5-5.6II : 150-600mm|S
    {Tamron}; -> 17-50/2.8 : 28-75/2.8 : 70-200/2.8 : 300/2.8 SP MF : 24-70/2.8VC

    {Yongnuo}; -> YN35/2N : YN50/1.8N


  9. #9
    Account Closed
    Join Date
    20 Jul 2006
    Location
    Puffing Billy Land
    Posts
    12
    Mentioned
    0 Post(s)
    Tagged
    0 Thread(s)
    a friend of mine calls me Queen Head Swap

    I'm a self confessed CSII addict, 99% is for studio portraits
    When doing studio portraits, the lil bits of fluff that get on your backdrop is really annoying

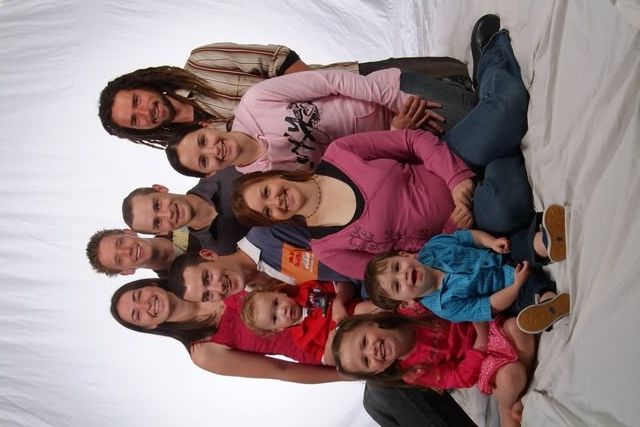
    Latest head & eye swap i did last was last night. We had a big fam portrait done at the local primary school (no i didn't take them, i am in it), every pic had someone pulling a silly face or my daughter cut out

    *This works because there were 6 photo's taken in succession*
    i pick one shot where the bodies are good for this example i'll call it Master,
    then i pull a head from one of the other pic's and put it on the "Master".
    Next time i will use the damn self timer, this woman was soooo crap!!! the posing & lighting & everything is sooooo wrong!!!

    if they ever upload I'll post a before & after (note the "after" being a bit dark, where i get them printed the shadows come out lighter)
    ** look at -- female back left - new eyes
    --both the lil boys have new heads


    BEFORE


    AFTER
    Last edited by PicturePerfect; 15-12-2006 at 9:55pm. Reason: had to add that i'm a CSII addict

  10. #10
    A royal pain in the bum! arthurking83's Avatar
    Join Date
    04 Jun 2006
    Location
    the worst house, in the best street
    Posts
    8,777
    Mentioned
    4 Post(s)
    Tagged
    0 Thread(s)
    OK I'll bite... (you knew I would!

    I just did a quick edit of a photo using CaptureNX....

    after I open the photo, I'll do the edits in the same order as they are listed in the right hand column(sometimes I go back and do stuff if I think it needs some extra tweaking..etc)

    #1 Adjust WB, camera is now set to Auto WB(almost super-glued the setting to Auto, because I can batch adjust in NX )


    notice how the setting on the left has recorded value ticked, just tick what you deem appropriate Daylight-cloudy was appropriate in this image.
    It allows the temperature to be set as well, but in this shot I didn't change it from 6000

    results....


    #2 Adjust the saturation(remember this is like setting the camera enhancement to more saturated!!)
    It doesn't really make a huge difference immediately, but I reckon it does once I start with playing with the 'levels and curves'.

    notice it says enhanced! It looks very basic, but it what you get on the camera.
    remember this is doing what the camera does, but on the PC.

    .. more to follow....
    Last edited by arthurking83; 23-12-2006 at 1:37pm.

  11. #11
    A royal pain in the bum! arthurking83's Avatar
    Join Date
    04 Jun 2006
    Location
    the worst house, in the best street
    Posts
    8,777
    Mentioned
    4 Post(s)
    Tagged
    0 Thread(s)
    #4 adjust exposure compensation. Sometimes I need it, usually I'll shoot using the histogram on the review screen and watch the histogram, trying to get a good exposure using the "expose to the right" principle if I miss the exposure or I want to vary the mood with dark/light exposure is cool to play with....


    the way I've been taught to adjust the curve, usually requires a little more exp.

    #5 Adjusting the curves and levels...the variable here are mind boggling I guess all editing apps do a similar thing, so understanding levels and curves in one is kinda similar in the other??


    I don't fully understand what these adjustments are doing (or how to consistently get the same result) I adjust and keep adjusting, till I get what looks OK


    Keep an eye on the histogram while you adjust!

    noramlly I don't edit the R, G, or B channel individually, I'll do th eRGB channel as a whole(the black line) but sometimes I'm looking at the individual colors in the histogram, and adjust each channel separately too


    ... more to follow....
    Last edited by arthurking83; 23-12-2006 at 1:37pm.

  12. #12
    A royal pain in the bum! arthurking83's Avatar
    Join Date
    04 Jun 2006
    Location
    the worst house, in the best street
    Posts
    8,777
    Mentioned
    4 Post(s)
    Tagged
    0 Thread(s)
    ....

    #6 Damn!! I forgot to check sharpening (out of order now )

    I think I did eventually settle on high in this shot, I'll try most settings to see any effects (at 100%) 99% of the time I'll use Medium High

    #7 Adjust brightness at a point

    easiest thing to do in NX is adjust the brightness using the Color Control Point tool.
    Pick an area adjust the size of the circle, adjust you heart away!

    the order of the tool settings are
    Hue, Saturation, Brightness, Contrast, Red, Green, Blue, Warmth(the letters on the ladder looking scale) drag each scale up/down it's brilliant! Nikon calls it U-Point control or whatever.
    Easy to use.
    result....


    I may add another point to darken another area or whatever.
    the sky in that spot looks a little overexposed, the road looks fine, but I wanted to contrast it more so another point was made

    One of my favourite things about this is that you can rightclick and duplicate each color control point and use them in areas that need the same settings.

    .... not too much more remaining now.....
    Last edited by arthurking83; 23-12-2006 at 1:38pm.

  13. #13
    A royal pain in the bum! arthurking83's Avatar
    Join Date
    04 Jun 2006
    Location
    the worst house, in the best street
    Posts
    8,777
    Mentioned
    4 Post(s)
    Tagged
    0 Thread(s)
    ....

    quick an easy crop
    I hate cropping, it's kinda like admitting I still can't 'see' properly, as a photographer STILL!.. I have a way to go yet

    cropping is easy, I like to keep the same aspect ratio as the original.


    too easy!


    that's a quick and easy work flow, it doesn't take too much time to achieve a reasonable result.

    To me, one of the most important aspects of using NEF(Nikon) and Capture(whatever version) is... when you make an edit, it's non-destructive. You can adjust every aspect and not have to save a master copy! All edits are undo-able, if you want th eoriginal image intact! This alone helps to save space and keep things in you images album nice and neat, rather than having 10 copies of an image at various stages of editing(if you are that way inclined)
    Also, there's the extra power(quality) that adjusting the raw file gives(over jpg of course)

    Hope this helps(Nikon folks! Useless to Canon folks!! apologies)

    end of longwinded ranting rave ... I think I may just have put myself to sleep .....
    Last edited by arthurking83; 23-12-2006 at 1:39pm.

  14. #14
    Member
    Threadstarter

    Join Date
    03 Aug 2006
    Location
    Lilli Pilli
    Posts
    40
    Mentioned
    0 Post(s)
    Tagged
    0 Thread(s)
    Excellent work AK & Queen Head Swap!

    Brian, the healing brush is an awesome tool and I now use it more than the clone brush.
    It's really a hands on thing so just give it a try and experiment with it and you will see the benefits.

    As you know the clone tool does exactly that...clones, so you would also know that there are times where you can see repeated areas. The healing tool is much softer and less aggresive. It is perfect to use in flat tonal situations as it seems to take in the surrounding data and averages it.

    It's perfect for removing wrinkles on faces or blemishes/pimples etc quickly and is great to use combined with the "shift" key to delete a scratch or long line. It's hard to describe verbally but because it takes in the surrounding data as an average, the image does not suffer a totally cloned replacement. In other words it heals rather than clones (I guess it's name says it all).

    As you learn to use it you will also learn it is no good to use near an edge of something in your image. Because it is taking in the surrounding data a "heal" close to a darker or lighter part of you image will place a darker or lighter tone in the selected area. You then need to switch back to the clone tool for that and maybe tidy up afterwards with a small healing brush. You'll see what I mean when you use it.

    I hope this is not too confusing

Posting Permissions

  • You may not post new threads
  • You may not post replies
  • You may not post attachments
  • You may not edit your posts
  •